
Related articles


Arena Breakout Lockdown Zone: Complete Solo Survival Guide
Solo Lockdown Zone survival requires 100,000 Koens gear value minimum plus a 20,000 Koens entry fee (Season 3). TV Station hosts 12 players across a 20-minute raid with three timed extractions. Armory offers four free safes, three locked safes, and guaranteed air drop loot. Solo survival sits at 30% vs. 50% for squads — but with the right positioning, sound discipline, and isolation tactics, consistent squad wipes are achievable.
Buffget
What Is the Lockdown Zone and Why It Demands a Different Mindset
Rules, Timers, and Zone Activation
Lockdown Zone punishes reactive play and rewards deliberate positioning. Entry costs by season:
- Season 3: 100,000 Koens gear value + 20,000 Koens entry fee
- Seasons 1–2: 100,000 Koens flat entry
- Forbidden Zone: 300,000 Koens gear value + 50,000 Koens fee
Extraction points aren't passively available — each requires a specific activation at a specific time. Miss the window and you're trapped with a full lobby hunting you. These timers aren't optional knowledge; they're the foundation of every successful solo run.
The Solo Raider Paradox
Solo survival is 30% against a squad's 50%. That 20-point gap is the information deficit — no callouts, no revives, no suppressing fire. But solo players carry zero coordination overhead, move faster, and generate less sound than a four-person squad. The players who close that gap consistently are the ones who turn the squad's size into a liability.
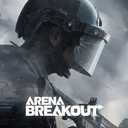
Armory Lockdown Zone: Complete Solo Breakdown
Key Engagement Zones and Choke Points
Three entrances access the Armory bunker, each with a switch timer:
- Hole in the Wall — 1 min 40 sec switch timer
- Mid Entrance — 1 min 40 sec switch timer
- Tank Entrance — 1 min switch timer (closes fastest)
Understanding these timers lets you deny entry to squads or funnel them into a single predictable corridor.
Key named interior locations:
- Weapons Room — high-traffic, contested immediately after entry
- Equipment Storage Key Room — requires Equipment Storage Key (durability 25)
- Repair Facility — contains an advanced weapon crate, frequently patrolled
- Staging Area — guaranteed air drop spawn, highest fixed loot value on the map
The bunker holds 4 free safes and 3 locked safes. Renoir boss squad spawns inside; Elite Rors patrol the exterior — use NPC aggro as a tactical tool.
Three Flanking Routes Squads Never Expect
Squads entering via Tank Entrance almost always push straight to the Staging Area. Counter that rotation:
- Hole in the Wall → Repair Facility → Weapons Room rear — intercepts Tank Entrance squads rotating toward Staging Area
- Mid Entrance → Equipment Storage Key Room corridor → Staging Area side — bypasses the main weapons room firefight entirely
- Tank Entrance → immediate left hold — counterintuitive; forces squads to fight backward
Pro tip: The Radar Station spawn point around the Armory exterior gives you an early read on squad density before committing to an entrance.
For players funding premium loadouts without grinding for hours, Arena Breakout Bonds direct recharge through buffget offers competitive pricing and fast delivery — keeping your gear score where it needs to be for Lockdown Zone entry.
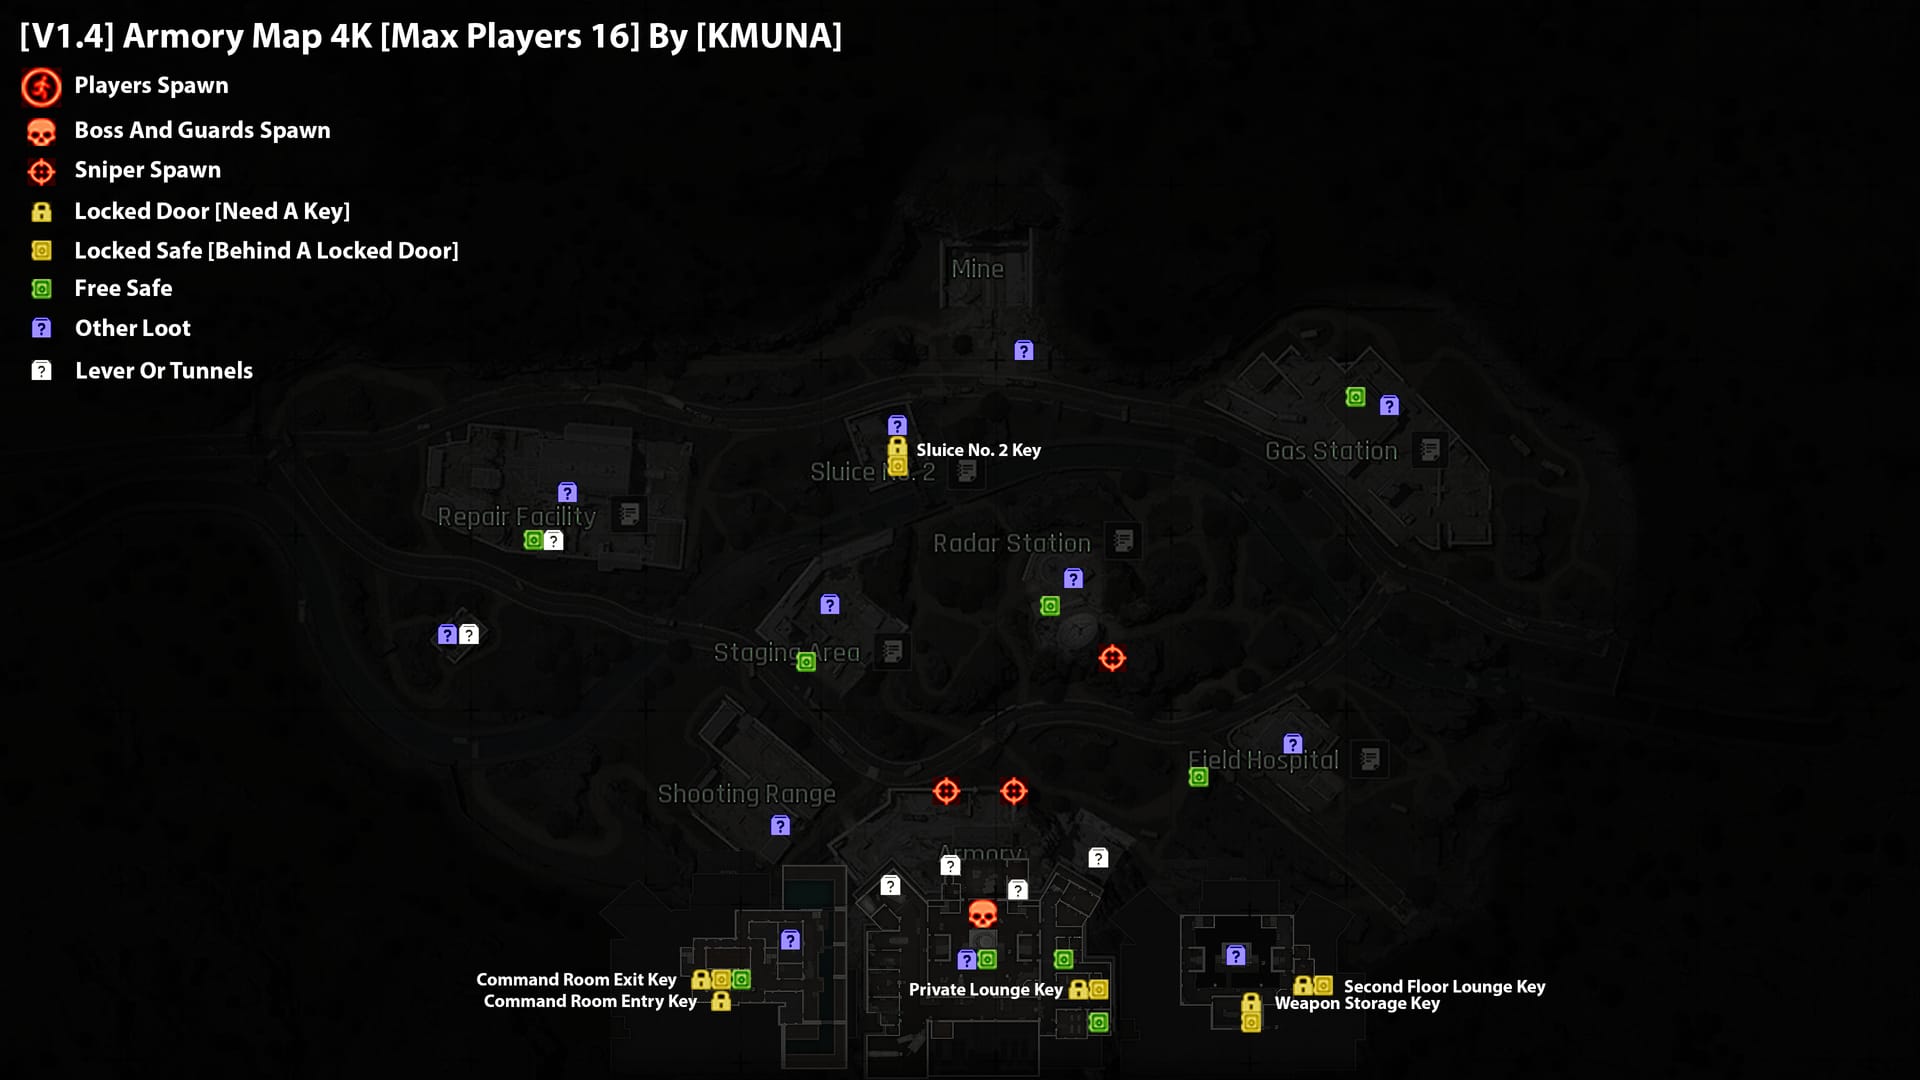
TV Station Lockdown Zone: Floor-by-Floor Tactical Analysis
Spawn Distribution and Vertical Advantage
TV Station runs 20 minutes with 12 spawn points — the highest player density of any Lockdown Zone map.
Ground floor and exterior spawns:
- Central Control Room
- Loading Dock Entrance
- Main Entrance Lobby
- Ventilation Stairs
- Parking Lot (two positions)
- Logistics Area
- Warehouse Set-up Area (three positions)
- Photography Area
Upper floor and interior spawns:
- Director's Office Hallway
- Back Stairwell
- Elevator Corridor
- Broadcast Editing Room
- Office Area
- Rest Area Stairs
- Exhibition Corridor Stairs
- Lobby
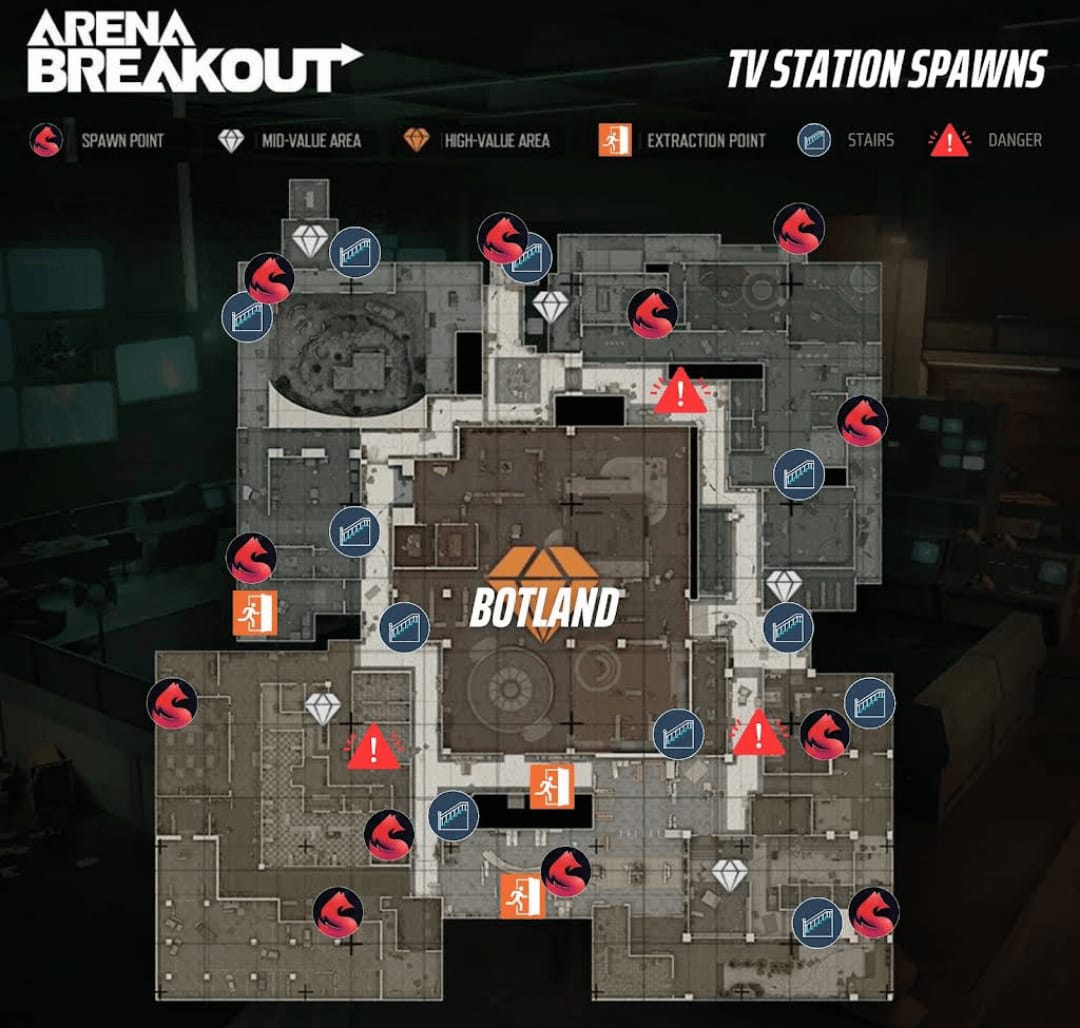
The Director's Office (2nd floor) holds top-tier loot and is the most contested room on the map. Secure the upper floor early and squads pushing staircases funnel into predictable angles you control.
TV Station Kill Funnel Blueprint
Central Control Room holds 2 safes (Seasons 1–2), expanding to 3 safes in Season 9. It draws squads like a magnet. Clear it first, then hold the Back Stairwell angle — that's the single most predictable movement corridor on the map.
Ventilation Stairs doubles as both a spawn point and extraction switch location. Any squad activating the Loading Dock extraction passes through or near this position. Pre-position here after the 10-minute mark for a natural kill funnel without chasing anyone.
The 2F General Office Card (durability 10) unlocks the second floor southwest area, yielding: 2 coats, a PC, a document box, a suitcase, a safe, and a large material crate. Squads who know this will rotate there. Be waiting.
Solo Squad-Wipe Execution Framework
Phase 1 — Intelligence Gathering: Reading Sound Cues
A squad of four moving through the Warehouse Set-up Area generates overlapping, irregular footstep signatures. A solo player sounds like a single clean rhythm. Train yourself to distinguish these patterns within the first two minutes.
Reload sounds are positional confirmations. When you hear one, the enemy is stationary for 2–3 seconds and just burned a magazine — that's your window to reposition or push.
Phase 2 — Isolation: Separating and Eliminating Squad Members
Squads spread when they loot. The Staging Area air drop in Armory creates a natural separation — one or two players guard while others loot. The Repair Facility angle covers the looters without exposing you to the guards. Take the isolated looter first, then reposition immediately before guards triangulate.
At TV Station, the Director's Office creates the same dynamic: one player on the door, one or two inside looting. The Back Stairwell gives you the door guard angle without entering the room.
Phase 3 — Pressure and Bait: Using NPCs Strategically
Elite Rors patrolling outside the Armory bunker will engage any player moving carelessly in the exterior. Bait a squad into NPC crossfire by retreating through a patrol zone — they take suppression from two directions simultaneously, coordination collapses, and isolated members become viable targets.
Grenade cook timing is a force multiplier in tight corridors. Both the Armory's interior corridors and TV Station's stairwells are grenade-optimal. Cook to 2–3 seconds before throwing into a doorway — squads can't react and push simultaneously.
Phase 4 — Cleanup: Clearing the Last Player
The last surviving squad member is the most dangerous. They have full positional intel from watching teammates die and nothing to lose. Don't push — reposition to a new angle and let them come to you. The psychological pressure of being last alive in a Lockdown Zone forces an aggressive move within 30 seconds almost every time.
Optimal Solo Loadout Builds
Weapon and Armor Priority
Engagement range determines weapon class:
- TV Station interiors — SMGs or short-barrel ARs; engagements rarely exceed 20 meters inside
- Armory bunker — mid-range ARs reward the longer Staging Area sightlines
When budget is constrained, prioritize chest protection over helmet tier. Most lethal hits in close-quarters Lockdown Zone target center mass. High-tier chest plate + mid-tier helmet outperforms the reverse.
Medical stack for solo play (no backup):
- Tourniquet — non-negotiable for limb bleed control
- Two medical kits minimum for sustained engagement
- Adrenaline Injector for post-wipe extraction sprint when overweight
Budget Loadout: Profitability Without Overspending
TV Station's 450,000 Koens loot cap per raid creates a hard ceiling on returns. The Equipment Storage Key has a market value of 600,000 Koens — 150,000 Koens over the cap. Bringing it into TV Station for routine loot yields diminishing returns relative to its value. Budget key usage accordingly.
To maintain consistent Lockdown Zone entry without depleting reserves, cheap Arena Breakout currency online through buffget's secure platform keeps the 20,000 Koens entry fee sustainable across multiple raids.
Extraction Safety Protocol After a Squad Wipe
All Extraction Points Ranked by Safety
TV Station:
- Elevator — activates 10 min after raid start; call from 2F Elevator Corridor; safest post-wipe option if you hold upper floor
- Loading Dock — flip switch at Ventilation Stairs, wait 20 seconds; moderate risk due to switch exposure
- Main Entrance — flip switch at Main Entrance; highest exposure, lowest priority for solo post-wipe
Armory:
- Canal — pull switch in control room after 3 min raid time; earliest available, least contested
- Radar Station — pull switch in midmap building after 2 min 30 sec; fast activation, moderate exposure
- Mine — pull Radar Station switch after 5 min, enter before final 20 seconds; highest complexity, lowest third-party risk
Loot Priority and Overweight Management
After a squad wipe, treat 60–90 seconds as a hard timer before third-party squads arrive. Loot in this order:
- Keycards and small high-value items (best value-to-weight ratio)
- Weapons from eliminated players if they upgrade your loadout
- Armor plates if your current set is depleted
- Bulk loot only if you're under carry weight threshold
If overweight, drop bulk ammunition before medical supplies. Ammo is replaceable; medical kits keep you alive through the extraction run.
Armory vs. TV Station: Which Map for Solo Squad Wipes?
Armory's three-entrance structure gives you more control over player flow — identify which entrance a squad used and predict their internal rotation. TV Station's 12-spawn density creates chaotic early-raid conditions that punish predictable movement.
Choose Armory if you prefer methodical, position-based play with defined choke points and NPC patrol manipulation. The Weapon Storage Keycard (durability 10) unlocks the top floor bunker southern wall, yielding 4 wall-mounted weapons, a premium weapons case, and a medium weapons case — exceptional loot density for prepared solo players.
Choose TV Station if you're comfortable with vertical combat and can secure the upper floor within the first three minutes. Director's Office and Central Control Room loot density rewards aggressive early positioning, and the Elevator extraction provides a clean post-wipe exit unavailable in Armory.
In practice: The Second Floor Lounge Key (durability 15) for Armory's eastern wall second floor — unlocking a gym bag, safe, and suitcase — offers the best value-per-key-use ratio for solo players who can't guarantee clearing the full bunker.
FAQ
Q: How do you survive Lockdown Zone solo? Enter with 100,000 Koens gear minimum, locate squads through sound cues in the first two minutes, avoid early loot rooms until threats are identified, and pre-activate your extraction before engaging the final squad.
Q: Best extraction points for solo players? Armory: Canal (available after 3 min) — earliest and least contested. TV Station: Elevator (available after 10 min, called from 2F Elevator Corridor) — safest post-wipe option when holding the upper floor.
Q: How do you wipe a full squad alone? Identify squad separation points (loot rooms, air drops), eliminate isolated members first, reposition immediately after each kill, then use NPC patrols or cooked grenades to force remaining players into predictable pushes.
Q: Is the Equipment Storage Key worth bringing into TV Station? At 600,000 Koens value against a 450,000 Koens per-raid loot cap, the key's value exceeds what you can extract in a single run. Use it strategically, not routinely.
Q: When should a solo player disengage from a squad? Disengage immediately if you've taken two or more hits without eliminating a target, a second squad is audible within 50 meters, or your extraction timer is under 3 minutes and you're not yet at the activation switch.
Q: What sound cues matter most for solo play? Footstep density (overlapping steps = squad), reload sounds (enemy stationary and vulnerable for 2–3 seconds), and grenade pin audio (reposition immediately). These three cues provide 80% of the positional intelligence you need to make engagement decisions.