_39828.jpg)

Related articles


Blood Strike Ranked Meta: Best 3 Striker Synergies 2026
The top ranked meta runs Volt, Nacho, and Ran. Volt's EMP strips 40 armor damage within 40 meters, Nacho's Hellfire blinds for 1.5 seconds across a 30-meter wall, and Ran's Ice Barrier absorbs 1,000 HP. Chain these within a 3–5 second window during mid-fight or zone collapse — that's what separates Diamond squads from everyone else.
Buffget
Why Striker Synergy Decides Ranked Matches
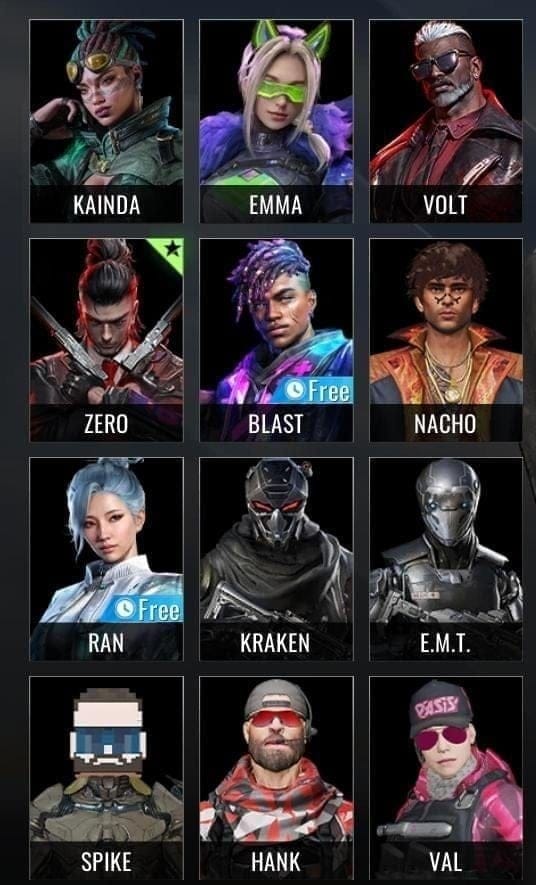
Striker synergy is the measurable advantage your squad gains when each Striker's abilities amplify one another rather than overlap. Blood Strike has 16 Strikers across four roles — Assault, Support, Recon, and Tank — and the gap between random selection and coordinated composition becomes decisive at Diamond rank.
Below Diamond, raw mechanics can carry fights. At Diamond and above, enemy squads arrive with coordinated ultimate chains, and a mismatched composition can't respond in kind. Three pillars define a winning ranked squad: composition (which Strikers you pick), timing (when ultimates fire), and communication (syncing without wasting cooldowns).
The most common composition error: stacking two Strikers of the same role. Two Tanks creates redundancy in one area while leaving critical gaps elsewhere. Every squad needs at least one Recon ability for intel, one defensive anchor, and one aggressive initiator.
Striker Roles: Your Ranked Squad Foundation
Assault — Primary damage initiators. Ultimates open or close fights, not sustain them. Bloat's Blood Rage lasts 12 seconds — it's a burst-window tool requiring immediate teammate follow-up.
Support — Creates conditions for squad wipes rather than executing them. Ran's Cryomancy passive boosts ally shield recovery by 30% within 30 meters. Her Ice Barrier provides a 1,000 HP structure lasting 25 seconds — it doesn't just protect, it forces enemies to commit resources breaking it while you reposition.
Recon — The most undervalued role below Diamond. Nacho's The Penitent Eyes passive detects enemies within 66 meters when their HP drops below 40%. Knowing which enemies are low without manual pinging is a decisive edge in multi-squad scenarios.
Tank — Frontline pressure and zone-denial. Ethan's Protection Matrix offers 400 HP lasting 30 seconds — lower durability than Ran's barrier but longer duration, making it better for sustained positional holds than reactive defense.
Top 3 Striker Synergy Combos for Squad Wipes
Want to unlock these Strikers faster? Blood Strike global recharge online through buffget — streamlined, secure Gold top-ups without delays.
Combo #1: Volt + Nacho + Ran — The EMP-Blind-Barrier Chain
The highest-performing ranked composition right now. Execute in this exact order:
- Volt activates Electromagnetic Pulse — 40 armor damage to all enemies within 40 meters, stripping their defensive layer instantly.
- Nacho deploys Hellfire — 30-meter long, 4-meter high wall blinds for 1.5 seconds, persists 20 seconds, cuts off retreat and line-of-sight simultaneously.
- Ran places Ice Barrier — 1,000 HP structure seals the remaining exit corridor, forcing enemies into your kill zone.
Critical detail: Volt's EMP must land before Nacho's wall goes up. Enemies with full armor can still push through the blind. Strip armor first, then blind, then seal.
Combo #2: Ran + Ethan + Volt — The Sustain Wipe
Built for drawn-out fights where enemies have cover and won't push open ground. Ran's 30% shield recovery keeps your squad fighting longer, Ethan's 30-second barrier creates a forward position, and Volt's Coursing Currents passive — +50% ADS speed and +10% movement speed when fully charged — turns your Assault player into a flanking threat the moment barriers absorb enemy attention.
Best used during final-circle fights where zone collapse forces enemies toward your position.
Combo #3: Nacho + Volt + Nova — The Aggressive Intel Rush
For squads that want to dictate early-zone engagements:
- Nacho's passive identifies already-damaged enemies within 66 meters.
- Nova's Toxic Grenade forces them out of cover — explosion damage plus DOT in a 7-meter radius.
- Volt closes distance using Coursing Currents mobility to finish.
This punishes squads rotating between fights without healing — a common mid-game ranked pattern.
Ultimate Mechanics Every Ranked Player Must Know
Timing isn't instinct — it's pattern recognition built on ability parameters.
Range constraints are absolute. Volt's EMP only deals armor damage within 40 meters. At 60 meters, you've wasted the cooldown. Nacho's Hellfire doesn't cover elevated positions — enemies on rooftops or ridgelines are unaffected by the blind.
Passives amplify ultimate value constantly. Ran's Cryomancy is always active within 30 meters of allies — your squad's shields recover 30% faster throughout the entire fight, not just when her ultimate deploys. Position Ran within 30 meters of your most aggressive player. Most squads ignore this.
Ultimate readiness sync is the single most important coordination habit in ranked. Before committing to any fight, all three squad members confirm ultimate status. A two-ultimate engagement against a three-ultimate enemy squad is a losing trade regardless of mechanics.
The Three Ultimate Timing Windows
Pre-Engagement: Recon Before Commitment
Nacho's The Penitent Eyes operates continuously. If no enemies appear in the 66-meter detection radius as low-HP targets, the enemy squad is likely at full strength. Don't force the fight — adjust timing.
Mid-Fight: Chain Within 5 Seconds
The optimal Volt-to-Nacho chain window is 3–5 seconds. Longer gaps let enemies recover armor or reposition out of the blind zone. Designate one player as the chain caller — their job is to verbally or ping-signal the moment Volt's EMP connects, triggering Nacho's immediate deployment.
Zone-Collapse: Force Movement, Then Punish It
Zone collapse is the highest-value window for barrier ultimates. As the safe zone shrinks, enemies must move — and moving enemies are predictable. Deploy Ran's Ice Barrier at the most likely entry point, then cover the two remaining approach angles. Enemies walking into a 1,000 HP barrier they can't avoid are in a controlled kill zone.
Ultimate Timing Mistakes That Cost Ranked Points
- Single-target EMP waste: Using Volt's EMP on one isolated enemy when a full squad is grouped 35 meters away. Always confirm cluster positioning before activation.
- Premature Hellfire: Triggering Nacho's wall before your squad is in flanking position. It lasts 20 seconds — if your team is still rotating, enemies simply wait it out.
- Ignoring enemy cooldown cycles: Enemy Ran just deployed her barrier? Her ultimate is on cooldown. That's your push window — her squad's primary defensive anchor is unavailable.
- The perfect moment trap: Holding ultimates indefinitely. Good conditions are created by using ultimates, not by waiting for them to appear.
Squad Coordination Without Voice Chat
Three ping types, established before the match starts:
- Enemy ping on a grouped cluster = EMP range confirmed — Volt activate
- Location ping on a wall or doorway = Nacho Hellfire here — deploy now
- Danger ping on your own position = Need Ran's barrier — place immediately
Set these conventions in pre-game text chat. Also watch teammate ultimate animations — Volt's charging animation and Ran's barrier placement are visible to squadmates and should trigger immediate repositioning.
Meta Weapons That Complement Striker Synergy
Ultimates create windows. Weapons close them. To top up Blood Strike Golds by UID, buffget offers competitive pricing and fast delivery for players serious about staying ahead of the meta.
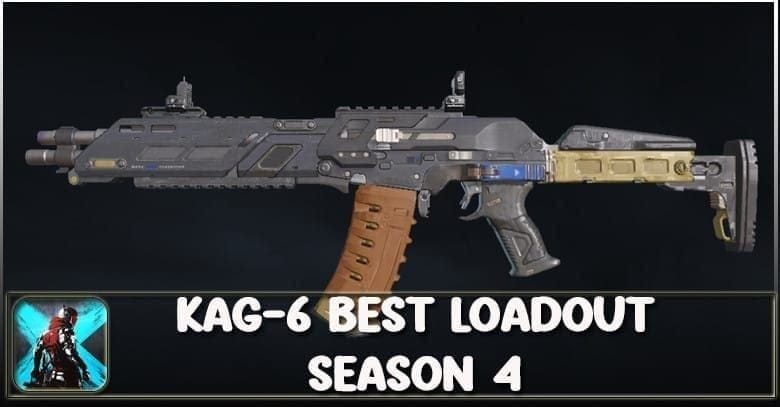
KAG-6 — 18 damage/shot at 63 RPM, in 70% of pro loadouts. Full CQB build: CQB Muzzle (unlocks level 38), Extended Barrel (+25% range, level 20), Extended Vertical Grip (level 40), Romeo4T Red Dot (level 42). Optimal for close-range kill zones created by Nacho's Hellfire.
FAL — 705 RPM semi-auto, optimal damage at 50–100 meters, in 70% of tournament loadouts. Compensator: 25% vertical recoil reduction. Extended Vertical Grip: +20%. Combined: 45% total recoil reduction — critical for accurate fire during Volt's 1.5-second blind window.
P90 — 21 damage/bullet at 78 RPM, 80% damage effectiveness at medium range, in 60% of close-quarter pro fights. Pairs with Ran's barrier plays forcing enemies into tight corridors.
Kala .50 — 125 base damage, one-hit-kill headshot potential to 200 meters, in 90% of pro sniper selections. Unlocks at Striker Level 13. Position outside the engagement zone during Nacho's blind — eliminates any enemy who breaks through the wall.
Pro tip: Competitive settings cluster at eDPI 400–600 for accuracy during the chaotic 3–5 second chain execution window.
How to Counter Enemy Striker Synergy
- Identify the Support Striker first. Ran and Ethan anchor every defensive combo. Eliminate the Support player before their ultimate deploys — removes the squad's primary sustain.
- Break the chain at link one. If Volt initiates, immediately reposition out of the 40-meter EMP radius before Nacho's wall deploys. Break step one and the full combo fails.
- Push during cooldown windows. After an enemy squad deploys their full chain, all three cooldowns run simultaneously. That 20–30 second window is your optimal push — they can't chain again until at least one ultimate recharges.
Three Metrics That Prove Your Synergy Is Working
Track these per session:
- Squad wipe rate: A coordinated three-Striker combo should produce at least one full squad elimination per match in mid-game lobbies.
- Ultimate efficiency ratio: Ultimates used vs. squad wipes produced. Below 3:1 (three ultimates per wipe) = strong chain execution. Above 5:1 = timing or positioning errors.
- Survival rate post-wipe: Your squad should stay above 60% HP after a successful wipe. Consistently taking heavy damage means your positioning during the chain is exposing you unnecessarily.
FAQ
What are the best Striker synergies for ranked squads? Volt + Nacho + Ran is the strongest current meta composition. Volt strips 40 armor damage within 40 meters, Nacho blinds for 1.5 seconds with a 20-second wall, and Ran's 1,000 HP Ice Barrier seals the kill zone. Chain within 5 seconds for consistent squad wipes.
How do you time ultimates for a squad wipe? Three windows: pre-engagement (Recon intel confirmation), mid-fight (3–5 second chain with a designated caller), and zone-collapse (barrier at forced entry points). The caller signals the moment the first ultimate connects.
What Striker roles does every ranked squad need? One Recon for intel, one Support or Tank for defensive anchoring, one Assault for initiation. Stacking two of the same role creates gaps that coordinated enemies will exploit.
How do you coordinate ultimates without voice chat? Enemy ping = EMP confirmation. Location ping = wall placement. Danger ping = barrier request. Set conventions in pre-game text chat and watch teammate ultimate animations as live cues.
What are the most common ultimate mistakes in ranked? Using single-target ultimates when squad clusters are available, deploying before teammates are in position, ignoring enemy cooldown cycles, and holding ultimates waiting for perfect conditions that never arrive.
How does the meta shift after patch updates? Monitor patch notes for changes to barrier HP values, AoE radius adjustments, and passive skill interactions — these three parameters most directly impact synergy viability within 48 hours of any release.