_39648.jpg)

Related articles


Cost 3 Echo Farming Guide 2026: Harmony Set Routes
Cost 3 Echoes drop from elite enemies across Wuthering Waves' open world. Optimized routes yield 4-9 echoes per 12-18 minute loop. Law of Harmony set provides 30% Heavy Attack DMG bonus through its 3-piece effect. Elite enemies have pity at 4 drops. Data Bank Level 15+ unlocks 5-star drops; Level 21 guarantees 5-star quality.
Buffget
Understanding Cost 3 Echoes and Harmony Set
Cost 3 Echoes are highest-tier drops from level 25+ elite enemies, forming endgame optimization foundation. Each enemy type drops specific Sonata sets determining elemental damage output.
Law of Harmony is the most sought-after Cost 3 set in 2026. Unlike traditional 5-piece sets, Harmony uses 3-piece system: 30% Heavy Attack DMG Bonus for 4 seconds after Echo Skill, plus team-wide Echo Skill DMG +4% for 30 seconds (stacks 4x). This dual benefit makes it exceptional for coordinated teams.
Wuthering Waves top up through buffget offers competitive pricing for Lunite to refresh stamina and maximize farming efficiency.
Why Cost 3 Echoes Matter
Cost 3 Echoes provide highest base stats and most impactful set bonuses. Elite pity guarantees Cost 3 drop every 4 defeats. Data Bank Level 15 unlocks 5-star drops; Level 21 guarantees them.
Key Set Bonuses:
- Freezing Frost: Glacio DMG +10% (2pc), Basic/Heavy Attack Glacio DMG +10% per stack, max 3 stacks (5pc)
- Molten Rift: Fusion DMG +10% (2pc), Resonance Skill Fusion DMG +30% (5pc)
- Void Thunder: Electro DMG +10% (2pc), Heavy/Resonance Skill Electro DMG +15% per stack, max 2 stacks (5pc)
- Sierra Gale/Celestial Light: Elemental DMG +10% (2pc), Intro Skill elemental DMG +30% (5pc)
Harmony Set Bonuses Explained
Harmony's 3-piece requirement allows hybrid builds with 2-piece bonuses from other sets. The 30% Heavy Attack DMG activates after any Echo Skill, providing consistent 4-second damage window.
Team-wide Echo Skill DMG +4% stacks independently, reaching 16% max when all four members trigger Echo Skills within 30 seconds. This rewards coordinated rotations.
Common pairings: Harmony + Lingering Tunes 2pc (ATK +10%) or elemental-specific 2pc sets.
Why Harmony Dominates 2026 Meta
Heavy attack mechanics evolved in 2026. Newer characters deal 200-400% normal attack damage through charged sequences. Harmony's 30% multiplicative bonus applies after all calculations, making it exponentially more valuable than additive ATK%. Characters with built-in heavy attack amplification see 45-60% total output increase.
Team-wide Echo Skill DMG component transforms Echo Skills into meaningful DPS contributors, adding 8-12% to overall team damage.
Harmony's 3-piece structure solves equipment flexibility issues. It's now default recommendation for 60% of DPS characters.
Harmony Set Spawn Mechanics and Drop Rates
Cost 3 Echoes follow deterministic spawn system tied to elite locations. Elites respawn on server reset cycles. Elite pity counter at 4 guarantees Cost 3 drop.
Data Bank Level 15 is critical threshold for 5-star availability. Below this, you get exclusively 4-star drops. Level 21 guarantees 5-star quality from all elites.
Harmony Set Locations:
- Tideline Verge, Nightmare Nest, Sanguis Plateaus (southwest of Tetragon Temple)
- Averardo Vaults: Echo Station, Precious Metals Depository, Echo Depository, Unknown Vault
- Riccioli Islands: Helm Village, Serene Bay, Reyes Ruins, Drake Island
Respawn Timers Breakdown
Server resets occur at fixed daily intervals (typically 4:00-5:00 AM server time), respawning all elites simultaneously. Elites stay defeated for your instance until reset—no spawn camping.
Optimized routes yield 20-30 echoes/hour. Individual loops: 12-18 minutes.
Weekly Route Schedule:
- Mon-Wed: Aero routes (Dim Forest, Whining Aix Mire)
- Thu-Fri: Havoc routes (Wuming Bay, Port City Guixu)
- Weekend: Riccioli Islands (less competition)
Drop Rate Percentages
Elite pity at 4 defeats creates guaranteed floor. Data Bank Level 15: ~35-40% chance for 5-star. Level 21: 100% guaranteed 5-star.
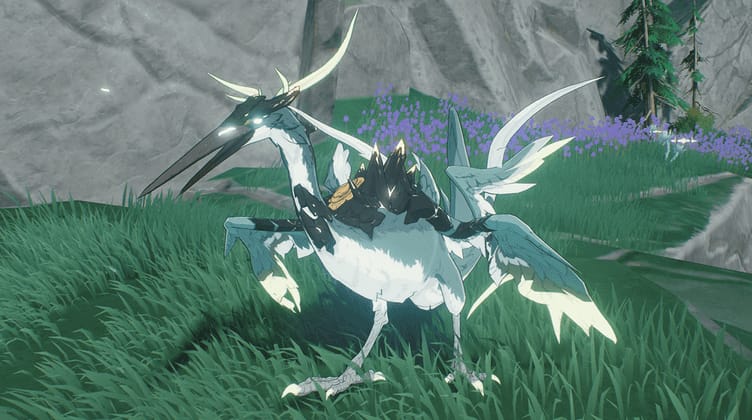
Sonata assignment follows enemy type. Nightmare: Cyan-Feathered Heron drops Law of Harmony exclusively. Autopuppet Scout drops Freezing Frost/Celestial Light. Viridblaze Saurian drops Molten Rift only.
Main/substat rolls are independent RNG. Crit Rate, Crit DMG, ATK% appear at ~15% frequency each. Expect 8-12 echoes per optimal piece.
Server Reset and Daily Limits
No hard daily limit beyond available elite spawns. Comprehensive routes yield 25-35 Cost 3 echoes/day. Buy Lunite Wuthering Waves through buffget to refresh stamina for Forgery Challenges.
Elites require 0 stamina to engage. Maintain 30-40% stamina reserves for travel to avoid speed penalties.
Complete Harmony Set Location Map
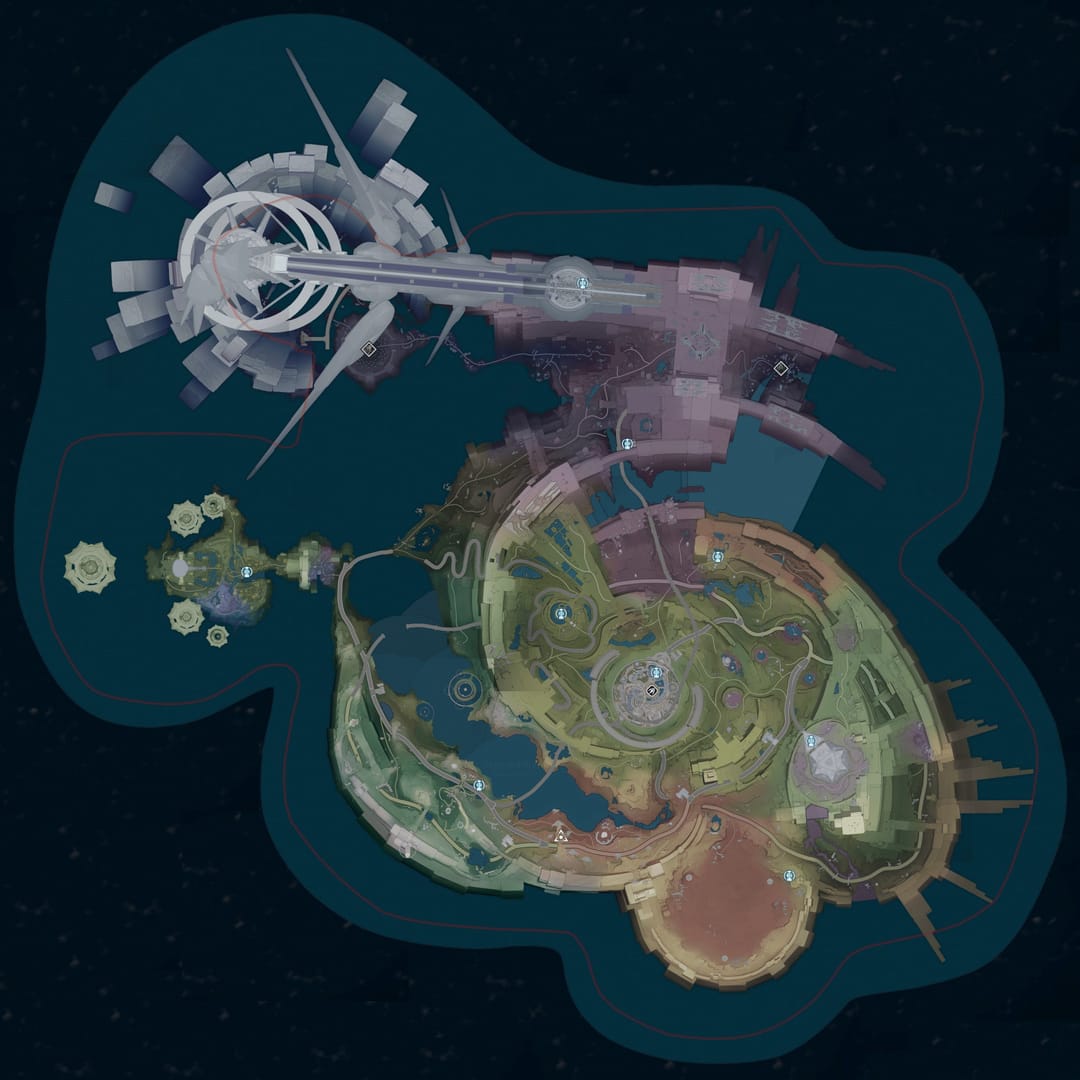
Law of Harmony concentrates in three zones: Riccioli Islands (highest density), Averardo Vaults (concentrated indoor farming), Sanguis Plateaus (mainland alternative).
Nightmare: Cyan-Feathered Heron near Fallen Grave in Whining Aix Mire is most reliable source. Level 110 elite anchors 31-point route (15 min), guarantees Harmony drops.
Riccioli Islands loop: Helm Village (3-4 spawns) → Serene Bay (2-3 spawns) → Reyes Ruins (4-5 spawns) → Drake Island (2-3 spawns). Complete circuit: 6-8 echoes in 18 min.
Northern Territory Locations
Averardo Vaults (4 zones):
- Echo Station: 2 elites in main chamber
- Precious Metals Depository: 3 elites across storage rooms
- Echo Depository: 2-3 elites near central archive
- Unknown Vault: 4-5 elites (requires puzzle, 2-3 min extra, best quality)
Whining Aix Mire's Fallen Grave: Cyan-Feathered Heron + Violet-Feathered Heron. 31-point route (15 min) includes Plateau Ruins, Waving Battlefield. Yields 7-9 echoes with guaranteed Harmony.
Central Plains Spots
Central Plains: 28-point Chaserazor route (12 min), 4-6 echoes/loop. Doesn't drop Harmony but offers Freezing Frost/Celestial Light.
Autopuppet Scout near Tiderise Cliff: Level 40 elite, drops Freezing Frost/Celestial Light. Adds 1-2 min to routes.
Viridblaze Saurian east of Yeming Slide: Level 30 elite, Molten Rift exclusive. Integrates into daily commission runs.
Southern Region High-Density Areas
Port City Guixu: Roseshroom spawns outside city near Donglu Research Station. 55-point route (16 min), 7-9 echoes/loop. Underground bunker (password 2457): 3 Diamondclaw elites.
Wuming Bay Shattered Blocks: Havoc Dreadmane spawns, 76-point route (14 min), 7-9 echoes/loop. Groups of 4 Fusion Dreadmane Minor throughout bay.
Tiger's Maw Distribution Center: Groups of 3 Sabyr Boar elites (Level 50). Integrates into southern routes.
Hidden Locations
Dim Forest:
- Snip Snap, Whiff Whaff, Tic Tac near Violet Banyan (Level 100)
- Glacio/Havoc/Spectro/Fusion Prism near Giant Banyan (requires Prism Heart defeat)
- Thorny Passage: Hoochief/Hooscamp (Level 120), 23-point route (18 min), 6-8 echoes
Peach Blossom Town's Qichi Village: Chasm Guardian/Rider drop Rejuvenating Glow/Lingering Tunes. Less traffic, essential for support builds.
Fastest Route #1: Speed Run (12-15 Min)
Optimized speed route prioritizes minimal travel, quick combat. Yields 4-6 echoes per 12-min loop. Focuses on Central Plains Chaserazor spawns (available after Main Story Act 1).
Start from Central Plains main teleport, head northeast to first Chaserazor cluster. Level 25 elites die in 30-45 sec with proper builds. 28-point route ensures comprehensive coverage.
Combat efficiency determines completion time. AoE abilities engage multiple enemies simultaneously (20-30 sec/encounter). Maintain 60%+ HP to eliminate healing downtime.
Preparation Requirements
Begin at Central Plains Resonance Beacon (eastern cluster). Equip DPS with +15 weapon, Level 60+ character for one-rotation kills. Bring healing items if sustain is weak.
Verify Data Bank Level before starting. Below Level 15 = 4-star echoes only. Farm within 3 hours of server reset for max spawn availability.
Step-by-Step Navigation

- From Resonance Beacon, travel northeast 200m to stone arch. First Chaserazor 50m beyond arch near fallen tree
- Continue northeast 150m following cliff edge to second spawn (three large boulders)
- Turn southeast, descend cliff via grapple. Third spawn in valley floor near dried riverbed (180m)
- East along riverbed 250m to wooden bridge. Cross, turn north to fourth cluster (2-3 enemies near abandoned campsite)
- North 300m following main road to watchtower. Fifth spawn behind watchtower
- West 200m to final cluster near Resonance Beacon (completes circle)
Expected Yield
12-min completion assumes competent combat and spawn familiarity. First-timers: 15-18 min. After 3-5 reps: 12-13 min. Optimized runners: 10-11 min.
Echo yield: 4-6 drops/loop (6-8 elite defeats trigger pity at least once). Favorable RNG: 7-8 echoes.
Echoes/hour: 20-24 continuous running. Checking substats after each loop reduces to 16-20/hour.
Optimal Route #2: Maximum Yield (20-25 Min)
Maximum yield route covers Wuming Bay Shattered Blocks, 76-point Havoc Dreadmane path. Yields 7-9 echoes/loop. Requires stronger builds but provides 40-60% more echoes than speed route.
Wuming Bay's elite density creates combat chains (2-3 enemies in succession). Combat = 60-70% of route time. Bring healing/support for sustained combat.
Includes groups of 4 Fusion Dreadmane Minor (Molten Rift drops). Group spawns trigger pity rapidly (2-3 drops per cluster).
Comprehensive Coverage Strategy
- Start at Wuming Bay southern Resonance Beacon. Northwest 300m to first Havoc Dreadmane (collapsed building, exposed rebar). Level 40 elite, dodge heavy combo
- Northwest 250m to Fusion Dreadmane Minor cluster (4 elites near shipping containers). 90-120 sec combat
- Northeast 400m to second Havoc Dreadmane (elevated factory, requires grapple, +30-45 sec travel)
- Southeast 350m to third cluster (2-3 mixed Havoc/Fusion elites)
- South 500m back to start, clear respawned enemies
Boss Sequence for Best Results
Prioritize Fusion Dreadmane Minor groups first (rapid pity advancement). Engage Havoc Dreadmane second (higher 5-star rates at Data Bank 18-20). Save mixed clusters for end (flexible time management).
Time vs. Quality Balance
20-25 min completion = 7-9 echoes/loop = 21-27 echoes/hour (5-15% higher than speed route).
Echo quality improves due to Level 40+ enemies (better 5-star rates at Data Bank 15-20).
Worthwhile for 45+ min sessions. 60+ min availability: default to max yield. 20-30 min sessions: use speed route.
Advanced Farming Strategies
Multi-route rotation maximizes daily acquisition. 3-day cycle:
- Day 1: Freezing Frost/Celestial Light (Central Plains, Autopuppet Scout)
- Day 2: Molten Rift (Jinzhou west, Wuming Bay Fusion clusters)
- Day 3: Law of Harmony (Riccioli Islands, Averardo Vaults, Cyan-Feathered Heron)
Weekend: Riccioli Islands (less competition due to unlock requirements).
Track daily yields via spreadsheet: total echoes, 5-star %, optimal pieces.
Energy Management
Equip stamina reduction food (15-25% cost reduction) = 20-30% more distance/bar. Plan grapple chains to minimize waste. Chain grapple points without touching ground preserves stamina.
Include support with stamina regen passives (1-2 stamina/sec) = 15-20% effective pool increase.
Team Composition
Build around primary DPS with strong AoE. Wide-area ultimates clear groups 30-40% faster. Prioritize characters not requiring complex setup rotations.
Include support with healing/shielding to eliminate downtime. Passive healing maintains HP without item consumption.
Avoid compositions requiring elemental reactions or complex rotations. Reliability > peak damage for farming.
Common Mistakes to Avoid
Pre-Level 15 Farming: Don't farm Cost 3 before Data Bank Level 15. You'll get 4-star only (20-30% stat loss vs 5-star). Prioritize Data Bank leveling first.
Route Inefficiency: Poor spawn knowledge wastes 5-8 min/loop. Practice routes 3-5 times before measuring efficiency.
Substat Mistakes: Don't keep echoes with correct main stat but DEF%/HP% substats. Establish keeping criteria: main stat + 2+ desirable substats (Crit Rate, Crit DMG, ATK%).
Guaranteed Drop Misconceptions
Elite pity guarantees Cost 3 drop, NOT 5-star quality. Below Data Bank 15 = guaranteed 4-star from pity. Only Level 21 guarantees 5-star quality.
Sonata assignment follows enemy type deterministically. Farm specific enemies for specific sets, not random elites.
Main/substat rolls stay random regardless of level. Need 8-12 echoes per optimal piece.
Route Inefficiencies
Backtracking = primary time waste. Routes should be circular/linear, minimizing revisits. Target 60-70% combat time vs 30-40% travel.
Don't engage non-elite enemies. They don't advance pity or drop Cost 3. Sprint/dodge past trash mobs.
Farm during off-peak (early morning, late night) or within 3 hours of reset. Peak hours = 20-30% spawns already cleared.
Substat Priority Mistakes
Keep only: main stat + 2+ desirable substats. Desirable = Crit Rate, Crit DMG, ATK%, element DMG. Discard defensive substats.
Don't over-invest in enhancement before obtaining optimal pieces. Keep at +0 or +5 during farming. Fully enhance only confirmed optimal pieces.
Stop farming when you have 5 pieces with correct main stats + 2+ desirable substats. Good vs perfect = 5-8% damage difference, 40-60 hours farming difference.
Maximizing Results: Pro Tips
Server Reset Timing: Farm within 30-60 min of reset (4:00-5:00 AM server time) for 100% spawn availability. Produces 15-20% higher echoes/hour.
Crystal Solvent Usage: Use only on echoes with correct main stat + 3 desirable substats. Save for final optimization after initial set collection.
Track Metrics: Monitor echoes/hour across routes/times to identify personal optimal strategies.
Best Farming Times
- Early morning (5:00-8:00 AM): 95%+ spawn availability, lowest competition
- Late night (11:00 PM-2:00 AM): 85-90% spawn availability
- Avoid peak (6:00-10:00 PM): 40-50% spawns cleared, 25-35% efficiency loss
Crystal Solvent Efficiency
Prioritize: Cost 3 with correct main stat, correct set, 3 desirable substats (top 5-10% of drops).
Reroll at +0 to minimize waste. Set monthly budgets (15-20 Solvent/month): 60% main DPS, 30% supports, 10% emergency.
Progress Tracking
Use phone timers. Record start/end times including inventory management. Calculate echoes/hours spent.
Maintain weekly averages (smooths RNG variance). Compare personal metrics vs theoretical max (speed route: 30 echoes/hour theoretical, 20-24 realistic).
When to Stop Farming
Transition to building once you have 5 pieces with correct main stats + 2+ desirable substats.
Good to perfect upgrade = 40-60 hours farming for 5-8% damage gain. Inefficient vs building other characters.
If current setup clears all endgame content, additional optimization provides no practical benefit.
Character-Specific Priorities
Heavy attack-focused characters = highest priority. 30% Heavy Attack DMG directly amplifies primary damage source. Characters with 200-400% charged sequences see 45-60% total output increase.
Echo Skill damage dealers benefit from team-wide +4% stacking buff. Teams with coordinated rotations achieve 16% permanent increase.
Supports skip Harmony for Rejuvenating Glow/Lingering Tunes.
Top Characters for Harmony
Characters with built-in heavy attack amplification receive max value. Kits with 250-400% charged damage create multiplicative scaling.
Burst dealers relying on Echo Skill rotations get 10-15% improvement. Consider as secondary option after primary elemental sets.
Hybrid DPS (split normal/heavy) see moderate value. 30% applies only to heavy portions. Evaluate damage distribution before committing.
Main Stat/Substat by Role
DPS: ATK% or element DMG% main stats. Priority substats: Crit Rate, Crit DMG. Target 60-70% Crit Rate, 140-160% Crit DMG.
Supports: Energy Recharge or Healing Bonus main stats. Healers: Healing Bonus + HP%/Energy Recharge substats. Buffers: Energy Recharge + ATK% substats.
Hybrids: Balanced stats. Target 50-60% Crit Rate, 120-140% Crit DMG, 15-20% Energy Recharge.
Building Multiple Sets
Allocate 2-3 weeks per character (60-90 min daily, 20-30 echoes/day). Need 40-60 total echoes for complete 5-piece set.
Prioritize main DPS first (60-70% team damage). Complete DPS before supports.
Parallel farm for characters sharing sets. Reduces total time 30-40% vs sequential farming.
2026 Updates
Law of Harmony introduced as first 3-piece set, enabling hybrid builds. Shifted meta for 60% of DPS characters.
Riccioli Islands/Averardo Vaults added high-density zones. 6-8 echoes per 18-min route = 15-20% efficiency improvement.
Data Bank Level 21 guarantees 5-star from all elites. Eliminates quality RNG, improves planning accuracy.
Recent Spawn Changes
Cyan-Feathered Heron spawn rates increased in Whining Aix Mire. 31-point route now 7-9 echoes (was 5-7) = 20-30% improvement.
Elite pity counter visibility added to Data Bank interface. Eliminates manual counting.
Spawn timers standardized to server reset. All refresh simultaneously at known times.
New Harmony Pieces
Law of Harmony remains only 3-piece set. No announced variants. Future updates may introduce additional 3-piece sets (no confirmed timeline).
Existing 5-piece sets unchanged: Freezing Frost, Molten Rift, Void Thunder, Sierra Gale, Celestial Light, Sun-sinking Eclipse, Rejuvenating Glow, Moonlit Clouds, Lingering Tunes.
Future-Proofing Strategy
Farm versatile sets working across multiple characters. Harmony applies to numerous DPS. Elemental sets maintain value long-term.
Maintain diverse collections covering all major sets. Meta shifts can elevate niche sets overnight.
Prioritize quality over quantity. One optimal echo > three mediocre echoes.
FAQ
What are Cost 3 Echoes? Highest-tier equipment from level 25+ elites. Strongest set bonuses and base stats. Elite pity guarantees drops every 4 defeats.
Where to find Harmony Set echoes? Nightmare: Cyan-Feathered Heron (Whining Aix Mire), Riccioli Islands (Helm Village, Serene Bay, Reyes Ruins, Drake Island), Averardo Vaults (4 zones), Sanguis Plateaus (southwest Tetragon Temple).
Cost 3 Echo respawn time? Server reset cycles (4:00-5:00 AM server time). All elites respawn simultaneously daily.
Fastest farming route? Central Plains Chaserazor: 12 min, 4-6 echoes/loop (speed). Wuming Bay Havoc Dreadmane: 14 min, 7-9 echoes/loop (max yield).
Which characters need Harmony most? Heavy attack-focused characters dealing 200-400% normal attack damage through charged sequences. Teams emphasizing coordinated Echo Skill rotations.
Required Union Level for Cost 3 farming? Available after Main Story Act 1 (Union Level 15-20). Data Bank Level 15 required for 5-star drops. Level 21 guarantees 5-star quality.