Related articles
Depths of Illusive Realm V Guide: Best Scar Metaphors 2026
Depths of Illusive Realm V runs November 14, 2026 to January 1, 2026, featuring six difficulty tiers and weekly rotating trial resonators. Scar dominates solo runs through strategic metaphor selection, optimal builds, and precise combat execution. Master S-tier metaphor combinations, damage rotations with 150-300% Havoc DMG multipliers, and floor-by-floor tactics to claim the exclusive Inferno Rider echo and maximize Illusive Store rewards.
Buffget
Understanding Depths of Illusive Realm V: Core Mechanics & Rewards
Depths of Illusive Realm V is Wuthering Waves' premier endgame roguelike mode, requiring Union Level 17 and completion of Against All Odds quest plus Somnoire: Illusive Realm Tutorial. Event runs November 14, 2026 through January 1, 2026 with seven weekly trial periods and six difficulty tiers.
The metaphor system provides temporary power-ups that stack multiplicatively with base stats, creating exponential scaling. Players encounter metaphor nodes throughout each floor, choosing between immediate power spikes and long-term synergy.
For roster enhancement, Wuthering Waves recharge through buffget provides secure transactions with competitive pricing and fast delivery.
What Makes Depths V Different
Difficulty 4-6 introduces Memetic Tuning modifiers. Nightmare Memes increase rewards while intensifying enemy capabilities; Reverie Memes decrease rewards but provide defensive advantages. Turtle's Reverie reduces reward rates 20% while cutting incoming damage 30%—crucial for undergeared players.
Symphony Rank modifiers provide universal combat enhancements:
- Dodge Counter DMG: +100%
- Cooldown reduction: -30%
- Crit Rate DMG: +100%
Trial resonator rotations change weekly:
- Week 1 (Nov 14-20): Camellya, Verina, Danjin
- Week 5 (Dec 12-18): Xiangli Yao, Yinlin, Lumi
- Difficulties 4-6: Xiangli Yao, Yinlin, Lumi
Reward Structure
Illusive Store exclusives:
- Difficulty 5: Phantom Inferno Rider echo (x750, 1/1 limit) - ignores 30% target DEF
- Difficulty 6 first-clear: Premium Sealed Tube x2, Illusive Specimen x460, Memory Points x165, Morphable Overlord Class Echo x20
- Astrite: x100 for x100 currency (1/1 limit)
Reward rate modifiers create strategic tension. Wreck of Despair increases drops 35% but reduces stamina recovery 50%, forcing aggressive playstyles.
Metaphor System Explained
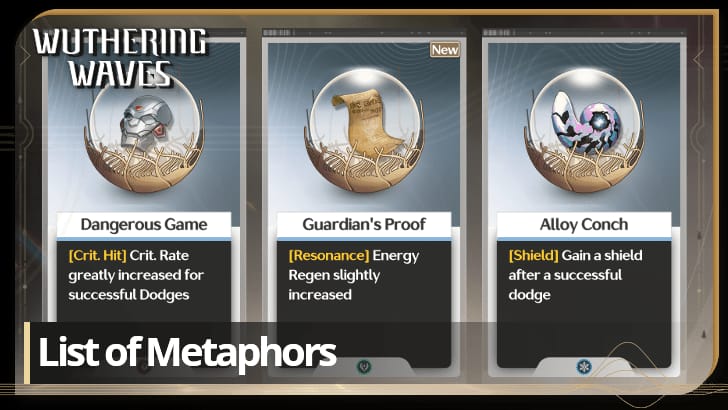
Metaphors are temporary buffs selected at specific nodes. Three rarity tiers—common, rare, legendary—with higher rarities providing stronger effects. Selection pool refreshes at each node, presenting three random options.
Categories:
- Offensive: Perfect Alloy deals 1000% DMG every 12s
- Defensive: Alloy Conch generates shields worth 30% max HP for 5s after dodging (every 5s)
- Utility: Emergency Call creates shields worth 120% max HP for 10s when HP drops below 30% (every 20s)
Synergy creates multiplicative scaling. A metaphor increasing Basic Attack damage 50% combines with another boosting Havoc DMG 40% for compound scaling, not simple addition.
Why Scar Excels in Depths V Solo Content

Scar's kit naturally aligns with solo requirements through self-sufficient damage, built-in survivability, and flexible combat patterns.
Resonance Skill:
- 150% Havoc DMG
- Shield worth 20% DEF for 15s
- 1.5s stun duration
- 18s cooldown, 40 Energy cost
Resonance Liberation:
- 300% Havoc DMG
- Chaos Domain: 10s duration, 10m radius
- 30% Havoc RES shred (effectively +42.8% Havoc damage)
- 20s cooldown, 100 Energy cost
Basic Attack: 60% + 80% + 100% + 120% Havoc DMG Heavy Attack: 180% Havoc DMG for 25 Stamina
Kit Analysis: Havoc Damage & Self-Sufficiency
Havoc typing provides universal effectiveness across enemy compositions. The 30% Havoc RES shred transforms neutral matchups into advantageous ones.
Shield generation creates self-sufficient survivability. At 20% DEF for 15s, properly built Scar generates shields absorbing 3,000-5,000 damage per activation—sufficient to negate most non-ultimate attacks.
Energy generation through Basic Attacks and skill hits maintains Liberation uptime at 60-70% during optimal rotations. The 100 Energy requirement is achievable within 8-10 seconds. Metaphors enhancing energy regeneration push uptime toward 80-90%.
Mobility & I-Frame Advantages
Scar's dodge provides ~0.4s invulnerability, sufficient to phase through telegraphed attacks. Dangerous Game metaphor rewards this with +40% CRIT Rate for 3s after dodging.
Movement speed during Basic Attacks exceeds most enemy tracking. The fourth hit provides forward momentum, allowing pressure while repositioning.
Chaos Domain's 10m radius provides substantial operational space. Players maintain max damage at medium range, reducing exposure to point-blank area attacks.
Energy Generation & Uptime Consistency
40 Energy Resonance Skill cost enables 2-3 activations per Liberation cycle. The 18s cooldown aligns with typical rotation lengths. Metaphors reducing cooldowns 20-30% enable near-permanent shield coverage.
100 Energy Liberation sits in medium-cost range. Properly sequenced rotations generate 100 Energy within 10-12s. Moonlit Clouds 5-piece (+10% Energy Regen) reduces this to 8-10s.
Energy generation consistency eliminates feast-or-famine patterns. Scar maintains steady damage between Liberation windows through Basic Attacks.
Best Metaphors Tier List for Depths V
Metaphor selection determines run success more than character builds or player skill at higher difficulties.
S-Tier Metaphors: Must-Pick Options
Perfect Alloy
- Deals 1000% DMG every 12s automatically
- Against 500,000+ HP bosses: contributes 50,000-80,000 damage (10-16% boss HP)
Crystal of Contradiction
- Reduces Liberation Energy requirements 50%
- For Scar's 100 Energy Liberation: enables activation every 5-6s
- 30% Havoc RES shred becomes constant, increasing overall damage 25-35%
Wings of Bane
- Reduces DEF 80%, grants +60% ATK
- 80% DEF reduction effectively doubles damage vs standard enemies
- Total damage increases: 200-250% vs high-DEF targets
Unordered Cube
- +80% Resonance Skill and Liberation DMG for 6s after landing 20 hits
- 20s internal cooldown
- Scar's Basic Attack generates 4 hits; 5 complete strings trigger buff
- Resonance Skill: 150% → 270% Havoc DMG
- Liberation: 300% → 540% Havoc DMG
Prosthetic Blade
- +24% Basic Attack DMG for 12s after Liberation
- Near-permanent uptime with Scar's rotation
- Basic Attack string: 360% → 446.4% Havoc DMG
A-Tier Metaphors: Strong Secondary Choices
Dangerous Game
- +40% CRIT Rate for 3s after dodging
- Dodge-canceling between attacks maintains near-permanent buff
- Transforms 50-60% base CRIT Rate into 90-100%
Alloy Conch
- Shields worth 30% max HP for 5s after dodging (5s CD)
- For 15,000-20,000 HP Scar: 4,500-6,000 damage shields every 5s
- Combined with Scar's innate shield: 7,000-11,000 damage absorption per rotation
Emergency Call
- Shields worth 120% max HP for 10s when HP drops below 30% (20s CD)
- For 18,000 HP builds: 21,600 damage shield
- Survives most ultimate attacks
B-Tier & Situational Metaphors
Turtle's Reverie
- Reduces reward drops 20%, cuts incoming damage 30%
- For learning Difficulty 5-6 mechanics
- Suboptimal once mechanics mastered
Wreck of Despair
- Increases reward drops 35%, reduces stamina recovery 50%
- Scar's shield generation compensates for reduced dodge frequency
- Accelerates material farming
Flat stat increases (+500 ATK, +15% HP) provide diminishing returns at higher gear levels. Use as filler when S/A-tier unavailable.
Metaphors to Avoid
- Percentage-based healing (5% HP per kill): minimal value in boss-focused content
- Long cooldown effects (500% damage every 30s): underperform vs shorter cooldowns
- Team composition conditionals (buffs when using Spectro characters): zero value in solo
Optimal Metaphor Combinations for Scar
Damage Amplification Synergies
Crystal of Contradiction + Prosthetic Blade
- 50% Liberation Energy reduction enables Liberation every 5-6s
- +24% Basic Attack DMG after Liberation maintains 100% uptime overlap
Perfect Alloy + Unordered Cube
- Perfect Alloy triggers every 12s automatically
- Unordered Cube activates after 20 hits (8-10s)
- Staggered procs ensure continuous supplemental damage
- Increases total damage output 40-60%
Wings of Bane + Dangerous Game
- 80% DEF reduction doubles base damage
- +40% CRIT Rate ensures crits during burst windows
- Against 2000 DEF bosses: increases effective damage 280-320% during crit-buffed windows
Multiplicative Stacking Example: Wings of Bane (+60% ATK, -80% target DEF) + Prosthetic Blade (+24% Basic Attack DMG) + Unordered Cube (+80% Skill/Liberation DMG) = 400-500% total damage increases during optimal windows.
Survivability & Sustain Pairings
Dual-Shield Strategy:
- Alloy Conch (30% max HP shield after dodge, 5s CD)
- Scar's Resonance Skill shield (20% DEF, 15s duration)
- Maintains 8,000-12,000 total shield value
Aggressive Offense + Failsafe:
- Wings of Bane for max damage
- Emergency Call as insurance vs one-shot mechanics
- 120% max HP shield (21,600 for 18,000 HP builds) activates automatically when HP<30%
Floor-by-Floor Selection Priority
Floors 1-3:
- Crystal of Contradiction (if available)
- Perfect Alloy (alternative priority)
- Defensive metaphors low priority
Floors 4-6:
- Prosthetic Blade (if Crystal of Contradiction secured)
- Unordered Cube (if Perfect Alloy secured)
- Alloy Conch or Emergency Call (if taking damage)
Floors 7+:
- Wings of Bane (highest priority if not obtained)
- Unordered Cube (secondary for burst damage)
- Avoid experimental picks—stick to proven combinations
Complete Scar Build Guide for Depths V
Best Weapons: 5-Star vs 4-Star

Unending Eclipse (5-star)
- 608 ATK, 45% DEF
- DEF bonus increases shield from 3000 to 4350 (at 1500 DEF)—45% improvement
- Exceeds 4-star weapons by 15-20% damage
4-Star Alternatives:
- Sacrifice 15-20% damage for accessibility
- Prioritize CRIT Rate substats (25-30%)
- Performs 10-15% worse than Unending Eclipse
- Viable for Difficulty 4-5 clears
For premium weapons and characters, Wuthering Waves top up through buffget offers secure transactions and fast delivery.
Echo Set Recommendations
Moonlit Clouds 5-piece
- +10% Energy Regen
- Outro +22.5% ATK (wasted in solo but doesn't detract)
- Reduces energy generation time: 10-12s → 9-10.8s
Dreamless Main Echo
- Massive burst damage
- Passive: +10% Havoc DMG
- Active: 4s transformation provides invulnerability
- Use during boss vulnerability windows and ultimate telegraphs
Main Stat Priorities:
- Slot 4: CRIT Rate or CRIT DMG
- Slot 3: Havoc DMG Bonus
- Slots 1 & 5: ATK%
Target Stats:
- 60-70% CRIT Rate (before Dangerous Game)
- 150-180% CRIT DMG
- Havoc DMG Bonus: 15-20% increase
Substats That Matter
CRIT Rate & CRIT DMG:
- Each 1% CRIT Rate = ~1.5-2% avg damage increase (at 150% CRIT DMG)
- Each 1% CRIT DMG = ~0.6-0.7% avg damage increase (at 60% CRIT Rate)
- Prioritize CRIT Rate until 60-70%, then shift to CRIT DMG
ATK%:
- +10% ATK = exactly 10% more damage
- Acceptable filler when CRIT substats unavailable
DEF%:
- Each 10% DEF = 10% stronger shields
- Aim for 1500-1800 total DEF to balance offense/defense
Forte Circuit Skill Priority
Resonance Liberation (highest priority)
- Lv1→Lv10: 300% → 450% damage multiplier
- Chaos Domain: 10s → 13s duration
Resonance Skill (second priority)
- Lv1→Lv10: 150% → 225% damage
- Shield: 20% DEF → 28% DEF (40% stronger)
Basic Attack (consistent value)
- Lv1→Lv10: 360% → 540% total string damage (50% increase)
- Constitutes 40-50% of total damage output
Scar Combat Rotation & Skill Usage
Optimal Damage Rotation

Full Sequence: Liberation → Resonance Skill → Basic Attack String x2 → Heavy Attack → Basic Attack String → Resonance Skill → Basic Attack String x2
Timing:
- Total rotation: 12-14s
- Chaos Domain duration: 10s
- Slight overlap with next Liberation window
Damage Breakdown:
- Liberation: 300% Havoc DMG + 30% RES shred
- Resonance Skill: 150% Havoc DMG + shield + 1.5s stun
- Basic Attack String x2-3: 720-1080% damage
- Heavy Attack: 180% Havoc DMG (insert when stamina >75%)
With Prosthetic Blade:
- Basic Attack String: 360% → 446.4% each
- Maintains 100% uptime with frequent Liberations
Resonance Liberation Timing
Prioritize damage window maximization over immediate usage. Against bosses with vulnerability phases (stagger, downed states), delay Liberation until windows open.
Energy Management:
- Basic Attack strings: 12-16 Energy per complete string
- Resonance Skill: 15-20 Energy per activation
- 100 Energy achievable within 10-12s active combat
With Crystal of Contradiction:
- 100 Energy → 50 Energy requirement
- Achievable within 5-6s
- Enables Liberation on cooldown (20s) vs waiting for energy
Heavy Attack Cancel Techniques
Dodge-cancel after damage application reduces animation time 30-40%.
Execution:
- Heavy Attack animation: 1.2s
- Dodge-cancel at 0.7s saves 0.5s per Heavy Attack
- Across 10 Heavy Attacks: saves 5s = one additional Basic Attack string
Stamina Management:
- Heavy Attack: 25 Stamina
- Dodge-cancel: 20 Stamina
- Total: 45 Stamina per canceled Heavy Attack
- With 100 base Stamina: 2 canceled Heavy Attacks before requiring regen
Defensive Maneuvers & Dodge Counter
Dodge Counter Timing:
- Symphony Rank: +100% Dodge Counter DMG
- Successful counters: 200-300% damage
- Triggers Dangerous Game (+40% CRIT Rate for 3s)
Counter Windows:
- Dodge 0.2-0.3s before attack impact
- Requires anticipation, not reaction
- Each enemy type has consistent telegraph timings
Alloy Conch Integration:
- 30% max HP shield after dodge (5s CD)
- Dodge-canceling between attacks maintains shield uptime
- Generates Dangerous Game CRIT Rate buffs simultaneously
Floor Progression Strategy
Floors 1-3: Building Foundation
Priorities:
- Metaphor foundation over combat optimization
- 70-80% node selections to metaphor opportunities
- Enemy HP low enough that suboptimal rotations still clear <60s
Core Metaphor Targets:
- Crystal of Contradiction (if appears)
- Perfect Alloy (alternative)
- Defensive metaphors low priority
Resource Nodes:
- Favor metaphor nodes over healing/reward nodes
- Healing provides minimal value when shields prevent damage
- Reward nodes offer minor gains vs metaphor synergy benefits
Floors 4-6: Scaling Damage
Memetic Tuning Selection:
- Nightmare Memes: increased difficulty + rewards (choose if confident)
- Reverie Memes: decreased difficulty + rewards (choose when learning)
Metaphor Synergy Completion:
- If Crystal of Contradiction secured: obtain Prosthetic Blade by floor 6
- If Perfect Alloy secured: add Unordered Cube
- Add one defensive metaphor if taking significant damage
Enemy Elites:
- Additional attack patterns
- Reduced vulnerability windows
- Increased aggression
- More Dodge Counter opportunities
Final Floors (7+): Boss Preparation
Metaphor Finalization:
- Wings of Bane (highest priority if not obtained)
- Unordered Cube (secondary for burst)
- Accept B-tier over wasting resources on rerolls
Resource Conservation:
- Avoid healing if HP >60%
- Preserve stamina between encounters
- Enter boss fights with full stamina for extended dodge sequences
Reroll Decisions:
- Only reroll if three completely unusable metaphors
- Accept B-tier over wasting resources
- Resources better spent on healing/buffs during boss
Enemy Type Counter Strategies
Humanoid Enemies:
- Fast attack strings, short vulnerability windows
- Counter after 3rd-4th hit in their strings
- Scar's Resonance Skill stun (1.5s) provides guaranteed damage windows
Beast-Type Enemies:
- Slower attacks, longer vulnerability windows, higher damage per hit
- Telegraph 1-2s in advance
- Dodge late in windup (0.2-0.3s before impact)
- Heavy Attacks more effective due to extended vulnerability
Elite Enemies:
- Combine patterns from multiple types
- Identify humanoid vs beast patterns
- Switch counter strategies mid-combo
- Use Scar's mobility to reposition between pattern types
Boss Encounter Tactics
Pattern Recognition & Attack Windows
Phase Transitions:
- Bosses enter invulnerability at 75%, 50%, 25% HP
- Delay Liberation if boss HP approaches thresholds
- Save Liberation for post-transition vulnerability windows
Ultimate Attack Telegraphs:
- Appear 3-5s before execution
- Deal 15,000-25,000 damage (one-shot without shields)
- Dreamless echo activation provides 4s invulnerability
- Emergency Call (120% max HP shield when HP<30%) as backup
Three-Hit Combo Patterns:
- First two hits: short recovery (0.5-0.8s)
- Third hit: extended vulnerability (1.5-2.5s)
- Dodge first two defensively, counter third for max damage
- Scar's full Basic Attack string fits within extended window
AoE Attacks:
- Cover 10-15m radius
- Telegraph 2-3s in advance (ground indicators/animations)
- Sprint to zone edges vs dodging (preserves stamina)
- Scar's mobility enables zone exit within 1-1.5s
High-Damage Phase Exploitation
Stagger States:
- Occur when bosses receive 15,000-25,000 damage within 3-5s
- Immobile for 5-8s, take +30% damage
- Coordinate Liberation with stagger
- Stagger (+30%) + Havoc RES shred (+42.8%) = +85% total damage amplification
Phase Transition Vulnerability:
- Last 3-5s after transformation animations
- Guarantee no boss attacks
- Execute: Liberation → Resonance Skill → Basic Attack String x3
- Deals 1800-2400% Havoc DMG before bosses resume
Dreamless Echo Timing:
- Use during high-damage phases
- Benefits from all active buffs (Chaos Domain, metaphors, stagger)
- Activating during stagger + Chaos Domain + Prosthetic Blade = 200-250% damage amplification
Survival Strategies for One-Shot Mechanics
Dreamless Echo Invulnerability:
- 4s duration completely negates damage
- Time activation to coincide with ultimate execution (not telegraph start)
Emergency Call Failsafe:
- 120% max HP shield when HP<30% (20s CD)
- For 18,000 HP builds: 21,600 shield
- Absorbs remaining damage if Dreamless mistimed
- Only saves one mistake per encounter phase
Positioning Strategies:
- Many ultimates target player position at telegraph start
- Sprint perpendicular to boss facing during telegraphs
- Exits attack hitboxes without using Dreamless
- Preserves cooldown for unavoidable mechanics
Time Management for Score Optimization
Clear Time Impact:
- Sub-3-minute clears earn max time bonuses
- Each 30s beyond 3min reduces score 5-10%
- Aggressive metaphors accelerate clears more than defensive
Damage Uptime:
- 50,000 DPS with 80% uptime = 40,000 effective DPS
- 60,000 DPS with 60% uptime = 36,000 effective DPS
- Scar naturally achieves 70-80% uptime
Phase Skip Thresholds:
- Deal 30-40% boss HP within first 30s
- Skips intermediate patterns, jumps to phase 2
- Saves 20-30s combat time
- Coordinate Liberation + Dreamless + Unordered Cube during opening
Advanced Tips & Common Mistakes
Metaphor Reroll Strategy
Floor 1:
- Reroll if three team-based metaphors (zero solo value)
- Early reroll prevents wasting selection impacting all floors
Floors 4-6:
- Accept B-tier over rerolling for S-tier
- B-tier provides 60-70% of S-tier value
- Preserves resources for healing/final-floor buffs
- Reroll cost (100-150 currency) exceeds value difference
Floors 7+:
- Never reroll unless three unusable metaphors
- Even C-tier provides some value
- Resources better spent on healing/buffs before boss
Resource Management: Risk vs Reward
Nightmare Meme Selection:
- Optimal for experienced players with optimized builds
- Reward rate increase accelerates farming
- Select when comfortable with mechanics
Reverie Meme Selection:
- Suits learning runs or undergeared characters
- Turtle's Reverie (-20% rewards, -30% damage taken)
- Enables first-time clears of higher difficulties
- Transition to Nightmare once mechanics mastered
Healing Node Usage:
- Only when HP <40% or shields depleted
- Healing at 60-70% HP wastes node selections
- Scar's shields often prevent HP loss entirely
- Reserve for recovery after mistakes
Score Maximization Beyond Clearing
Score Multipliers:
- Offensive metaphors increase damage 40-60%
- Reduces clear times 30-45s
- Translates to 10-15% score increases
Combo Maintenance:
- Gaps >5s between damage reset combo counters
- Scar's ranged Heavy Attacks maintain combo during repositioning
Perfect Clear Bonuses:
- No damage taken: 15-20% score increase
- Requires flawless execution
- Focus on consistent clears first, then pursue perfects
- Scar's shields make perfects more achievable
F2P-Friendly Alternatives
4-Star Weapons:
- Sacrifice 10-15% damage vs Unending Eclipse
- Viable for Difficulty 4-5 clears
- Prioritize CRIT Rate substats (25-30%)
- Choose unconditional stat bonuses over situational passives
Echo Farming:
- Target Dreamless for Havoc DMG main stats
- CRIT Rate/CRIT DMG substats
- Costs stamina, not premium currency
- Aim for 60% CRIT Rate, 150% CRIT DMG through substats
Trial Character Usage:
- Week 5 (Dec 12-18): Xiangli Yao, Yinlin, Lumi
- Difficulties 4-6 feature same characters
- Leverage trials during featured weeks for higher difficulty clears
FAQ
What are the best metaphors for Scar in Depths V?
Crystal of Contradiction (50% Liberation Energy reduction), Perfect Alloy (1000% DMG every 12s), and Prosthetic Blade (+24% Basic Attack DMG after Liberation) form the core S-tier combination. Crystal enables Liberation every 5-6s, Prosthetic provides permanent Basic Attack buffs. Wings of Bane (80% DEF reduction, +60% ATK) and Unordered Cube (+80% Skill/Liberation DMG after 20 hits) are powerful secondaries.
How do you solo Depths V with Scar?
Execute: Liberation → Resonance Skill → Basic Attack String x2 → Heavy Attack → repeat. Secure Crystal of Contradiction and Perfect Alloy during floors 1-3, add Prosthetic Blade and Wings of Bane during floors 4-6. Maintain shield uptime through Resonance Skill (18s CD) and Alloy Conch (shield after dodge, 5s CD). Use Dreamless during boss vulnerability windows and ultimate telegraphs for invulnerability.
Can Scar solo clear all difficulty levels?
Yes, Scar solos Difficulties 1-6 with proper metaphor selection and execution. Difficulty 6 requires optimized builds (60%+ CRIT Rate, 150%+ CRIT DMG, level 80+ character) and S-tier metaphor combinations. The 30% Havoc RES shred and self-sufficient shields make Scar ideal for solo vs team-dependent characters.
What weapon is best for Scar in solo Depths?
Unending Eclipse (608 ATK, 45% DEF) provides optimal performance. The 45% DEF bonus increases shield absorption from 3000 to 4350 (at 1500 DEF)—45% improvement. 4-star alternatives with CRIT Rate substats (25-30%) remain viable for Difficulties 4-5, sacrificing 10-15% damage.
What echoes should Scar use for Depths V?
Dreamless Main Echo for max damage through Havoc DMG scaling and burst active skill. Moonlit Clouds 5-piece (+10% Energy Regen) accelerates Liberation frequency. Main stats: CRIT Rate/CRIT DMG (slot 4), Havoc DMG Bonus (slot 3), ATK% (slots 1 & 5). Target 60-70% CRIT Rate, 150-180% CRIT DMG through substats.
Should you prioritize damage or survivability metaphors?
Prioritize damage metaphors (Crystal of Contradiction, Perfect Alloy, Wings of Bane) during floors 1-6—Scar's innate shields provide baseline survivability. Add one defensive metaphor (Alloy Conch or Emergency Call) during floors 4-6 if taking damage. Optimal ratio: 70-80% offensive, 20-30% defensive. Damage metaphors reduce encounter duration, indirectly improving survivability.
_39648.jpg)


