

Related articles


Genshin Impact Elemental Gauge Theory: Complete Guide
Elemental Gauge Theory is the hidden math system behind every elemental reaction. It defines aura strength (measured in Elemental Units: 1U, 2U, 4U), how long auras persist, and when characters can reapply elements (Internal Cooldown). Master the 2.5-second ICD timer, the 3-hit rule, and gauge consumption ratios—and you'll go from inconsistent reactions to optimized, rotation-locked meta damage.
Buffget
What Is Elemental Gauge Theory?
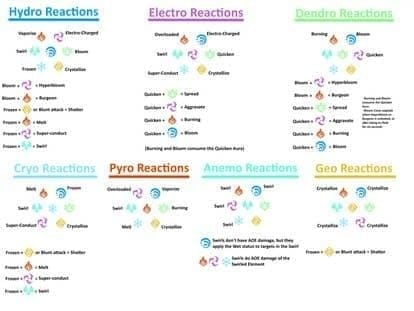
Every elemental reaction in Genshin Impact—Vaporize, Hyperbloom, Freeze—runs on this framework, whether you know it or not. The system assigns Elemental Units (EU) to every elemental application. These units determine aura strength and duration. When a second element hits an enemy carrying an aura, fixed gauge consumption ratios determine how much gets eaten.
For Spiral Abyss and meta team building, this is why some rotations feel smooth and reaction-consistent while others feel random. The math is always running—gauge theory just makes it visible.
Want the characters to execute these rotations? Discount Genesis Crystals top up by UID through buffget offers competitive pricing and fast delivery to build your roster efficiently.
Elemental Units (EU): Measuring Aura Strength
1U, 2U, and 4U — What They Actually Mean

Every elemental application is classified as 1U, 2U, or 4U. But a 20% aura tax applies when an element first lands as an aura:
- 1U attack → 0.8U aura
- 2U attack → 1.6U aura
- 4U attack → 3.2U aura
This tax is what many intermediate players miss when calculating aura persistence.
How Long Does an Aura Last?
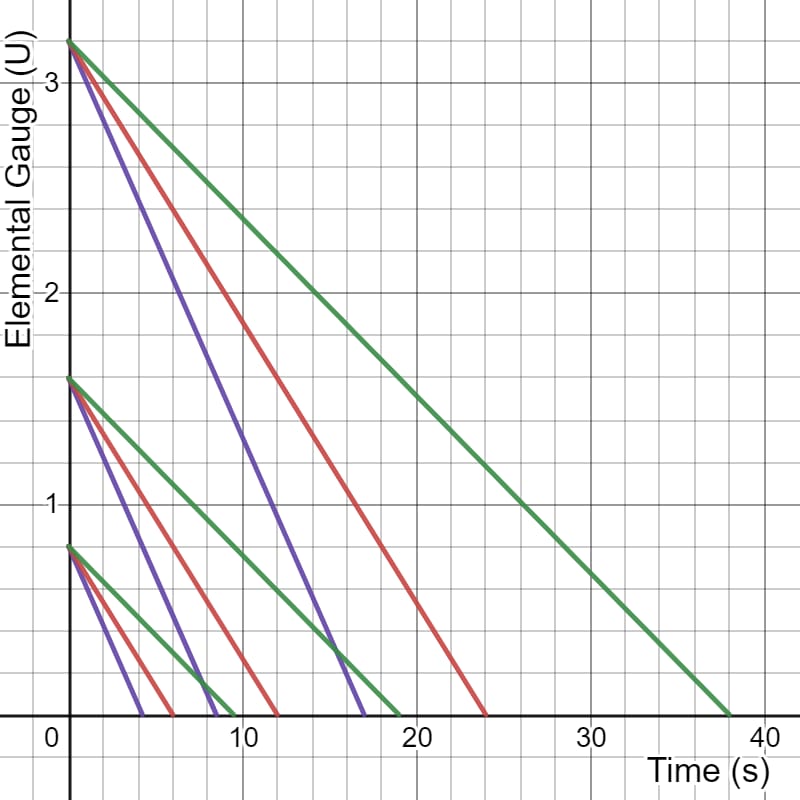
Formula: (2.5 × Gauge Units + 7) seconds
- 0.8U aura → 9.5 seconds
- 1.6U aura → 12 seconds
- 3.2U aura → 17 seconds
Pro tip: Applying 1U then 2U of the same element stacks to a 1.6U aura lasting 19 seconds—longer than either application alone. Note: Since Version 3.0, Pyro no longer inherits decay from previous aura stacks, so Pyro aura management works differently from other elements.
Real Character EU Examples
- Childe (melee stance): 2U Hydro — creates a 1.6U aura with a 12-second window, one of the strongest Hydro auras available
- Xiangling Pyronado: 1U Pyro with no ICD — every tick applies Pyro independently
- Ganyu Frostflake Arrows: No ICD Cryo — enables consistent Freeze or Melt setups
Internal Cooldown (ICD): The Rule Controlling Every Reaction
The 3-Hit Rule and 2.5-Second Timer
ICD prevents a character from applying their element on every hit. Standard rule: after an elemental application, no reapplication until either 2.5 seconds pass OR 3 hits land—whichever comes first.
This dual-condition is what makes ICD counterintuitive. A rapid-hitting character exhausts the 3-hit window in under a second, resetting the timer early. A slow hitter resets via the 2.5-second timer before landing 3 hits.
Characters With No ICD — Reaction Powerhouses
These characters apply their element on every hit or tick, making them the backbone of reaction-focused teams:
- Xiangling: Pyronado and Guoba both apply 1U Pyro with no ICD — every tick is a potential reaction trigger
- Xingqiu: Elemental Skill — no ICD Hydro
- Kokomi: Elemental Skill — no ICD Hydro
- Kazuha: Elemental Burst — no ICD Anemo, enabling consistent Swirl
- Bennett: Elemental Skill — no ICD Pyro
- Ganyu: Charged shots and Frostflake Arrows — no ICD
And Plunging Attacks across all characters have zero ICD — why plunge-based rotations (Xiao, certain Hu Tao setups) apply elements more freely.
High-ICD Characters: Know the Limits
- Yelan Burst: 2-second / 3-hit ICD
- Raiden Elemental Skill: 0.9-second timer ICD — faster reset than standard
- Fischl (Oz): 5-second / 4-hit ICD — one of the slowest application rates in the game
- Nahida Elemental Skill: 1-second timer ICD — relatively frequent Dendro application
- Hu Tao Charged Attacks: 0.5-second ICD — one of the fastest Pyro appliers in melee range
One often-missed rule: Claymore and Sword users share ICD between Normal and Charged Attacks. Polearm, Bow, and Catalyst users maintain separate ICDs for each attack type. This is why Hu Tao (Polearm) can alternate Normal and Charged Attacks to maximize Pyro application.
Aura vs. Trigger: Rotation Order Is Everything
One element must already exist on the enemy (the aura); a second element lands to fire the reaction (the trigger). Whoever applies first is the aura applier. Rotation order determines which character gets the reaction multiplier.
In Hu Tao Vaporize: Xingqiu applies Hydro first (aura), Hu Tao's Charged Attacks trigger Vaporize. Reverse the order and Hu Tao becomes the aura applier — you get Reverse Vaporize with a different multiplier.
- Forward Vaporize (Pyro triggers on Hydro aura): Pyro character deals 1.5× damage
- Reverse Vaporize (Hydro triggers on Pyro aura): Hydro character gets 2× multiplier
Knowing which role each character plays is fundamental to building around amplifying reactions.
Need the characters to run these precise rotations? Top up Genshin Impact Genesis Crystals fast on buffget with secure transactions and wide game coverage.
Gauge Consumption Math: How Reactions Eat Auras
Fixed Consumption Rates by Reaction Type
- Forward reactions (Forward Vaporize, Forward Melt): consume 2.0× trigger's gauge from aura
- Reverse reactions: consume 0.5× trigger's gauge
- Overloaded: consumes 1.0× gauge
- Swirl: consumes 0.5× gauge
- Crystallize: consumes 0.5× gauge
This explains why Reverse Vaporize needs a ~2:1 Hydro-to-Pyro gauge ratio — Hydro aura depletes at 0.5× rate, so a smaller Hydro application sustains multiple Pyro triggers. Forward Melt needs ~3:1 Cryo-to-Pyro to maintain the aura through repeated Pyro triggers.
Transformative Reactions: Special Rules
Transformative reactions (Overloaded, Superconduct, Hyperbloom, Swirl) don't scale with triggering character stats — damage is fixed by Elemental Mastery and level. But gauge consumption still applies:
- Electro-Charged: Consumes 0.4U per second as a tick-based reaction, draining both Hydro and Electro auras simultaneously
- Swirl: Has a 0.5-second ICD on damage — rapid Kazuha Burst procs are spaced to prevent overlap
- Burning: Re-applies 1U Pyro every 2 seconds, creating a self-sustaining aura that can interfere with other reaction setups
Coexisting Auras
Most elements can't coexist — a second element either reacts with or overwrites the first. Exception: Dendro + Electro create the Quicken aura, enabling both Spread and Aggravate without consuming the aura in the traditional sense.
Dendro and the Post-Sumeru Meta: Quicken Changes the Model
Dendro introduced the Quicken aura — a fundamentally new elemental state. When Dendro and Electro coexist, they create a Quicken aura that persists independently. Subsequent Electro hits trigger Aggravate; subsequent Dendro hits trigger Spread — both without consuming Quicken at the standard rate.
This breaks the traditional aura-trigger model. In Quicken teams, both Dendro and Electro characters simultaneously act as aura appliers and reaction triggers — why Nahida + Raiden or Nahida + Fischl generate such high reaction frequency.
Hyperbloom follows more standard gauge rules: Dendro seeds from Bloom (Dendro + Hydro) are detonated by Electro, consuming the seed rather than an elemental aura. Nahida's 1-second ICD makes her one of the most efficient Dendro appliers for sustaining Bloom seed generation.
Meta Team Case Studies: Gauge Theory in Real Rotations
Hu Tao Vaporize: Xingqiu's no-ICD Hydro creates a persistent aura. Hu Tao's 0.5-second ICD allows frequent Pyro triggers. The 0.5× reverse consumption rate means Xingqiu's Hydro sustains through multiple Hu Tao hits — why this pairing is so efficient.
Freeze (Ayaka): Kokomi's no-ICD Hydro ensures the aura is always present. Ayaka's Cryo triggers Freeze consistently. Key: maintain enough Hydro aura strength so Cryo doesn't fully consume it before the next Hydro application.
Raiden National: Raiden's 0.9-second ICD allows faster Electro application than standard. Combined with Xiangling's no-ICD Pyro and Xingqiu's no-ICD Hydro, the team generates Overloaded and Vaporize in rapid succession. Overloaded consumes 1.0× gauge, so Xingqiu must refresh Hydro aura frequently.
Common Gauge Theory Mistakes (And Fixes)
Mistake 1: More hits = more reactions. ICD prevents this. A character hitting 10 times in 2 seconds applies element only on hits 1, 4, 7, and 10 — not every hit.
Mistake 2: Overwriting your own aura. Applying the same element twice quickly can refresh the timer but wastes application potential. In Pyro teams, applying Pyro before the enemy's Hydro aura is consumed turns your DPS into an aura applier instead of a reaction trigger.
Mistake 3: ICD misalignment in Vaporize teams. If your Hydro applier's ICD creates coverage gaps, Hu Tao's Charged Attacks hit a Pyro-aura enemy — no reaction or a weaker one.
Mistake 4: Ignoring AoE gauge differences. Each enemy carries its own independent aura. A single Swirl or AoE application must build and maintain separate auras per target, diluting reaction consistency in large groups.
4-Step Rotation Audit Checklist
- Identify your aura applier. Confirm their EU value (1U, 2U, 4U). Calculate actual aura strength after the 20% tax. Estimate duration using (2.5 × GU + 7).
- Map your trigger character's ICD. Standard 2.5s/3-hit, or custom (Raiden's 0.9s, Hu Tao's 0.5s)? Count reaction-eligible hits per rotation.
- Align rotation timing. Aura must be applied before the trigger character's first hit. Confirm aura duration covers the full damage window.
- Validate in-game. Reaction procs should appear consistently. Random Vaporize procs = aura consumed faster than refreshed. Fix: add a second Hydro applier or shorten the trigger window.
FAQ: Elemental Gauge Theory in Genshin Impact
Q: What is Elemental Gauge Theory and why does it matter? It's the math system governing how elemental auras are applied, how long they last, and how much is consumed during reactions. It directly determines how consistently and powerfully your team triggers reactions.
Q: How does the 3-hit ICD rule work? After applying an element, no reapplication until 3 hits land or 2.5 seconds pass — whichever comes first. Rapid hitters exhaust the 3-hit window fast; slow hitters reset via the timer.
Q: Which no-ICD characters matter most? Xiangling, Xingqiu, Kokomi, Kazuha, Bennett, and Ganyu. No ICD means every hit or tick can apply their element — far more frequent reactions, essential in meta teams.
Q: Forward vs. Reverse Vaporize — what's the gauge difference? Forward Vaporize consumes 2.0× the trigger's gauge from the aura. Reverse Vaporize consumes only 0.5×. Hu Tao's Reverse Vaporize setup sustains more reactions per rotation because the Hydro aura depletes slowly.
Q: Can two elemental auras coexist on one enemy? Generally no. The exception is the Quicken aura (Dendro + Electro), which persists and enables both Spread and Aggravate without being fully consumed.
Q: Why do my reactions feel inconsistent with the right team? Most common causes: ICD misalignment (trigger hits during a window when no element applies), aura depletion (consumed faster than refreshed), or wrong rotation order (trigger element applied before aura element). Run the 4-step checklist above to diagnose.