

Related articles


HSR Relic Farming Guide: Optimal Crit Ratio & Break Effect Caps
Quick Answer: Stop farming relics when Crit Rate and Crit DMG hit the 1:2 ratio — target 65–70% Crit Rate / 130–140% Crit DMG for most DPS, or 160–200% Break Effect for supports and 360%+ for dedicated Break carries. Beyond these thresholds, returns rarely translate into meaningful content clears. Here's the exact math, the numbers, and a practical framework for every piece you drop.
Buffget
Why Stopping Points Matter
Most mid-to-late game players fall into the same trap: they clear Memory of Chaos Star 9 with decent relics, then burn another 3,000 Trailblaze Power chasing marginally better sub-stats. The actual damage gap between good enough and near-perfect relics is often just 8–12% in real combat — not enough to flip a failed clear.
Trailblaze Power regenerates 1 point every 6 minutes, capping at 300 daily. Each Cavern of Corrosion Difficulty 3 run costs 40 Trailblaze Power and guarantees one 5-star relic — roughly 7 per day. But the odds of that relic having the right main stat, correct sub-stats, and favorable upgrade rolls simultaneously are extremely low. Hard stopping points protect this finite resource.
The content-clearing reality:
- Memory of Chaos 9–12 needs 200–250% Break Effect for Break-oriented teams
- Apocalyptic Shadow demands 360%+ Break Effect for maximum Super Break damage
- Crit DPS characters like Acheron, Dr. Ratio, and Feixiao clear endgame comfortably at 65% Crit Rate / 130% Crit DMG — not at theoretical maximums
For players who want consistent resources to sustain farming, cheap Honkai Star Rail Express Supply Pass through buffget offers competitive pricing and fast delivery to keep progression steady.
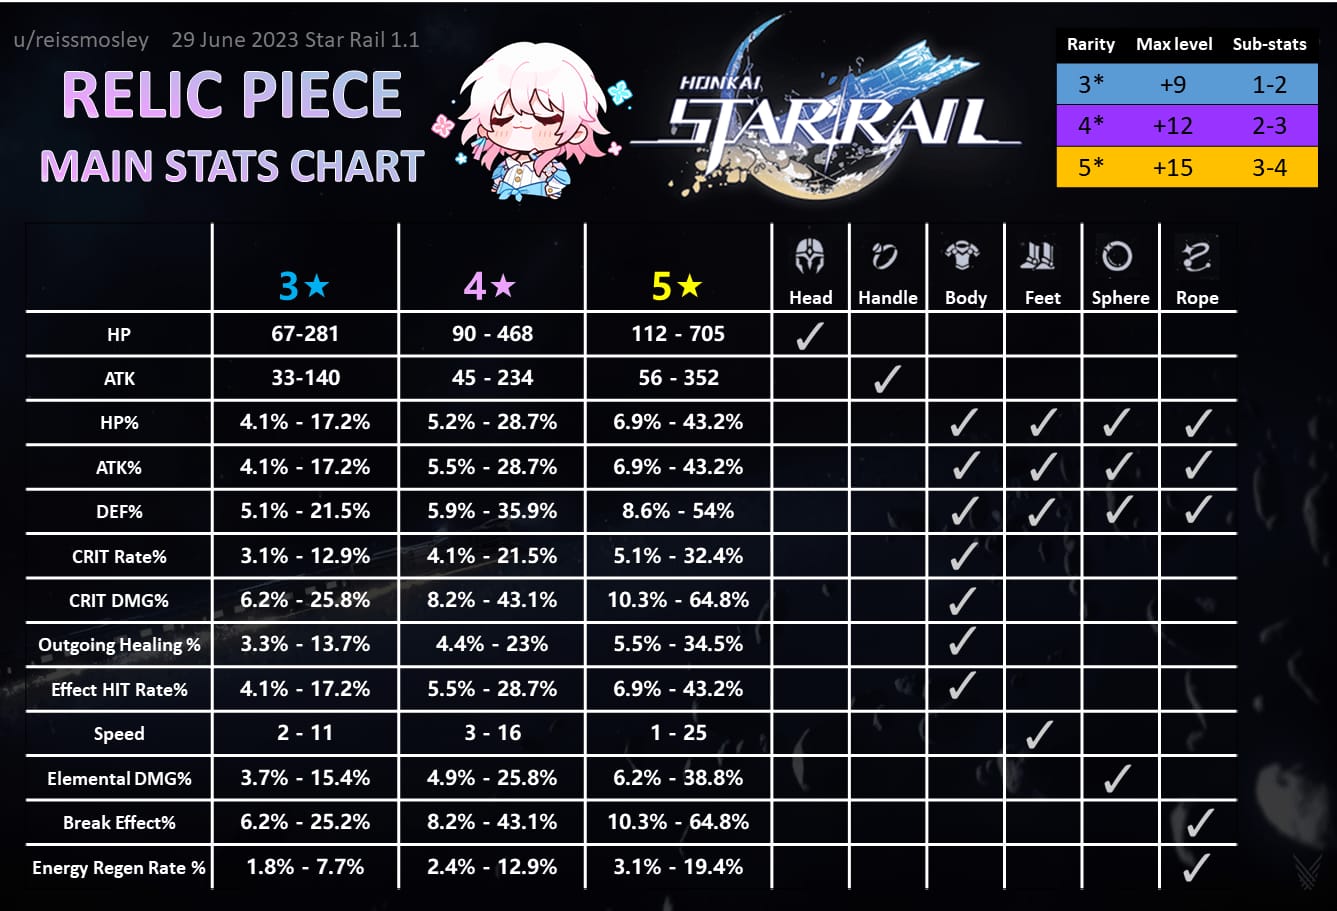
How Relic Sub-Stats Work
Every 5-star relic starts with 4 sub-stats. Enhancements at +3, +6, +9, +12, and +15 give 5 additional upgrade rolls — each randomly selects one existing sub-stat and adds a value within its roll range.
5-star sub-stat roll ranges:
- Speed: 2.0–2.6 per roll
- Crit Rate: 2.5–3.2% per roll
- Crit DMG: 5.1–6.5% per roll
- Break Effect: 5.8–6.9% per roll
A relic consistently rolling at the Crit DMG floor (5.1%) vs. ceiling (6.5%) represents a 27% difference per roll — that compounds significantly over 5 upgrades.
Pro tip: Enhance promising relics to +4 first. If desired sub-stats (Break Effect, Speed, Crit Rate, Crit DMG) appear in the roll, continue to +8. Roll again? Push to +12. This staged approach prevents wasting materials on pieces that reveal poor patterns early.
The Math Behind the 1:2 Crit Ratio
The 1:2 Crit Rate to Crit DMG ratio isn't arbitrary — it emerges directly from the damage formula: Expected Damage = 1 + (Crit Rate × Crit DMG).
At equal total stat investment, three distributions compared:
- 50% CR / 100% CDMG: Multiplier = 1 + (0.50 × 1.00) = 1.50
- 70% CR / 140% CDMG: Multiplier = 1 + (0.70 × 1.40) = 1.98
- 90% CR / 180% CDMG: Multiplier = 1 + (0.90 × 1.80) = 2.62 — but requires far more total sub-stat investment
The 70/140 benchmark is achievable through main stats, Light Cone passives, Trace bonuses, and sub-stats combined. It's the sweet spot where investment and output align.
Character-specific note: Boothill's Ascension 2 grants up to 30% Crit Rate and 150% Crit DMG based on Break Effect — meaning his Crit sub-stat targets are dramatically lower than standard DPS. You're building Break Effect to unlock the Crit, not stacking Crit directly.
Crit Sub-Stat Stopping Points: Three Tiers

Minimum Viable (Floor):
- 50–55% Crit Rate / 100–110% Crit DMG
- Clears Memory of Chaos 1–6 and story content
- Achievable within 2–3 weeks at Trailblaze Level 40+
Comfortable Stopping Point (Sweet Spot):
- 65–70% Crit Rate / 130–140% Crit DMG
- Clears Memory of Chaos 9–12 and Apocalyptic Shadow reliably
- Where the vast majority of players should stop and redirect resources
BiS Threshold (Diminishing Returns):
- 75%+ Crit Rate / 150%+ Crit DMG
- Marginal improvement over the comfortable tier in actual content
- Requires 3–5x more Trailblaze Power than reaching the comfortable tier
Character-specific lean: Dr. Ratio's follow-up mechanics amplify Crit DMG, making 65% CR / 150% CDMG marginally more efficient than the standard 70/140 split for his specific damage formula.
Break Effect Thresholds Explained
Break Effect scales Super Break damage with a direct multiplier. At 360%, the Super Break multiplier reaches approximately 4.6x — why Firefly and Rappa specifically target this number for Apocalyptic Shadow.
Key Break Effect benchmarks:
- 160%: Activates Iron Cavalry Against the Scourge 4-piece second bonus — ignores an additional 15% DEF on top of the 10% at 150%. Minimum target for Iron Cavalry users.
- 180–200%: Optimal for support and harmony units. Ruan Mei provides 50% Weakness Break Efficiency and 25% Break Effect to the team; at 250% personal Break Effect, she grants allies an additional 30% Break Effect.
- 200–250%: Required for Memory of Chaos 9–12 with Break-oriented teams.
- 360%+: Required for Apocalyptic Shadow and maximum Super Break output.
Boothill exception: Optimal personal target is 200–250% Break Effect. His Ascension 2 passive converts Break Effect into Crit stats — stacking beyond 250% yields diminishing returns compared to other offensive sub-stats.
Set bonuses reduce your sub-stat farming target:
- Talia: Kingdom of Banditry 2-piece: 16% Break Effect + 20% bonus at 145+ Speed
- Watchmaker, Master of Dream Machinations 4-piece: 30% Break Effect to all allies for 2 turns after Ultimate
Factor these in — your actual sub-stat farming target is lower than the raw threshold number.
For players building multiple Break Effect characters simultaneously, buy Oneiric Shard top up on buffget for secure, fast transactions that support farming efficiency without interruption.
Expected Value: How Many Runs to Hit Each Threshold
A 5-star relic has 4 initial sub-stats drawn from ~10 possible options. Chance of one specific desired sub-stat appearing: ~40%. Chance of two specific desired sub-stats both appearing: ~13–17%.
Trailblaze Power investment by tier:
- Minimum threshold (50/100): 400–600 TP (10–15 runs) with favorable main stat selection
- Comfortable threshold (65/130): 1,200–2,000 TP (30–50 runs) on average
- BiS threshold (75/150+): 4,000–8,000+ TP (100–200+ runs)
The Self-Modeling Resin system allows 2 syntheses per month at 3 units per relic reroll. Reserve this for locking correct main stats on body, feet, planar sphere, and link rope — not sub-stat fishing, where variance is too high to justify the cost.
The staged enhancement approach (+4 → +8 → +12 evaluation gates) reduces wasted enhancement materials by approximately 40–60% compared to enhancing every piece to +15 blindly.
Practical Decision Framework: Keep or Trash?
Step 1 — Main Stat Check: Wrong main stat? Salvage immediately, regardless of sub-stats.
- Body (DPS): Crit Rate or Crit DMG
- Feet: Speed or ATK%
- Planar Sphere: correct DMG type
- Link Rope: Break Effect% or Energy Regeneration Rate
Step 2 — Sub-Stat Count: Count desired sub-stats present at base.
- Crit DPS wants: Crit Rate, Crit DMG, ATK%, Speed
- Break carry wants: Break Effect, Speed, ATK%, Effect Hit Rate
3 out of 4 desired sub-stats → enhance to +4. 2 out of 4 → only proceed if both are highest-priority stats.
Step 3 — Roll Quality at Gate Points: At +4, check which sub-stat upgraded. Desired sub-stat rolled? Continue to +8. Filler sub-stat (flat HP, flat DEF)? Stop unless your equipped relic is significantly worse.
Instant trash — red flags:
- Flat HP + flat DEF both present on a DPS piece
- Effect Hit Rate on a character with no debuffs
- Speed sub-stat on a character whose Speed breakpoint is already met
Worth pushing to +15 — green lights:
- Crit Rate + Crit DMG + Speed + ATK% on a DPS body piece
- Break Effect + Speed + ATK% on a Break carry feet piece with correct main stat
On the in-game Relic Scoring System: Useful rough filter, but it weights sub-stats generically rather than character-specifically. A 40+ score is worth a second look — but always cross-reference against your character's actual stat needs.
Common Misconceptions
More Crit Rate is always better than Crit DMG. False. Beyond the 1:2 ratio, additional Crit Rate provides less expected damage than equivalent Crit DMG investment. At 80% Crit Rate, you're overcapping relative to the formula's optimal distribution — those rolls generate more damage as Crit DMG or ATK%.
You need perfect relics to clear Memory of Chaos. The comfortable threshold (65% CR / 130% CDMG; 200–250% Break Effect) clears Memory of Chaos 9–12 reliably. Perfect relics improve clear speed marginally — they don't unlock content that good-enough relics can't.
Break Effect has no meaningful ceiling. At 360%, the Super Break multiplier reaches 4.6x and growth flattens. Practical ceilings: 360% for Break DPS, 250% for supports. Farming beyond these is inefficient.
The in-game Relic Score tells the whole story. It doesn't account for character-specific synergies, Speed breakpoints, or set bonus interactions. Use it as a starting filter, not a final verdict.
Meta Shifts & Patch Freshness
New character releases shift farming priorities. Boothill's Break Effect → Crit conversion mechanic changed how players farm for him versus Firefly or Rappa. When new characters release, check whether existing relic sets can be redistributed before farming entirely new pieces.
Signs your relics are holding you back:
- Failing 3 stars in Memory of Chaos 9+ despite correct team composition
- Break Effect below 160% on Iron Cavalry users after set bonuses
- Crit Rate below 50% after Light Cone and Trace contributions on a Crit DPS
Speed interaction worth noting: Firmament Frontline: Glamoth 2-piece grants 12% ATK and 12–18% DMG bonus at 135–160 Speed — meaning Speed breakpoints directly interact with set bonus activation, shifting Speed sub-stat priority for faster DPS compositions.
Patches drop approximately every 6 weeks and can introduce new Cavern of Corrosion relic pools, new characters with unique stat interactions, and rebalanced endgame difficulty. Revisit these thresholds after each major version update.
FAQ
Q: What's the ideal Crit Rate and Crit DMG ratio in Honkai Star Rail? 1:2 — for every 1% Crit Rate, target 2% Crit DMG. Practical sweet spot: 65–70% Crit Rate / 130–140% Crit DMG for most DPS.
Q: What's the minimum Break Effect for Firefly and Rappa? 360%+ for Apocalyptic Shadow to hit the 4.6x Super Break multiplier. Memory of Chaos 9–12 is clearable at 200–250%, but 360% is the endgame benchmark for dedicated Break DPS.
Q: What are the 5-star relic sub-stat roll values for Crit and Break Effect? Crit Rate: 2.5–3.2% per roll. Crit DMG: 5.1–6.5% per roll. Break Effect: 5.8–6.9% per roll. Upper-end rolls are significantly more valuable than floor rolls.
Q: How many Trailblaze Power runs does it take to get good relics? Comfortable Crit threshold (65/130): 30–50 runs, averaging 1,200–2,000 TP. BiS relics: 100–200+ runs. Each Difficulty 3 run costs 40 TP and guarantees one 5-star relic.
Q: When should I stop farming and push endgame content? Stop and attempt endgame when you hit the comfortable threshold: 65% CR / 130% CDMG for Crit DPS, or 200–250% Break Effect for Break carries targeting Memory of Chaos. Return to farm only if you're failing clears despite correct team composition.
Q: Does Break Effect have a soft cap? Yes. Practical soft cap for Break DPS is 360% — Super Break multiplier growth flattens beyond this. For supports, 250% is the effective ceiling where team-wide Break Effect bonuses like Ruan Mei's are fully activated.