

Related articles


Northridge Hotel Rush Routes 2026: Safe Spawns & Loot Guide
Master efficient rush routes in Northridge Hotel with safe spawn strategies, premium weapon crate locations across all four buildings, and proven extraction tactics maximizing loot value while minimizing risk. Covers optimal movement patterns, stamina management, and route adaptations for the January 16, 2026 Melee-Only event and standard raids.
Buffget
Understanding Northridge Hotel Rush Routes
Rush routes are optimized movement paths securing high-value loot while managing PvP encounters and extraction timing. The 40-minute raid timer creates strategic windows—extraction activates at 10 minutes requiring a 2-minute completion window. Effective routes balance loot density, movement efficiency, and survival probability.
Northridge Hotel features four buildings (A, B, C, D) containing 8 safes: 3 in Building A, 2 in Building B, 2 in Building C, 1 in Building D. Each building presents unique loot opportunities and risk profiles influencing route selection.
For maximized raid efficiency, buy Arena Breakout Bonds through buffget for competitive pricing and instant delivery.
What Defines Effective Rush Routes
Effective routes optimize three metrics: time-to-loot (spawn to first container access), survival rate (successful extraction percentage), and profit margin (loot value minus loadout cost). Best routes achieve first container access within 90-120 seconds while maintaining detection avoidance.
Movement Speed Detection Ranges:
- Sprint: 25+ meters
- Walk: 12-15 meters (14-18m in Building A corridors with +20% modifier)
- Crouch-walk: 5-8 meters
Stamina management is critical. Each melee swing depletes 10-15% stamina with 3-5 second regeneration. Movement speed reduces 40% below 60% stamina. Carry 2-3 stamina consumables per raid for emergency reserves.
Why Northridge Hotel Remains Meta in 2026
Level 11 minimum access filters inexperienced players, creating predictable threat environments. The January 16, 2026, 05:00 UTC+0 Melee-Only event introduces new tactical considerations with 5 free tickets for risk-free experimentation.
Frade Lee spawns at Cable Car Station 2-4 minutes after raid start with 3-5 minute patrol cycles. This predictable behavior enables route planning around engagement windows.
Detection Mechanics:
- Well-lit areas: 15-20 meters
- Dark corridors: 8-12 meters
- Crouching: 30% detection reduction
Rush Route Fundamentals: Speed vs Safety
Speed Run (15-20 minutes):
- Enter Hotel Main Entrance immediately
- Loot Building A second floor 3 safes (5-7 min)
- Execute Spot #1 ambush (Building A corridor corner, 2-3m from corner)
- Extract at 10-minute window
- Profit: 150,000-200,000 koens, 70% survival rate
Maximum Value (30-35 minutes):
- Delay entry 3-5 minutes avoiding spawn rushes
- Loot Buildings C, D safes (8-12 min)
- Clear Building B at 15-20 minutes
- Execute Spots #5/6 ambushes (Connector Hallway, Central Pool)
- Loot Building A at 25-30 minutes
- Extract at 32-35 minutes
- Profit: 300,000-400,000 koens, 45% survival rate
Complete Spawn Point Analysis
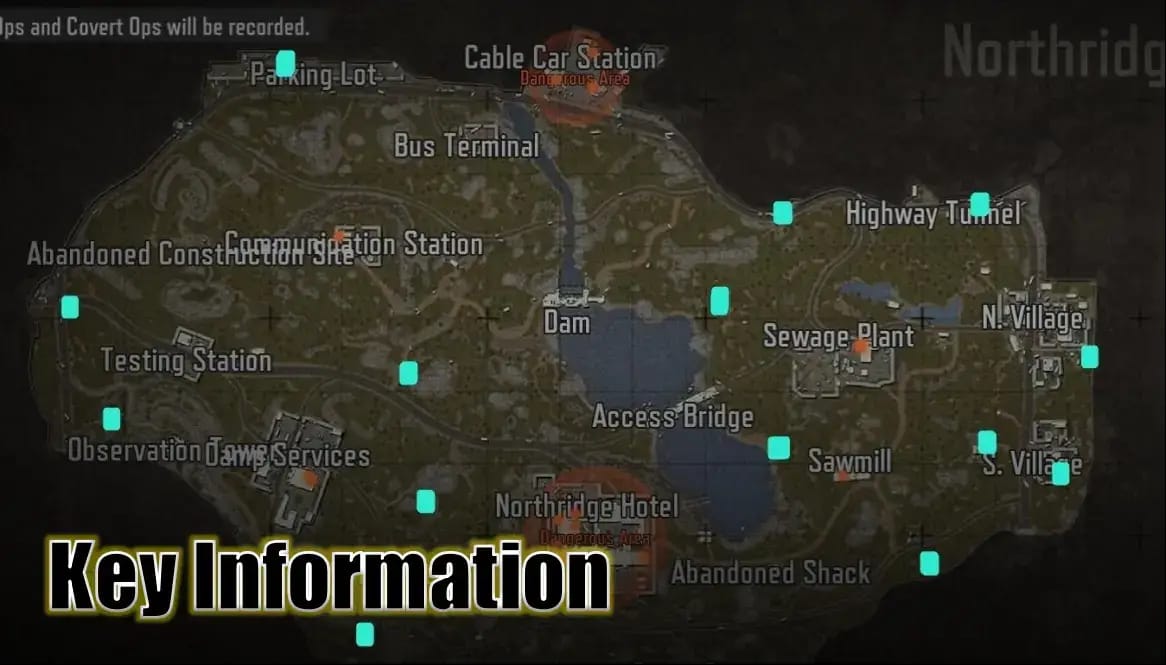
Spawn location determines initial route options and first-contact probability. Identify spawn within 10 seconds for immediate route commitment.
Building A Spawn: Corridor Advantages
Building A spawns position players 35-45 seconds sprint from Hotel Main Entrance with immediate access to 3-safe cluster. Fastest route to concentrated loot but attracts aggressive players.
Optimal Route:
- Sprint to second floor (45-60s)
- Crouch-walk final 10m to corner safe
- Loot 3 safes rapidly (90-120s total)
- Establish Spot #1 ambush (2-3m from corridor corner)
- Wait for Frade Lee first pass (5-7 min)
- Execute 2-3 rapid strikes, retreat for stamina regen
- Extract via Hotel Main Entrance (requires Health >70%, stamina >60%)
Building A corridor has 14-18m walking detection—crouch-walk mandatory for final approach. Carry Level 3 Armor to absorb 2-3 Frade Lee strikes.
Building B Spawn: Side Wall Positioning
Building B spawns offer balanced access to 2 safes with lower competition. Side Wall Hole (Spot #2) provides natural ambush position 1-2m inside with visual concealment.
45-60 seconds sprint from Hotel Main Entrance. Execute Spot #2 ambushes during 8-15 minute window when Frade Lee patrols through Side Wall corridor.
Crouch inside hole reduces detection to 8-12m in dark corridors. Standing increases to 15-20m. Maintain crouch until target confirmation.
Building C Spawn: Connector Hallway Strategy
Building C spawns provide access to 2 safes plus premium private lounge key (third floor). Key costs 70,000-90,000 koens with 10 durability, unlocks room with 3-4 military PCs and one safe—exceptional value density.
Connector Hallway (Spot #5) serves as natural chokepoint with 5-8m crouch-walk detection. Prioritize private lounge key acquisition before safe looting (additional 60-90s).
For consistent success, consider Arena Breakout top up services from buffget for secure transactions and excellent customer service.
Building C to Hotel Main Entrance: 45-60s sprint or 90-120s crouch-walk. Default to crouch-walk if gunfire detected.
Building D Spawn: Movie Room Entrance
Building D spawns position players near single safe and Spot #3 (Movie Room Entrance, 3-4m inside). Lowest loot density but highest safety profile—ideal for conservative players.
Isolated position creates natural separation from spawn rushes. Delay entry 3-5 minutes, observe PvP resolution before committing to high-traffic areas. 10-15 minute window at Spot #4 (Hotel Main Entrance Stairwell second-floor landing) becomes accessible after Building D looting.
Adopt maximum value strategies using 3-5 minute delay to monitor audio cues and identify active engagement zones.
Spawn Identification Within 10 Seconds
Building A Indicators:
- Second-floor corridor railings visible
- Corner room architecture
- Main stairwell sounds proximity
Building B Indicators:
- Side wall hole visible within 5m
- Underground parking access nearby
- Concrete pillar formations
Building C Indicators:
- Connector hallway immediately visible
- Third-floor stairwell access within 10m
- Central pool water ambient sounds
Building D Indicators:
- Movie room entrance signage
- Isolated positioning (no buildings within 20m)
- Carpet flooring texture
Audio cues supplement visual ID. Ambient sounds create unique acoustic signatures. Experienced players achieve audio recognition within 3-5 seconds.
Premium Weapon Crate Locations
8 safes across four buildings create distinct loot clusters influencing route efficiency.
Building A High-Density Cluster
3-safe concentration on second floor represents highest loot density per square meter. Corridor corner positioning requires sequential looting with constant threat awareness.
Looting Sequence:
- Approach via main stairwell (crouch-walk final 15m)
- Clear corner room safe first
- Advance to corridor mid-point safe
- Complete at far corridor safe
- Establish Spot #1 ambush immediately
- Total time: 90-120s
Equip Universal Keycard Chain (single inventory slot) for all safes without individual key management, saving 10-15s per container.

Building B Moderate-Value Distribution
2-safe distribution creates balanced risk-reward. Positioning near Side Wall Hole enables combined looting and ambush prep. Loot both safes within 60-90s before establishing ambush for Frade Lee patrols.
Building C Safes and Private Lounge
2 standard safes plus private lounge key location create three-tier opportunity. Key's 70,000-90,000 koen value and 10 durability make it priority target. Third-floor location requires additional 45-60s but provides access to 3-4 military PCs and one safe, yielding 150,000-200,000 koens.
Priority Sequence:
- Loot ground floor safe (30-40s)
- Advance to second floor safe (25-35s)
- Access third floor for private lounge key (45-60s)
- Use key immediately if inventory allows
- Establish Spot #5 in Connector Hallway
- Total time: 140-195s
Building D Single Safe Value
Single safe offers lowest absolute loot but highest safety margin. Serves as ideal starting point for maximum value routes. Movie Room Entrance (Spot #3) 3-4m inside provides excellent defensive coverage during looting.
30-40s looting time provides minimal exposure while establishing inventory baseline. Conservative approach suits players prioritizing consistent profits.
Container Spawn Patterns
All 8 safes spawn consistently—no RNG. This reliability enables precise time-to-loot calculations and profit forecasting.
Melee-Only event (January 16, 2026, 05:00 UTC+0) maintains standard safe spawns while restricting weapons. 5 free tickets allow risk-free melee-focused route experimentation.
Optimal Rush Routes by Spawn
Building A Speed Run: Corridor Blitz
Prioritizes rapid safe access and 10-minute extraction, minimizing PvP exposure through aggressive timing.
Execution:
- 0:00-0:45 - Sprint to Building A second floor
- 0:45-1:15 - Crouch-walk to corner safe
- 1:15-2:45 - Loot all 3 safes sequentially
- 2:45-5:00 - Establish Spot #1, wait for Frade Lee
- 5:00-7:00 - Execute 2-3 strike combo (8-10 hits with Arasaka SpecOps Blade)
- 7:00-10:00 - Secure loot, advance to Hotel Main Entrance
- 10:00-12:00 - Extract during 2-minute window
Requires Health >70%, stamina >60% for extraction. Monitor stamina during Frade Lee engagement—execute 2-3 strikes, regenerate 3-5s, maintain >60% threshold.
Building B Balanced Route
18-22 minute route combining safe looting, Spot #2 ambush, and systematic advancement to Building A.
Execution:
- 0:00-1:00 - Sprint to Building B safes
- 1:00-2:30 - Loot both safes
- 2:30-8:00 - Establish Spot #2 (Side Wall Hole, 1-2m inside)
- 8:00-10:00 - Execute Frade Lee ambush
- 10:00-15:00 - Advance to Building A via crouch-walk
- 15:00-17:00 - Loot Building A safes if uncontested
- 17:00-20:00 - Extract via Hotel Main Entrance
Side Wall Hole provides 8-12m crouch detection in dark corridors. Maintain crouch until target enters 5m engagement range.
Building C Maximum Value Route
Most profitable variation through private lounge key acquisition and multi-building clearance. 30-35 minute route delays initial entry avoiding spawn rushes.
Execution:
- 0:00-3:00 - Delay entry, monitor audio for PvP resolution
- 3:00-8:00 - Loot Building C safes, acquire private lounge key
- 8:00-12:00 - Clear Building D safe, establish Spot #3
- 12:00-15:00 - Use private lounge key, loot 3-4 military PCs and safe
- 15:00-20:00 - Advance to Building B, loot safes, execute Spot #5 ambush
- 20:00-25:00 - Clear Central Pool Area (Spot #6) if Frade Lee detected
- 25:00-30:00 - Loot Building A during late-raid window
- 30:00-35:00 - Extract via Hotel Main Entrance or Armored Vehicle (requires 2 dog tags)
Profit potential: 300,000-400,000 koens. Requires premium loadout (Level 3 Armor, Arasaka SpecOps Blade, 2-3 stamina consumables) for 45% survival rate.
Building D Conservative Route
25-28 minute route prioritizing survival over maximum profit. Uses isolated spawn to avoid initial rushes.
Execution:
- 0:00-0:40 - Loot Building D safe immediately
- 0:40-3:00 - Establish Spot #3, monitor audio
- 3:00-8:00 - Delay until initial PvP resolves
- 8:00-13:00 - Advance to Building C, loot safes and private lounge key
- 13:00-18:00 - Clear Building B safes, execute Spot #5 ambush
- 18:00-25:00 - Advance to Building A during late-raid window
- 25:00-28:00 - Extract via Hotel Main Entrance
Maintains 65% survival rate through delayed entry and systematic progression. Budget loadouts (M9 Saber, basic armor) viable due to reduced PvP exposure.
Universal Backup Routes
Backup Triggers:
- Heavy gunfire in target building → Skip to next building, return late-raid
- Footsteps approaching → Abort looting, establish ambush or retreat
- Multiple player voices → Avoid engagement, prioritize extraction
- Frade Lee engagement sounds → Delay advancement 3-5 min until patrol resets
Armored Vehicle extraction (requires 2 dog tags, 30s window) suits aggressive players who secured PvP kills.
Route Execution: Movement Techniques
First 60 Seconds: Spawn Assessment
Optimal Sequence:
- 0:00-0:05 - Visual landmark ID
- 0:05-0:10 - Audio cue confirmation
- 0:10-0:15 - Route selection
- 0:15-0:60 - Sprint to first objective
Develop muscle memory for each spawn's optimal first movement. Pre-raid mental rehearsal reduces reaction time from 10-15s to 3-5s.
Movement Speed Optimization
Selection Matrix:
- Sprint (25+ m detection) - Open areas with >30m sightlines, confirmed empty spaces, extraction rushes
- Walk (12-15m detection) - Moderate-risk corridors, approach to contested areas, stamina conservation
- Crouch-walk (5-8m detection) - High-traffic chokepoints, final approach to loot, ambush positioning
Building A corridors: +20% detection modifier extends walking to 14-18m. Default to crouch-walk for final 15-20m approaches.
Stamina management: Monitor 60% threshold. Below this, movement speed reduces 40%. Carry 2-3 stamina consumables for emergency restoration.
Corner Clearing Technique
- Approach at walk speed to 3-4m from corner
- Transition to crouch-walk for final approach
- Pause 1-2s at corner edge, listen for audio
- Slice corner at 45-degree angle, weapon ready
- Clear visible area before full corner turn
- Resume appropriate movement speed
Doorway approaches require similar discipline. Opening doors generates audio detectable at 15-20m. Open doors during ambient noise peaks to mask interaction audio.
Audio Discipline
Principles:
- Minimize unnecessary interactions (avoid opening empty room doors, jumping, equipment switching)
- Time loud actions with ambient noise
- Monitor own audio output
- Prioritize audio intelligence gathering (stop movement periodically to listen)
Melee-Only event amplifies audio importance—weapon discharge sounds disappear. Rely on footsteps, stamina breathing, melee swing sounds.
Visual Landmark Navigation
Building A Landmarks:
- Corner room wallpaper pattern
- Second-floor railing design
- Corridor lighting fixture spacing
Building B Landmarks:
- Side Wall Hole concrete damage pattern
- Underground parking pillar numbering
- Floor tile discoloration
Building C Landmarks:
- Connector hallway carpet color transition
- Third-floor stairwell handrail design
- Private lounge door frame
Building D Landmarks:
- Movie room entrance signage font
- Carpet pattern near safe
- Window positioning relative to entrance
Experienced players achieve landmark recognition within 0.5-1.0s, enabling navigation without conscious map reference.
Combat Scenarios and PvP Hotspots
Main Stairwell: Most Contested Chokepoint
Hotel Main Entrance Stairwell (Spot #4) concentrates traffic during 10-15 minute window. Second-floor landing provides elevation advantage and cover.
Navigation Strategies:
- Early-raid (0-10 min) - Avoid entirely, use building-specific routes
- Mid-raid (10-20 min) - Extreme caution, crouch-walk final 20m, listen for combat
- Late-raid (20-30 min) - Often clear as early extractors departed, moderate-risk acceptable
Forced stairwell use during contested periods: advance to landing, crouch in cover, wait 30-45s monitoring audio. If clear, rapid sprint through minimizes exposure.
Pre-Clearing High-Value Areas
Sequence:
- Approach room entrance at crouch-walk (5-8m detection)
- Pause at doorway, listen 10-15s
- Slice doorway at angle, clear visible portions
- Enter room, immediately check corners
- Confirm clear before looting
- Maintain audio awareness during looting
30-45s investment reduces ambush death probability from 25-30% to 8-12%.
When to Engage vs Avoid
Engage When:
- Current loot <50,000 koens (minimal loss risk)
- Premium loadout equipped (combat advantage)
- Favorable positioning (ambush advantage, elevation, cover)
- Enemy appears wounded/low-stamina
- Extraction >15 min away
Avoid When:
- Current loot >200,000 koens (high loss risk)
- Budget loadout equipped (combat disadvantage)
- Unfavorable positioning (exposed, low ground, multiple angles)
- Multiple enemies detected
- Extraction <5 min away
Melee-Only event shifts calculations toward stamina management. Players executing 2-3 strike combos followed by 3-5s regeneration defeat opponents who exhaust stamina through continuous swinging.
Post-Combat Looting Priority
Priority Order:
- Dog tags (required for Armored Vehicle extraction, need 2)
- High-value weapons (Arasaka SpecOps Blade, Banishing Blades)
- Armor (if superior to current)
- Consumables (stamina items, medical supplies)
- Miscellaneous loot (if inventory space available)
Time limit: 30-45s maximum before repositioning. Extended looting attracts third-party players investigating combat sounds. Loot essentials, immediately relocate 20-30m to break sightlines.
Loadout Optimization
Minimum Viable Loadout: Budget
Components:
- Weapon: M9 Saber (35-39 base damage, 11 armor damage, 12-15 hits for Frade Lee)
- Armor: Level 1 or none
- Consumables: 1 stamina item, 1 basic medical supply
- Accessories: Universal Keycard Chain
- Total Cost: 15,000-25,000 koens
- Profit Threshold: 40,000+ koens for positive ROI
Requires conservative route selection—Building D or B spawns with lower PvP density. Avoid Frade Lee engagements unless necessary.
Mid-Tier Setup: Balanced
Components:
- Weapon: Assault Dagger Level 30 (43-46 base damage, 13 armor damage) or Riptide Striker Purple Knife (45-49 base damage, 14 armor damage)
- Armor: Level 2 (absorbs 1-2 strikes)
- Consumables: 2 stamina items, 2 medical supplies
- Accessories: Universal Keycard Chain, basic backpack
- Total Cost: 45,000-65,000 koens
- Profit Threshold: 100,000+ koens for positive ROI
Enables opportunistic Frade Lee engagements and defensive PvP. Improved damage reduces Frade Lee kill time from 12-15 hits to 9-11 hits, decreasing exposure 30-40%.
Premium Loadout: Maximum Survival
Components:
- Weapon: Arasaka SpecOps Blade (47-50 base damage, 14 armor damage, 8-10 hits for Frade Lee) or Banishing Blades (46-49 base damage, 14 armor damage)
- Armor: Level 3 (absorbs 2-3 Frade Lee strikes)
- Consumables: 3 stamina items, 3 medical supplies
- Accessories: Universal Keycard Chain, premium backpack, Building C private lounge key
- Total Cost: 120,000-180,000 koens
- Profit Threshold: 250,000+ koens for positive ROI
Enables full route execution including multiple Frade Lee engagements and confident PvP. Arasaka SpecOps Blade's 8-10 hit requirement represents fastest elimination, minimizing third-party intervention risk.
Armor Selection Framework
- No Armor: Speed runs <15 min, budget loadouts accepting high risk
- Level 1: Balanced routes 15-25 min, moderate PvP exposure
- Level 2: Extended routes 20-30 min, regular PvP expected
- Level 3: Maximum value routes 30-35 min, multiple Frade Lee engagements planned
Level 3 Armor's 2-3 strike absorption provides critical survival margin during stamina regeneration. Execute strike combos, retreat behind cover, regenerate 3-5s, re-engage without death risk.
Essential Consumables
Priorities:
- Stamina items (2-3 per raid) - Extended combat, rapid repositioning, emergency sprints
- Medical supplies (2-3 per raid) - Maintain Health >70% for Hotel Main Entrance extraction
- Universal Keycard Chain (mandatory) - Single inventory slot for all safe access
- Building C private lounge key (optional) - 70,000-90,000 koen investment for 150,000-200,000 koen return
Consumable timing: Use stamina items at 40-50% during combat to prevent movement penalties, not after depletion. Medical supplies should maintain Health >70% threshold for extraction eligibility.
Advanced Tactics and Meta Adaptations
Reading Enemy Spawn Patterns
Loot container status provides intelligence on enemy spawn locations and movement patterns.
Intelligence:
- All Building A safes opened - Enemy spawned Building A, likely advanced to Building B or extracted
- Building C safes opened, Building D untouched - Enemy spawned Building C, avoided isolated Building D
- Random safe pattern - Multiple enemies from different spawns, high PvP activity
- No safes opened - Early arrival or all enemies eliminated, proceed cautiously
Check first safe status immediately upon building entry. Opened status triggers route modification: skip to next building or establish ambush anticipating enemy return.
Dynamic Route Switching
Audio-Triggered Modifications:
- Gunfire in target building - Delay entry 2-3 min, allow combat resolution
- Footsteps approaching - Establish ambush or retreat to previous area
- Door opening sounds - Enemy entering building, prepare for engagement/evasion
- Frade Lee combat sounds - Enemy engaging AI, opportunity for third-party attack or avoidance
Melee-Only event reduces audio complexity by eliminating gunfire. Footsteps and melee swing sounds become primary detection methods.
Time-Based Loot Priority
Early Raid (0-10 min):
- Prioritize safe access over combat
- Avoid contested areas
- Build loot foundation
Mid Raid (10-25 min):
- Selective PvP for dog tags
- Systematic building clearance
- Frade Lee ambush execution
Late Raid (25-40 min):
- Prioritize extraction over additional loot
- Avoid unnecessary combat
- Maintain Health >70%, stamina >60%
Players carrying 200,000+ koens should shift to extraction priority at 25-minute mark. Risk-reward favors guaranteed profit over potential gains with death risk.
Solo vs Squad Modifications
Solo Characteristics:
- Avoid high-traffic areas during peak windows (5-15 min)
- Prioritize speed runs or maximum value routes
- Retreat from unfavorable engagements immediately
- Use crouch-walk extensively
Squad Characteristics:
- Aggressive building clearance with designated roles
- Simultaneous multi-building looting through team splitting
- Confident PvP with numerical advantage
- Coordinated Frade Lee ambushes
Melee-Only event reduces squad advantage by eliminating suppressive fire and ranged support. All combat at 2-5m makes individual skill more important than numbers.
2026 Meta Shifts
Expected Changes:
- Increased Building A traffic - Players testing melee combat in familiar high-loot area
- Reduced early extraction - Players extending raids to practice melee mechanics
- Higher Frade Lee engagement rates - Melee-focused players seeking AI combat practice
- Shift toward stamina consumable usage - Recognition of stamina's critical role
Anticipate increased Building A competition during first week post-launch (January 16-23, 2026), then gradual normalization. Exploit by focusing on Buildings B, C, D during initial rush, return to Building A after traffic normalization.
Common Mistakes to Avoid
Over-Committing to Contested Crates
Mistake: I'll just finish this last safe before movingCorrection: Abort looting immediately upon threat detection, relocate 20-30m, reassess after 30-45s
Psychological trap of sunk cost causes players to complete actions despite changed risk. Experienced players abandon partial loot operations without hesitation.
Ignoring Extraction Time Windows
Mistake: Continuing looting at 35+ min without extraction buffer Correction: Begin extraction approach at 32-33 min for 35-min target, allowing 2-3 min buffer
Hotel Main Entrance extraction's Health >70%, stamina >60% requirements add complexity. Maintain thresholds during final approach. Arriving with Health at 65% or stamina at 55% results in extraction denial.
Poor Spawn-Based Route Selection
Mistake: Forcing Building A route from Building D spawn Correction: Execute spawn-appropriate routes (Building D conservative route from Building D spawn)
Route flexibility requires mental preparation of 4-5 variations before raid start. Practice each spawn's optimal route until execution becomes automatic.
Inadequate Inventory Management
Mistake: Collecting all items regardless of value, filling inventory by 10-min mark Correction: Establish minimum value threshold (15,000+ koens per item), discard low-value items for premium replacements
Universal Keycard Chain's single inventory slot efficiency exemplifies proper optimization. Individual keys waste 3-5 slots that could hold 45,000-75,000 koens in additional loot.
Predictable Movement Patterns
Mistake: Identical route execution across consecutive raids Correction: Rotate between 3-4 route variations, randomize approach angles to contested areas
Simple modifications like alternating sprint/crouch-walk approaches, varying entry timing by 2-3 min, or reversing building clearance order create sufficient unpredictability to defeat pattern-based ambushes.
Extraction Strategies
Primary Extract Point Risk Assessment
Hotel Main Entrance serves as primary extraction due to central positioning and predictable activation. Health >70%, stamina >60% requirements create preparation obligations.
Risk Factors:
- High traffic concentration (all players converge during 10-12 min window)
- Chokepoint vulnerability (Stairwell Spot #4 creates ambush opportunity)
- Strict health/stamina requirements (forces consumable usage)
- 2-minute completion window (limited time for threat clearing)
Approach via building-specific routes rather than direct paths. Building A players use second-floor corridor for covered approach, Building C players utilize Connector Hallway.
Secondary Extract Activation
Armored Vehicle provides alternative for players with 2 dog tags. 30-second window creates tight timing but offers lower player density.
Advantages:
- Lower traffic (requires dog tag prerequisite)
- Multiple approach angles
- No health/stamina requirements
- Available throughout raid
Disadvantages:
- Requires 2 dog tags (PvP mandatory)
- 30-second window (shorter than Hotel Main Entrance 2-min)
- Location knowledge required
Secure first dog tag by 15-min mark, allowing time for second acquisition without extraction pressure. Late-raid dog tag hunting (25+ min) creates unnecessary risk.
Loaded Inventory Movement
Full inventory reduces flexibility and increases loss magnitude. Players carrying 300,000+ koens should adopt maximum-safety protocols.
Protocols:
- Default to crouch-walk in all contested areas
- Avoid all optional combat
- Use maximum cover during advancement
- Consume stamina items proactively (maintain >70% for emergency sprint)
- Monitor audio continuously (stop every 15-20s to listen)
Practice loaded inventory extractions during low-value raids to develop stress-resistant protocols.
Final 100 Meters: Highest Risk Zone
Approach Technique:
- 100-75m - Crouch-walk, continuous audio monitoring, identify cover
- 75-50m - Pause 15-20s, listen for combat, assess player density
- 50-25m - Cover-to-cover movement, minimize exposure
- 25-0m - Final sprint to extraction, accept detection risk for speed
- Extraction activation - Defend position during completion window
Arrive at 100m mark with 90+ seconds remaining before window closure, allowing cautious advancement. Rushed approaches (<30s remaining) force exposed sprints creating ambush vulnerability.
Economic Analysis: Loot Value vs Survival
Extract at 15 min when:
- Current loot >150,000 koens (solid profit secured)
- Budget loadout (minimal additional investment to risk)
- Heavy PvP detected (survival probability declining)
Extend to 25 min when:
- Current loot <100,000 koens (below profit target)
- Premium loadout (combat capability supports extended raid)
- Light PvP activity (survival probability remains high)
Extend to 35 min when:
- Current loot <200,000 koens (maximum value route in progress)
- Multiple buildings remain unlooted (significant profit potential)
- Late-raid window (reduced player density)
Mathematical expectation: (Loot Value × Survival Probability) - Loadout Cost determines optimal extraction timing. 250,000 koens at 60% survival yields 150,000 expected value, while extending to 300,000 koens at 40% survival yields 120,000 expected value—favoring earlier extraction.
FAQ
What are the safest spawn points in Northridge Hotel 2026?
Building D spawns offer highest safety with isolated positioning away from spawn rushes. Single safe provides guaranteed loot with minimal PvP exposure during first 5-10 minutes. Building C ranks second with 2 safes plus private lounge key access and moderate player density. Building A presents highest risk due to 3-safe concentration attracting aggressive players. Building B provides balanced risk-reward with 2 safes and lower traffic than Building A.
Where are all premium weapon crates located in Northridge Hotel?
Northridge Hotel contains 8 safes total: 3 in Building A (second floor corridor), 2 in Building B (near Side Wall Hole), 2 in Building C (ground and second floors), 1 in Building D (Movie Room area). Building C private lounge key (third floor) unlocks access to 3-4 military PCs and one additional safe—highest loot density per location. Premium melee weapons like Arasaka SpecOps Blade (47-50 base damage) found in these high-value containers.
How long does a Northridge Hotel rush route take?
Speed runs complete in 15-20 minutes from spawn to extraction, prioritizing Building A's 3-safe cluster and immediate extraction at 10-minute window. Balanced routes require 18-25 minutes, covering 2-3 buildings with selective Frade Lee ambush execution. Maximum value routes extend to 30-35 minutes, systematically clearing all four buildings with multiple ambush positions and private lounge key utilization. 40-minute raid timer provides buffer, though extraction activates at 10 minutes with 2-minute completion window.
What is the best rush route for solo players in Northridge Hotel?
Solo players should prioritize Building D conservative routes or Building A speed runs depending on risk tolerance. Building D route starts with isolated single safe (30-40s), delays advancement until initial PvP resolves (3-5 min), then systematically clears Buildings C and B before late-raid Building A access (25-28 min total). Maintains 65% survival rate through delayed entry and systematic progression. Alternatively, aggressive solo players can execute Building A speed runs (15-20 min) with immediate second-floor safe access and 10-minute extraction, accepting higher risk for faster profit realization.
How do you avoid spawn campers in Northridge Hotel?
Spawn camping rarely occurs due to Level 11 minimum access requirement filtering inexperienced players. However, Hotel Main Entrance Stairwell (Spot #4) concentrates players during extraction windows (10-15 min). Avoid these areas during peak times by delaying extraction approach until 12-15 min when early extractors departed. Use crouch-walk for final 20m approaches reducing detection from 12-15m (walking) to 5-8m. Pause and listen technique—advancing to cover, waiting 30-45s monitoring audio—identifies threats before exposure.
Which Northridge Hotel route has the highest weapon crate density?
Building A contains highest safe density with 3 safes concentrated on second floor corridor, accessible within 90-120s of spawn. Building C with private lounge key provides highest loot value density—key unlocks access to 3-4 military PCs and one safe in single room. Key costs 70,000-90,000 koens with 10 durability but yields 150,000-200,000 koens per use. Maximum value routes prioritize Building C private lounge key acquisition followed by systematic clearance of Buildings D, B, and A for comprehensive loot coverage across all 8 safes plus premium container access.