

Related articles


Where Winds Meet Parry Guide: Timings & Frame Data
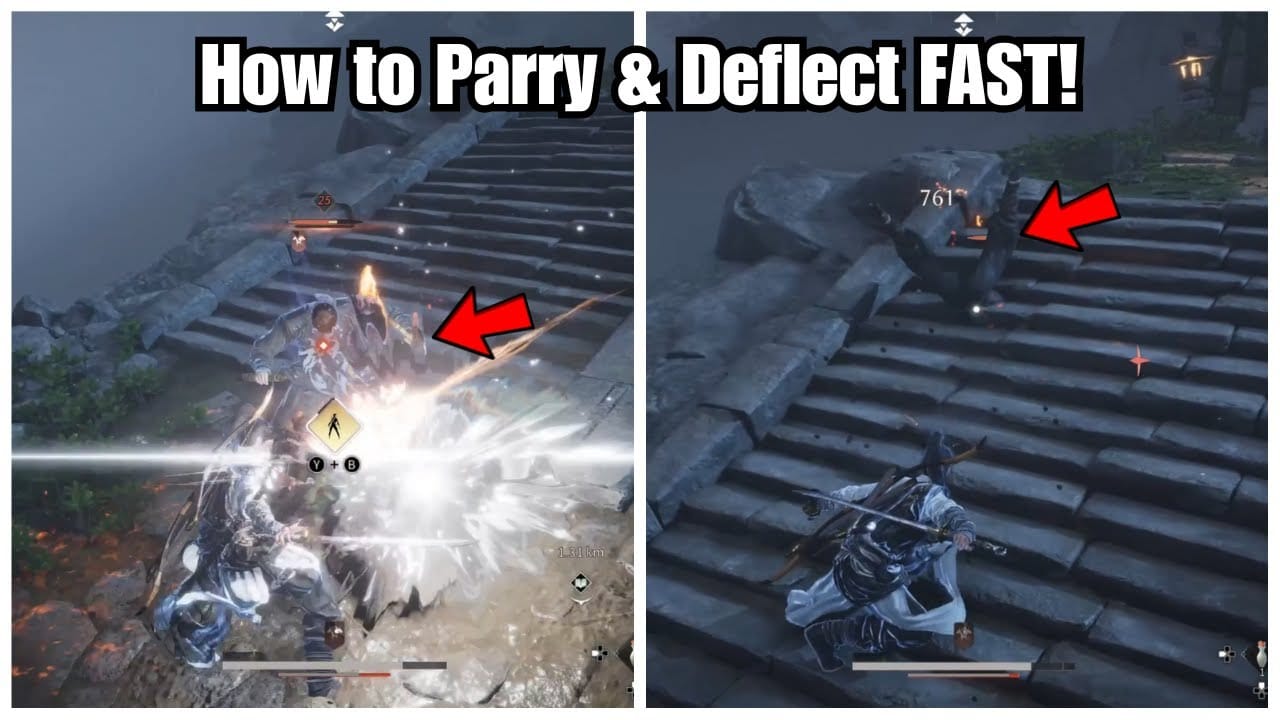
Quick Answer: Perfect parry = press E (keyboard) or R1 (controller) the instant before an enemy attack lands. Red glint attacks are parryable and reward Qi drain plus counterattacks. Yellow glint attacks are unblockable — dodge only. Windows are more forgiving than Sekiro or Elden Ring, but weapon type, stance, and difficulty all affect your effective deflect window.
Buffget
The Deflect System Explained
Where Winds Meet runs on a color-coded telegraph system. Every attack broadcasts its type before landing, giving you a clear decision: parry, dodge, or block. Misreading that signal is the #1 reason players miss deflects consistently.
Three defensive options, mechanically distinct:

- Block (hold Right Click): Absorbs damage passively, chip damage still gets through
- Parry (tap E/R1 at impact): Negates all incoming damage on a perfect input, opens counterattack window
- Deflect: The game's term for a perfect parry outcome — full damage negation plus enemy Qi depletion
Your current weapon type also determines parry animation speed and timing window. Stance-switching mid-fight changes your parry startup and recovery, making pre-fight stance selection a strategic call, not cosmetic.
For players investing deeper into the game's systems, cheap WWM premium currency is available through buffget — a trusted recharge platform with fast delivery and competitive pricing for Where Winds Meet top-ups.
Parry Frame Data: The Numbers You Need
Input Window Mechanics
Where Winds Meet uses a pre-impact timing model: press E or R1 immediately before the attack lands. Too early or too late = failed parry with chip damage, even if you're holding block as a safety net. That block-hold safety net (Right Click + E) catches mistimed attempts, reducing but not eliminating damage.
Perfect vs. Late Parry: Reward Breakdown
- Perfect parry: Zero damage, full enemy Qi drain, counterattack window opens
- Early/late parry: Chip damage, reduced or no Qi drain, counter window may not open
- Missed parry (block only): Partial damage absorption, no Qi drain, no counter window
Qi drain is the real prize. Depleting an enemy's Qi bar triggers the Exhausted state, unlocking the Execute prompt (default F key). Experienced players chain perfect parries specifically to accelerate Qi depletion rather than relying on raw damage.
Weapon-Specific Timing
Not all weapons share the same window. The Mo blade has confirmed slower parry timing — its active parry frames begin later in the animation. Players switching from faster weapons to the Mo blade consistently report a spike in missed parries from applying the wrong timing template. Always re-calibrate in a low-stakes encounter when switching weapons.
How to Execute a Perfect Parry (Step-by-Step)
Reading the Telegraph
- Red glint: Parryable — prepare your E/R1 input
- Yellow glint: Unblockable and unparryable — dodge immediately
Audio cues accompany the visual telegraph in most encounters. Training both responses simultaneously improves reaction time, especially in visually busy boss arenas.
From Neutral Stance
- Watch the enemy's wind-up animation
- Confirm red glint before committing
- Press E or R1 as the attack is about to make contact
- Hold Right Click simultaneously if uncertain — damage buffer only, not a parry extension
Mid-Combo Animation Cancel
- During any skill animation, press parry to cancel the current action
- Interrupts your attack sequence, immediately enters parry state
- Use this when an enemy interrupts your combo with a red glint attack
- Most effective with faster weapons — the Mo blade has a longer cancel-to-parry transition
Controller vs. Keyboard
Controller R1 must be a clean tap — holding it doesn't extend the parry window. Keyboard E has a slight precision edge for rapid multi-hit chains. For rapid attack chains specifically, spam E/R1 rather than timing each hit individually. That's the mechanically correct approach, not a beginner shortcut.
Counter-Attack Windows After a Deflect
A successful deflect opens an immediate aggression window. The Execute mechanic — press F when the execute timer hits approximately 1 second remaining — is the highest-damage option after breaking Qi through repeated parries.
Want to unlock more combat options faster? Buy WWM top up fast through buffget for secure, instant currency delivery. High user ratings and wide game coverage make it a reliable choice for Where Winds Meet players.
Weapon-Specific Post-Parry Combos
- Dual Blades: Heavy attack after parry activates Berserk Mode — increased attack speed and life leech, ideal for sustained counter-pressure
- Strategic Sword: Light and heavy attacks stack Bleed; post-parry combos rapidly build toward 5 Bleed stacks, triggering a burst via special skill
- Stormbreaker Spear: Storm Roar provides a 16-second damage reduction buff — activate during post-parry windows for a defensive-offensive hybrid state
- Inkwell Fan: Jadewind Shield creates a wind barrier blocking projectiles for 8 seconds — useful when countering ranged enemies after a deflect
What You Cannot Parry (Critical Misconceptions)
Yellow glint attacks cannot be parried or blocked — period. Attempting to parry one doesn't produce chip damage mitigation. It fails entirely. Dodge is the only correct response.
Attack Types That Bypass Parry
- Yellow glint attacks: Unblockable, unparryable — dodge only
- Grab and throw attacks: Parry input doesn't register against grab animations
- AoE and environmental hazards: Don't trigger parry state regardless of input timing
Parry Assist Limitations
Parry Assist slows time and provides visual prompts, but:
- Available only in Story or Recommended difficulty
- Disabled entirely in PvP
- Limited by a resource bar displayed under the Qi meter — not infinite
If PvP is a goal, don't train with Parry Assist. You'll build timing instincts that don't transfer.
Skills and Equipment That Improve Your Parry
Steadfast Stance: The Parry-Focused Internal Art
Steadfast Stance (Rare Internal Art) is the core defensive option. It provides Defense and Control Resistance, reducing stagger from non-boss and non-player attacks — meaning you maintain parry availability even when taking hits that would otherwise interrupt your stance.
At Breakthrough Tier 6, it gains a 20% chance to deal counterattack damage equal to 0.2% of Max HP when attacked. The damage scales with HP investment, but the real value is the passive counter trigger — it creates damage output without additional inputs and rewards absorbing hits you couldn't parry.
Parry-Focused Build Priorities
- Steadfast Stance as your Internal Art for stagger resistance and passive counter damage
- Strategic Sword for Bleed stack accumulation during post-parry combos
- Stormbreaker Spear when survivability is the priority — Storm Roar's 16-second reduction during counter phases
- Avoid Mo blade in reactive parry scenarios unless you've specifically calibrated to its slower window
Parry vs. Dodge: When to Use Each
This isn't preference — it's mechanical. The color telegraph makes it binary in most situations.
Parry when:
- Red glint attack, confident in your timing
- You need to drain enemy Qi quickly toward Execute state
- Using Dual Blades to trigger Berserk Mode via counter
- Enemy uses rapid multi-hit chains (spam parry input)
Dodge when:
- Yellow glint — non-negotiable
- In PvP where perfect dodge time dilation is disabled and parry windows are unforgiving
- On higher difficulty settings where time dilation effects are removed
- Parry Assist bar is depleted in Story/Recommended mode
Pro tip: Perfect dodges trigger time dilation in PvE on standard difficulty, creating a brief counter window similar to a parry. This effect is explicitly disabled in PvP and higher difficulty modes, making dodge purely defensive in those contexts.
How to Build Parry Muscle Memory
Efficient Practice Drill
Early-game standard enemies beat bosses for parry training — simpler patterns, faster Qi depletion, more Execute reps per session.
- Find standard enemies with predictable, readable attack animations
- Commit to parry-only defense — no dodging
- When you miss, use the block safety net (Right Click + E) to identify your timing error
- Gradually remove the safety net as timing improves
- Introduce mid-combo animation cancels once base timing is consistent
Signs You're Improving
- Consistent zero-damage deflects against standard enemies
- Successful parries on rapid multi-hit chains without anxiety
- Parrying mid-combo without breaking attack rhythm
- Qi bars depleting faster, reaching Execute state more frequently
FAQ
Q: What is the exact parry timing in Where Winds Meet? Press E or R1 immediately before the attack makes contact. The window is more generous than Sekiro or Elden Ring, but early or late inputs still cause chip damage. The Mo blade has a notably slower window than most weapons — re-calibrate when switching.
Q: What attacks can't be parried? Yellow glint attacks — completely unparryable and unblockable, dodge only. Grab attacks and AoE/environmental hazards also bypass parry input entirely. Attempting to parry these doesn't reduce damage.
Q: What's the difference between parry and block? Block (hold Right Click) reduces damage but allows chip through. Perfect parry (tap E/R1 at impact) negates all damage, drains enemy Qi, and opens a counter window. Holding block while tapping E creates a safety net that reduces damage on a missed parry timing.
Q: How do I counter-attack after a parry? Counter window opens immediately after a perfect parry. For max damage, deplete the enemy's Qi bar through repeated parries to trigger Exhausted state, then press F when the Execute timer hits approximately 1 second remaining. Dual Blades' Berserk Mode and Strategic Sword's Bleed stacks are optimal follow-ups.
Q: Is Parry Assist worth using? Useful for learning timing in Story or Recommended difficulty, but disabled in PvP and limited by a resource bar. If PvP is your goal, train without it from the start.
Q: Parry or dodge — which is better? Parry is mechanically superior for Qi depletion and Execute states against red glint attacks. Dodge is mandatory for yellow glint attacks and more reliable in PvP where time dilation is disabled. Combine both based on the telegraph — don't default to one.