

Related articles


Where Winds Meet Weapon Swapping Guide: Max DPS Combos
Weapon swapping in Where Winds Meet lets you equip two weapons simultaneously and switch mid-combat via Dual-Weapon Skills, unlocking devastating synergies like 5-stack Bleed detonations and Flamelash burst combos. This guide covers optimal weapon pairings, chi-based damage scaling through Affinity mechanics, precise rotation sequences, and gear optimization to maximize DPS in PvE and PvP.
Buffget
Understanding Weapon Swapping Mechanics
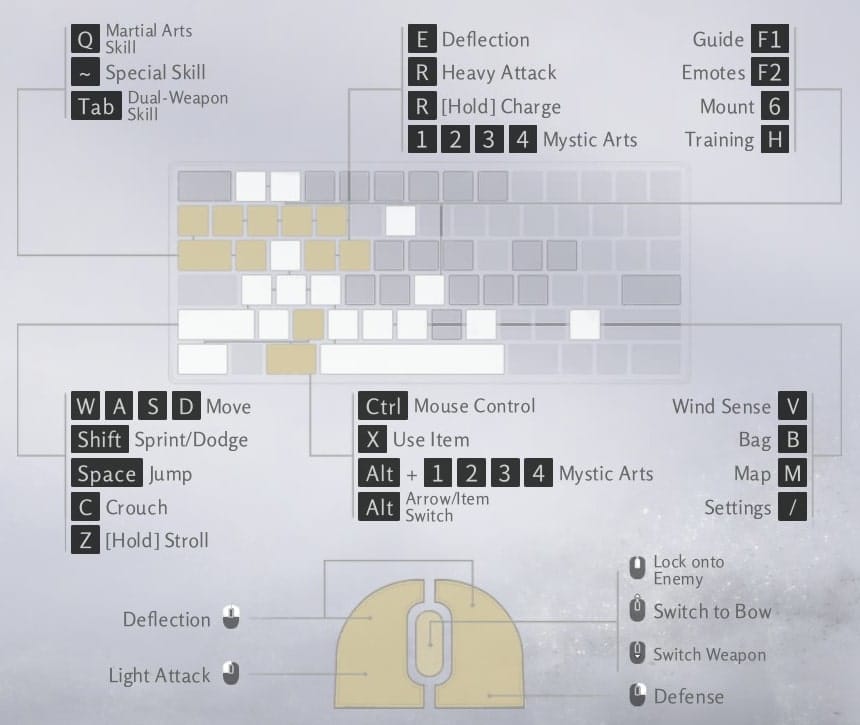
Where Winds Meet's weapon swapping system enables equipping two weapons and transitioning between them during combat. This fundamentally changes damage optimization by enabling skill synergies impossible with single-weapon builds. The system revolves around Dual-Weapon Skills activated via TAB (keyboard/mouse) or A/✖ (gamepad).
The Dual-Weapon Skill unlocks last in your weapon skill tree. Unlike standard attacks, this swap ability consumes no Endurance but operates on cooldown. You can manually switch weapons using D-pad Down (controller) or custom keybind (keyboard), though this lacks the combat flow advantages of Dual-Weapon Skills.
For faster progression and advanced weapon combinations, Where Winds Meet premium currency recharge through buffget provides secure transactions with competitive pricing and immediate delivery.
Six weapon paths define the swapping ecosystem:
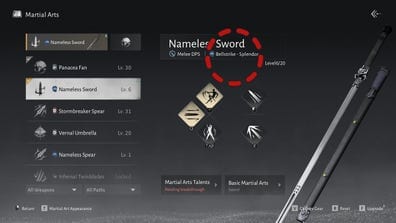
- Bellstrike-Splendor: Nameless Sword + Nameless Spear
- Bellstrike-Umbra: Strategic Sword + Heavenquaker Spear
- Silkbind-Deluge: Panacea Fan + Soulshade Umbrella
- Silkbind-Jade: Inkwell Fan + Vernal Umbrella
- Bamboocut-Wind: Infernal Twinblades + Mortal Rope Dart
- Stonesplit-Might: Stormbreaker Spear + Thundercry Blade
Why Weapon Swapping Matters for DPS
Weapon swapping transforms combat from linear sequences into dynamic rotations where secondary weapon skills amplify primary weapon effects. Strategic Sword and Heavenquaker Spear exemplify this: Heavenquaker applies Sober Sorrow debuff and stacks Bleed up to 5 times through light skills, then Strategic Sword's Inner Balance Strike detonates those stacks for massive burst damage.

This synergy converts gradual DoT effects into instant piercing hits. Fivefold Bleed mechanics convert 5 maximum stacks into a single devastating strike bypassing standard defense. Without swapping, Bleed stacks expire naturally, wasting damage potential.
DPS optimization requires understanding buff persistence. Buffs remain active through weapon transitions—a damage boost from your primary weapon continues benefiting secondary weapon attacks. Soulshade Umbrella's 15% damage buff demonstrates this, persisting as you swap to Panacea Fan for direct damage.
Core Mechanics: Swap Windows and Animation Frames
Successful swapping depends on identifying optimal transition points within attack animations. Martial Arts Skills (Q/X/□) and Special Skills (`/Y/△) cost Endurance and trigger cooldowns, creating natural swap windows when these abilities complete.
Infernal Twinblades and Mortal Rope Dart showcase precise timing. Start with Rope Dart Swing Light Attacks, execute Charged Heavy to boost Might Rat multipliers, follow with Bladebound Thread to pull enemies, then swap to Twinblades. Build Flamelash meter through Twinblades' 5-hit Light combo, buffing damage, crit rate, and crit damage simultaneously.
Animation commitment varies by weapon type. Heavy weapons like Stormbreaker Spear require longer animation completion before safe swapping. Fast weapons like Infernal Twinblades offer more frequent swap opportunities. Predator's Shield buff increases Stormbreaker charging speed by 50%, creating additional swap windows.
Weapon Swap Cooldowns and Limitations
Dual-Weapon Skills operate on internal cooldowns preventing spam-swapping. This balances synergistic combinations by forcing deliberate rotation planning. Manual switching bypasses cooldown but lacks integrated skill activation.
Endurance management becomes critical. While swaps cost no Endurance, skills before and after do. Depleting Endurance mid-rotation leaves you vulnerable. Stormbreaker's Storm Roar provides 16 seconds damage reduction, creating safe windows to regenerate Endurance between cycles.
Arsenal system unlocks at level 40, converting gear into permanent stat bonuses based on gear score. This indirectly affects swap viability by improving base stats that make cooldown windows less punishing.
The Chi System: Foundation of Combat Synergies
Chi mechanics—called Affinity attacks—deal 20% additional damage based on Max Physical Attack. This scaling transforms weapon swapping from skill rotation into stat optimization where gear choices directly amplify swap combo effectiveness.
Affinity Rate determines trigger frequency. Hawkwing gear set provides +0.1 Affinity Rate (2-piece), and 4-piece stacks 2% Physical Attack up to 5 times when Affinity triggers. This creates snowball effects where successful Affinity attacks increase subsequent Affinity damage.
For efficient gear progression, buy cheap WWM coins online safe through buffget ensures fast delivery and secure transactions for premium gear sets maximizing Affinity mechanics.
Jadewear offers alternative optimization: 2-piece grants +1 Max Physical Attack, 4-piece provides +10% Affinity Damage after Martial Art skills, increasing to +20% against controlled enemies or low-Qi targets for 12 seconds. This synergizes with crowd-control combinations like Rope Dart's pull into Twinblades burst.
How Chi Generation Works
Affinity generation varies by weapon attack patterns. Light attacks from Strategic Sword build Bleed through rapid hits, creating multiple Affinity opportunities per combo. Heavy attacks from Heavenquaker deal concentrated damage with fewer but more impactful Affinity procs.
Morale Chant stacks Yi River enhancement up to 5 times, increasing Physical damage. This directly amplifies Affinity damage since Affinity scales from Physical Attack. Combining Morale Chant with Hawkwing bonuses creates multiplicative damage increases.
Skill-based Affinity generation outpaces basic attacks significantly. Martial Arts and Special Skills trigger Affinity on each damage instance within multi-hit abilities. Panacea Fan's Echoes of a Thousand Plants generates Affinity while providing sustain.
Chi Consumption and Efficiency
Affinity efficiency depends on maximizing Max Physical Attack while maintaining sufficient Affinity Rate. Stacking only Physical Attack without Affinity Rate results in infrequent procs. High Affinity Rate with low Physical Attack produces frequent but weak hits. Optimal builds balance both through gear combinations.
Insightful Strike Concentration rewards perfect play with +10% Affinity Damage for 10 seconds at 100% Focus. Align this with highest-damage combos. For Strategic Sword users, activate immediately before detonating 5 Bleed stacks with Inner Balance Strike.
Battle Anthem increases Charged Skills damage against bosses by 10%, stacking multiplicatively with Affinity bonuses. Stormbreaker's Thunder Shock applies Vulnerable status, further amplifying all damage including Affinity hits from secondary weapons.
Chi Recovery During Swaps
Affinity mechanics persist through swaps—Affinity Rate buffs from primary weapons continue affecting secondary weapons. Soulshade Umbrella's Light Skill buff exemplifies this: activate buff, swap to Panacea Fan, and Fan's attacks benefit from both 15% damage buff and active Affinity Rate bonuses.
Bitter Seasons Poison debuff stacks up to 5 times, reducing enemy Physical Defense by 0.6% per stack over 10 seconds. Apply Poison with primary weapon, swap to secondary, unleash Affinity-enhanced combos against debuffed targets.
Rotation timing should align Affinity buff durations with high-damage swap windows. Jadewear's 12-second Affinity Damage buff provides clear timer—use Martial Art skill, swap weapons, execute highest-damage combo within 12 seconds, return to primary weapon to refresh cycle.
Preventing Chi Waste
Avoid buff overlap waste. Activating multiple Affinity Rate buffs simultaneously doesn't stack durations—most recent overwrites previous ones. Stagger buff activations across swaps to maintain continuous enhancement.
Hawkwing 4-piece stacks Physical Attack up to 5 times when Affinity triggers, but stacks decay if Affinity stops. Maintain consistent attack pressure. Inkwell Fan's Jadewind Shield (8-second projectile blocking) allows safe repositioning without losing stacks.
Focus management prevents waste during extended encounters. Reaching 100% Focus triggers Insightful Strike's +10% Affinity Damage, but maintaining 100% without spending wastes potential. Plan rotations to spend Focus on highest-damage burst combos, rebuild with secondary weapon strings.
Optimal Weapon Combinations for Maximum DPS
Top-tier pairings leverage complementary mechanics and Affinity synergies:

- Strategic Sword + Heavenquaker Spear: Single-target DPS via Bleed detonation
- Nameless Sword + Nameless Spear: Balanced offense across multiple targets
- Infernal Twinblades + Mortal Rope Dart: Burst damage windows
- Panacea Fan + Soulshade Umbrella: Sustained DPS with survivability
Strategic Sword and Heavenquaker rotation: Apply Sober Sorrow with Spear, stack 5 Bleed through light skills, execute Heavy Attack, swap to Sword, detonate Bleed with Inner Balance Strike. Use Sword parries against boss red attacks for defensive uptime.
Twinblades and Rope Dart create control-to-burst patterns. Start with Rope Dart Swing Lights for range control, use Charged Heavy to boost Might Rat multipliers, pull with Bladebound Thread, swap to Twinblades. Build Flamelash through 5-hit Light combo, increasing damage, crit rate, and crit damage.
Sword and Spear Synergy
Bellstrike-Umbra path (Strategic Sword + Heavenquaker Spear) represents gold standard for single-target damage. Strategic Sword stacks Bleed up to 5 times, creating damage reservoir that Inner Balance Strike converts to instant burst, bypassing DoT limitations.
Heavenquaker's Sober Sorrow amplifies all subsequent damage. Apply debuff first, stack Bleed through Spear's light skills—skill-based Bleed triggers Affinity more frequently. Once 5 stacks accumulate, execute Heavy Attack to maximize debuff window before swapping.
Swap timing is critical: transition to Strategic Sword immediately after Heavenquaker's Heavy completes but before Bleed decays. Input Inner Balance Strike during swap transition to minimize delay.
Dual Blades and Bow: Burst Rotation
Bamboocut-Wind path (Infernal Twinblades + Mortal Rope Dart) specializes in controlled burst windows. Rope Dart's Rodent Rampage adds damage using Token of Gratitude. Accumulate Tokens through Rope Dart combat, spend during Twinblades burst for multiplicative increases.
Flamelash meter management defines effectiveness. Twinblades' 5-hit Light combo fills Flamelash rapidly, and full meter buffs damage, crit rate, and crit damage simultaneously. Time activation with enemy vulnerability or boss stagger states.
Control-to-burst loop maintains consistent uptime. Rope Dart Swing Lights keep enemies at optimal range while building Tokens. Charged Heavies boost Might Rat before pulling with Bladebound Thread. Pull guarantees Twinblades' full combo connects, ensuring Flamelash fills completely.
Heavy with Fast Weapons
Stonesplit-Might weapons (Stormbreaker Spear + Thundercry Blade) combine heavy impact with sustained pressure. Stormbreaker's Storm Roar provides 16 seconds damage reduction for aggressive Thundercry combos. Thunder Shock applies Vulnerable, increasing all damage including Affinity.
Predator's Shield increases Stormbreaker charging speed by 50%, effectively doubling attack frequency. Faster charging creates more swap opportunities for tighter rotation loops.
Defensive swaps using Stormbreaker's damage reduction enable risky Thundercry positioning. Activate Storm Roar, swap to Blade, execute high-commitment combos during 16-second protection, swap back to refresh defensive buffs.
Ranged to Melee Transitions
Silkbind-Deluge weapons (Panacea Fan + Soulshade Umbrella) offer ranged-to-melee flexibility with sustain. Soulshade grants 15% damage buff to allies through Light Skill, benefiting your damage and party members. Buff persists through swaps, amplifying Panacea Fan's attacks.
Panacea Fan's Echoes of a Thousand Plants provides airborne healing while maintaining DPS. Activate during enemy attacks to avoid damage while healing, swap to Soulshade to reapply 15% buff. This creates self-sustaining DPS loop reducing consumable reliance.
Silkbind-Jade alternative (Inkwell Fan + Vernal Umbrella) focuses projectile combat. Inkwell's Jadewind Shield blocks projectiles for 8 seconds, enabling aggressive positioning. Activate shield, advance to melee, swap to Vernal for close-quarters damage, retreat behind shield to reset.
Mastering Weapon Swap Timing
Precise timing maximizes DPS by minimizing transition downtime and aligning cooldowns. Dual-Weapon Skill activation should occur during recovery frames of primary weapon's final attack. This overlap eliminates dead time.
Animation commitment varies significantly. Fast weapons like Strategic Sword allow swap inputs during most animations. Heavy weapons like Stormbreaker require complete commitment before accepting swaps. Understanding weapon-specific timings prevents failed attempts.
Keybinding optimization reduces input delay. Place Dual-Weapon Skill on easily accessible key—mouse thumb button or controller shoulder button—for faster reactions. Manual switch keybinds occupy secondary positions since they're used less frequently.
Identifying Perfect Swap Windows
Perfect windows occur when primary combo completes but enemy vulnerability remains open. For Sword and Spear, swap immediately after Spear's Heavy lands on debuffed target. Enemy remains vulnerable for several frames, allowing Sword's Inner Balance Strike to connect.
Boss attack patterns create predictable opportunities. Many bosses telegraph attacks with red indicators Strategic Sword can parry. Use parry moments as swap triggers—parry with Sword, swap to Spear during invulnerability, apply Sober Sorrow during boss recovery, swap back for next parry.
Crowd control from Rope Dart's Bladebound Thread creates guaranteed windows. Pulled enemies can't evade or counterattack during pull animation. Time Twinblades' 5-hit combo to begin exactly when pull completes for seamless continuation.
Animation Canceling for Faster Swaps
Animation canceling focuses on movement canceling rather than skill canceling. Most skills must complete fully to deliver damage, but movement inputs cancel recovery frames after damage delivery. Execute attack, confirm damage numbers, input dodge to cancel recovery and begin next action sooner.
Dodge canceling into swaps creates fastest transitions. Complete primary weapon's damage frames, input dodge, immediately input Dual-Weapon Skill during dodge animation. This chains attack-dodge-swap into single fluid motion.
Certain skills allow partial canceling without losing effects. Soulshade's Light Skill buff applies instantly despite longer animation. Cancel after buff icon appears to begin next action sooner, maximizing buff duration utilization.
Keybinding Configurations
Keyboard/mouse users should bind Dual-Weapon Skill to mouse thumb button or TAB (default). Martial Arts on Q and Special Skills on ` provide good defaults, but smaller hands may prefer rebinding Special Skills to mouse button.
Gamepad users benefit from default A/✖ for Dual-Weapon Skill. Consider swapping manual switch from D-pad Down to shoulder button for faster access without removing thumb from right stick.
Macros are generally unnecessary since swapping requires contextual decisions. However, simple toggle macros switching between two keybind layouts—one for primary combos, another for secondary—reduce finger stretching during extended sessions.
Common Timing Mistakes
Premature swapping before combo completion wastes damage and disrupts rhythm. Sword users frequently swap before Inner Balance Strike's damage registers, losing Bleed detonation. Wait for damage numbers before inputting swaps.
Late swapping after buff expiration nullifies synergy advantages. Jadewear's 12-second Affinity Damage buff requires immediate swap and execution to maximize window. Set mental timers, swapping with at least 6 seconds remaining for full secondary combo.
Cooldown desynchronization occurs when swapping while key skills remain unavailable. This forces suboptimal filler attacks. Track both weapons' cooldowns simultaneously, swapping only when secondary weapon's primary skills are ready.
Chi Synergy Combos: Advanced Rotations
Advanced rotations integrate Affinity with swap timing for multiplicative damage. Sword and Spear rotation becomes exponentially effective when Hawkwing 4-piece stacks Physical Attack during Bleed application, then stacks amplify Inner Balance Strike's detonation through Affinity.
Buff stacking order matters. Apply long-duration buffs first, then shorter ones, then execute damage. For Umbrella and Fan: activate Umbrella's 15% damage buff (longest), trigger Jadewear Affinity Damage with Martial Art (12 seconds), swap to Fan, unleash attacks during overlapping window.
Morale Chant and Battle Anthem create boss-specific burst. Stack Yi River to 5 times, activate Battle Anthem for +10% Charged Skills against bosses, execute highest-damage charged combo. For Stormbreaker, this means fully charged Thunder Shock followed by immediate Thundercry swap.
Chi Burst Timing
Affinity burst timing aligns with enemy vulnerability and buff convergence. Insightful Strike's +10% Affinity Damage at 100% Focus should activate during swap transition, ensuring buff applies to secondary weapon's opening combo. For Twinblades, reach 100% Focus with Rope Dart, swap to Twinblades, unleash Flamelash combos with Insightful Strike active.
Boss stagger states provide guaranteed burst windows. Reserve highest-damage Affinity combos for these moments. Apply all buffs—Umbrella damage, Jadewear Affinity, Morale Chant—swap to burst weapon, execute full strings while boss remains staggered.
Bitter Seasons Poison creates escalating opportunities. Each stack reduces Physical Defense by 0.6%, and Affinity scales from Physical Attack benefiting from reduced defense. Apply 5 Poison stacks early, time Affinity bursts when all 5 stacks are active.
Building Chi with Primary Weapon
Primary weapon Affinity generation should focus on rapid-hit skills triggering Affinity Rate frequently. Strategic Sword's light strings generate more procs than heavies due to higher hit frequency. Use lights to build Hawkwing Physical Attack stacks, swap to Spear to benefit during Bleed application.
Martial Arts Skills generate Affinity while triggering Jadewear bonuses simultaneously. Panacea Fan's Echoes hits multiple times during airborne animation, creating numerous Affinity opportunities while activating +10% Affinity Damage. This dual benefit makes Martial Arts optimal before swaps.
Focus building through primary attacks ensures Insightful Strike availability for secondary burst. Maintain aggressive pressure with primary until Focus reaches 100%, swap weapons, immediately spend Focus on secondary's highest-damage skill.
Spending Chi on Secondary Weapon
Secondary combos should prioritize high-damage, multi-hit skills maximizing Affinity opportunities during buff windows. Twinblades' 5-hit Light combo delivers five separate Affinity calculations, each benefiting from active buffs like Umbrella's 15% damage and Jadewear's Affinity bonus.
Charged attacks on secondary weapons benefit from Battle Anthem's +10% Charged Skills against bosses, stacking multiplicatively with Affinity. Stormbreaker's fully charged Thunder Shock applies Vulnerable while dealing massive damage, then Vulnerable amplifies subsequent Thundercry attacks after swapping back.
Endurance management prevents combo interruption. Reserve sufficient Endurance for secondary weapon's full string before swapping. Depleting mid-combo forces premature swap back, wasting buff durations and disrupting rhythm. Monitor Endurance constantly, swapping only with enough to complete planned combos.
Rotation Patterns for Different Scenarios
Single-target boss rotations prioritize sustained Affinity generation and buff cycling. Sword and Spear excel: Spear applies debuffs and Bleed while building Affinity, Sword detonates during Affinity buff windows. Maintain cycle throughout encounters, using Sword parries against red attacks.
Multi-target scenarios favor AoE capabilities. Nameless Sword and Spear (Bellstrike-Splendor) offer balanced AoE. Focus on hitting multiple targets per attack to generate Affinity from each enemy, multiplying effective Affinity Rate through target quantity.
Mobility-intensive fights require ranged-to-melee flexibility. Silkbind-Deluge weapons (Fan + Umbrella) enable damage while repositioning. Use Fan's ranged attacks during enemy movement, swap to Umbrella for melee burst when enemies become stationary, swap back during next movement phase.
Stance System Integration
Stance mechanics interact with swapping through buff persistence and skill availability. Certain stances enhance specific weapon types. Defensive stances reduce damage, enabling aggressive secondary combos. Offensive stances amplify damage but require careful swap timing.
Stance switching during swaps creates brief invulnerability windows advanced players exploit. Input stance switch simultaneously with Dual-Weapon Skill for invulnerability during swap animation. This allows swapping during enemy attacks without taking damage.
Stance-specific buffs apply to both weapons if stance remains active through swaps. Activate damage-boosting stance with primary, swap to secondary while maintaining stance, and both benefit. This enables stance-focused builds maximizing specific buffs across weapon pairs.
How Stances Affect Performance
Offensive stances increase damage but reduce defense, making swap timing more critical. Players must complete primary combos and swap during enemy recovery to avoid counterattacks. Stormbreaker's Storm Roar partially offsets offensive stance vulnerability.
Defensive stances extend combat duration but improve survival during learning. New players benefit from defensive stance damage reduction while practicing timing. As execution improves, transition to balanced or offensive stances for increased DPS.
Balanced stances offer moderate bonuses to both offense and defense, suiting most rotations. They don't dramatically amplify damage but prevent offensive stance vulnerability. Balanced stances work well with sustain-focused pairs like Fan and Umbrella.
Optimal Stance Switching
Stance switching should align with swap transitions to minimize downtime. Switch stance during primary weapon's final attack, input Dual-Weapon Skill immediately after stance switch completes. This chains attack-stance-swap into continuous sequence.
Defensive stance swaps enable survival during overwhelming pressure. When surrounded or facing multiple boss attacks, swap to defensive stance and most defensive weapon simultaneously. Inkwell's Jadewind Shield combined with defensive stance creates near-immunity to projectiles.
Offensive stance swaps maximize burst during enemy vulnerability. When bosses stagger or become immobilized, switch to offensive stance and highest-damage weapon simultaneously. Twinblades with full Flamelash plus offensive stance delivers devastating burst.
Stance-Specific Chi Bonuses
Certain stances increase Affinity Rate or Damage, directly amplifying swap effectiveness. Offensive stances typically boost Affinity Damage, ideal for burst pairs like Twinblades and Rope Dart. Activate offensive stance before Flamelash combos to maximize crit damage.
Balanced stances often provide moderate Affinity Rate increases, improving proc consistency across sustained rotations. Sword and Spear benefit from balanced stance Affinity Rate since rotation relies on consistent procs during Bleed application rather than single bursts.
Stance-based Affinity bonuses stack multiplicatively with gear bonuses. Hawkwing 4-piece Affinity Rate plus balanced stance Affinity Rate creates high proc frequency. Jadewear 4-piece Affinity Damage plus offensive stance Affinity Damage delivers extreme burst during buff convergence.
Defensive Swaps for Survivability
Defensive stance swaps prevent rotation interruption from enemy attacks. When enemy animations begin, swap to defensive stance and defensive weapon preemptively. Soulshade's damage buff persists even in defensive stance, maintaining party support while protecting yourself.
Stormbreaker's Storm Roar stacks with defensive stance bonuses for extreme mitigation. Activate Storm Roar, switch to defensive stance, execute risky combos with secondary weapon during overlapping protection. This enables aggressive play without typical vulnerability.
Defensive swaps should be temporary. Use defensive stance to survive specific attacks, swap back to balanced or offensive once threat passes. Prolonged defensive stance reduces DPS below optimal, extending combat and increasing overall damage through fight length.
Animation Canceling and Movement
Movement optimization maintains DPS uptime by reducing repositioning time. Dodge rolls cover distance quickly while providing invulnerability, enabling aggressive positioning without risk. Cancel attack recovery with dodge rolls toward next target to chain combos across multiple enemies.
Weapon swap animations can be movement-canceled to reduce transition time. Input dodge immediately after Dual-Weapon Skill to cancel swap animation's recovery frames. This shaves fractions of a second off each swap, accumulating significant savings across full rotations.
Directional movement during attacks adjusts positioning without interrupting combos. Many skills allow slight directional input during execution for micro-adjustments keeping enemies within optimal range. Twinblades' 5-hit Light combo permits forward movement throughout, allowing chase without interruption.
Which Animations Can Be Canceled
Recovery animations after damage delivery can be canceled safely. Wait for damage numbers confirming attack registered, then input dodge or swap to cancel recovery. This applies to most basic attacks and many skill animations.
Buff application animations can be canceled once buff icon appears. Soulshade's Light Skill buff applies instantly despite longer animation. Cancel after buff confirmation to begin next action sooner, maximizing buff duration.
Certain charged attacks allow canceling after minimum charge thresholds. Stormbreaker's charged attacks deal damage based on charge level, but full animation isn't required for partial charge damage. Release at minimum threshold, confirm damage, cancel recovery to begin next action faster.
Movement Canceling for Uptime
Forward dodge canceling maintains pressure on retreating enemies. Execute combo, cancel recovery with forward dodge toward enemy, immediately begin next combo. This prevents enemies escaping attack range, maintaining DPS that would otherwise be lost.
Backward dodge canceling creates safe distance after high-commitment attacks. Heavy weapons like Stormbreaker leave you vulnerable after major attacks. Cancel recovery with backward dodge to create space before enemy counterattacks land.
Lateral dodge canceling adjusts positioning for AoE avoidance while maintaining pressure. When enemies telegraph area attacks, cancel current combo with lateral dodge to exit danger zone, resume attacking from new position.
Dodge Canceling into Swaps
Dodge-swap chains create fastest weapon transitions. Complete primary weapon's damage frames, input dodge, input Dual-Weapon Skill during dodge animation. Swap begins before dodge recovery completes, eliminating swap animation downtime.
Invulnerability frame overlap provides defensive benefits during aggressive swapping. Dodge rolls grant brief invulnerability, and swap animations sometimes include additional invulnerability. Chaining creates extended invulnerability enabling swaps during enemy attacks without damage.
Directional dodge-swaps enable simultaneous repositioning and transitions. Dodge toward next target while inputting swap, arriving at optimal range with secondary weapon already equipped. This works well for Rope Dart to Twinblades swaps, positioning at melee range exactly when Twinblades become active.
Advanced Cancel Techniques
Animation queue canceling prevents unwanted skill execution after swaps. Input buffering sometimes causes skills to execute immediately after swaps, disrupting rotations. Clear input queue by tapping dodge without directional input after swaps, ensuring only intentional skills execute.
Skill-to-skill canceling chains abilities with minimal downtime. Certain skills can be canceled into other skills from same weapon. Strategic Sword's lights can be canceled into Inner Balance Strike mid-combo, enabling Bleed detonation without completing full light string first.
Swap-cancel-swap techniques enable rapid weapon cycling during specific mechanics. Execute primary skill, cancel with dodge, swap to secondary, execute one quick attack, cancel with dodge, swap back to primary. This rapid cycling maintains both weapons' buff uptimes simultaneously, though it requires precise execution and high Endurance reserves.
Building Your Character for Weapon Swap DPS
Character optimization prioritizes Max Physical Attack and Affinity Rate through gear and Arsenal progression. Arsenal unlocks at level 40, converting gear into permanent stat bonuses based on gear score. Prioritize high gear score items with Physical Attack and Affinity Rate for conversion.
Gear set bonuses dramatically impact effectiveness. Hawkwing 2-piece provides +0.1 Affinity Rate, 4-piece stacks 2% Physical Attack up to 5 times when Affinity triggers. This suits sustained DPS rotations like Sword and Spear where consistent procs build and maintain stacks.
Jadewear offers burst-focused alternatives: 2-piece grants +1 Max Physical Attack, 4-piece provides +10% Affinity Damage after Martial Art skills, increasing to +20% against controlled or low-Qi enemies for 12 seconds. This excels with crowd-control pairs like Rope Dart and Twinblades where Bladebound Thread pull triggers enhanced Affinity Damage.
Essential Attributes
Max Physical Attack scales Affinity damage directly, making it highest-priority stat. Each point increases Affinity bonus damage by 20%, creating multiplicative scaling with Affinity Rate. Prioritize gear with Max Physical Attack primary stats over attack speed or crit rate.
Attack speed increases hit frequency, generating more Affinity opportunities per second. Fast weapons like Strategic Sword benefit more from attack speed than slow weapons like Stormbreaker. Balance attack speed with Max Physical Attack based on weapon pair—fast pairs favor attack speed, slow pairs favor raw damage.
Crit rate and crit damage provide alternative scaling stacking with Affinity. Twinblades' Flamelash buff increases both crit rate and crit damage, making crit-focused gear particularly effective for Twinblades builds. Combine crit stats with Affinity stats for multiplicative increases during Flamelash bursts.
Chi Regeneration Gear
Affinity Rate accessories enable consistent proc generation across all weapon types. Rings, amulets, and accessories with Affinity Rate bonuses stack with gear set bonuses, pushing total Affinity Rate to levels where nearly every attack triggers bonus damage. Aim for combined Affinity Rate of 0.3+ for consistent generation.
Max Physical Attack accessories amplify Affinity damage per proc. While Affinity Rate determines frequency, Max Physical Attack determines damage. Balance both through accessory selection—use some slots for Affinity Rate, others for Max Physical Attack.
Endurance regeneration accessories extend combo duration without forcing premature swaps. Higher regeneration allows longer combo strings with each weapon before swapping, maximizing buff utilization. This proves valuable for buff-heavy rotations like Umbrella and Fan where maintaining buff uptime across extended combos increases overall DPS.
Skill Point Allocation
Skill point allocation should prioritize unlocking Dual-Weapon Skills for both equipped weapons before investing in advanced upgrades. Dual-Weapon Skills enable core swapping mechanic, making them mandatory. Allocate points to reach these skills first, then backfill earlier upgrades.
Weapon-specific skill paths determine optimal allocation. Strategic Sword requires points in Bleed-stacking skills and Inner Balance Strike for detonation. Heavenquaker needs Sober Sorrow debuff and light skill upgrades for Bleed application. Prioritize skills directly contributing to planned rotation over generalist upgrades.
Martial Arts Skills deserve investment due to Affinity generation and Jadewear 4-piece synergy. These skills trigger +10% Affinity Damage buffs while dealing respectable damage. Upgrade Martial Arts for both weapons to create flexible buff activation regardless of which weapon is active.
Weapon Upgrade Priorities
Primary weapon upgrades should focus on most frequently used skills. For Strategic Sword, prioritize Inner Balance Strike damage upgrades since this delivers burst damage. For Heavenquaker, upgrade light skills applying Bleed stacks, increasing application speed and damage per stack.
Secondary weapon upgrades should enhance burst potential during swap windows. Twinblades benefits most from Flamelash meter generation speed and buff duration extensions. These maximize burst window length, allowing more attacks under Flamelash buffs per cycle.
Balanced upgrade distribution prevents over-investment in one weapon at expense of the other. Swap effectiveness depends on both weapons contributing meaningfully. Allocate resources proportionally to each weapon's role—60/40 split favoring primary maintains balance while acknowledging primary's higher usage frequency.
PvE vs PvP Weapon Swap Strategies
PvE swapping emphasizes sustained DPS optimization and buff cycling against predictable enemy patterns. Boss attack telegraphs create reliable swap windows for safe transitions and full combo execution. Sword and Spear excel in PvE through predictable Bleed stack and detonation rotation.
PvP swapping prioritizes burst damage and unpredictability against human opponents. Players react differently than AI, requiring adaptive adjustments. Twinblades and Rope Dart work well in PvP—Rope Dart controls positioning, Twinblades delivers burst before opponents react.
Defensive swapping plays larger roles in PvP than PvE. Human opponents punish predictable rotations, requiring defensive swaps to counter enemy burst attempts. Soulshade's 15% damage buff supports allies while providing defensive options in team-based modes.
Boss Fight DPS Optimization
Boss-specific rotations adapt to individual mechanics and vulnerability windows. Bosses with frequent staggers favor burst pairs like Twinblades and Rope Dart. Bosses with consistent uptime favor sustained pairs like Sword and Spear.
Red attack parrying with Strategic Sword creates additional swap opportunities. Parry red attacks with Sword, swap to Heavenquaker during parry invulnerability, apply Sober Sorrow during boss recovery, swap back for next parry. This maintains defensive uptime while maximizing debuff application.
Battle Anthem's +10% Charged Skills damage against bosses makes charged attacks optimal for boss DPS. Stormbreaker's fully charged Thunder Shock benefits from this while applying Vulnerable. Combine Battle Anthem with Morale Chant stacks and Affinity buffs for extreme burst during vulnerability windows.
PvP Burst Combos
PvP burst combos must execute faster than opponents can react or escape. Rope Dart's Bladebound Thread pull into Twinblades Flamelash combo delivers massive damage before enemies dodge. Pull guarantees Twinblades' full combo connects, and Flamelash buffs ensure lethal output.
Unpredictable swap timing prevents opponents anticipating burst windows. Vary rotation patterns—sometimes swap after 3 Bleed stacks instead of 5, sometimes use defensive swaps to bait aggression, then counter with burst. This unpredictability keeps opponents guessing, preventing effective defensive responses.
Crowd control chains enable guaranteed damage during PvP swaps. Apply crowd control with primary, swap to secondary during control duration, execute full burst while opponent remains controlled. Rope Dart's pull, Stormbreaker's Thunder Shock stun, and similar effects create guaranteed damage windows.
Adapting to Enemy Behavior
Enemy attack pattern recognition enables proactive swapping. When enemies begin specific animations, swap to defensive weapon preemptively rather than reactively. Inkwell's Jadewind Shield activated before projectiles land provides complete protection, while reactive activation often occurs too late.
Aggressive enemies require defensive weapon prioritization. Keep defensive weapon active longer, swapping to offensive weapons only during confirmed enemy recovery. Soulshade's damage buff persists through swaps, allowing offensive support while prioritizing defensive positioning.
Passive enemies allow extended offensive weapon uptime. When enemies retreat or hesitate, maintain offensive weapon and execute full combos without defensive swaps. Twinblades' Flamelash builds faster during uninterrupted offense, creating stronger burst when enemies eventually engage.
Defensive Swaps and Counter-Attacks
Counter-attack swaps punish enemy aggression while maintaining DPS. Strategic Sword's parry exemplifies this—parry enemy attacks with Sword, swap to Spear during parry invulnerability, apply debuffs during enemy recovery, swap back for next parry. This converts defensive actions into offensive opportunities.
Defensive weapon buffs enable safer offensive swaps. Stormbreaker's Storm Roar allows aggressive secondary combos without excessive risk. Activate Storm Roar, swap to Thundercry, execute high-commitment combos during 16-second protection, swap back to refresh defensive buffs.
Retreat swaps create distance for healing or buff reapplication. When overwhelmed, swap to ranged weapon and create space through backward movement while maintaining damage. Panacea Fan's ranged attacks combined with Echoes healing enable safe recovery without completely disengaging.
Measuring and Improving DPS Performance
DPS measurement requires tracking damage output over time during controlled scenarios. Practice against training dummies or specific bosses repeatedly, recording total damage and time to kill. Calculate DPS by dividing total damage by time, then compare across different weapon pairs and rotations.
Rotation consistency matters more than theoretical maximum DPS. A simpler rotation executed perfectly outperforms complex rotation with frequent mistakes. Practice basic swaps until execution becomes automatic, then gradually add complexity through buff stacking and animation canceling as muscle memory develops.
Gear progression creates natural DPS increases over time. Arsenal conversions at level 40 provide permanent stat bonuses amplifying all future damage. Prioritize reaching level 40 and converting high gear score items to establish strong baseline stats before optimizing advanced techniques.
How to Track DPS
Training dummy testing provides controlled measurement environments. Execute full rotation against dummies for fixed periods—30 seconds, 1 minute, 2 minutes—recording total damage. Repeat tests multiple times, calculating average DPS to account for Affinity proc variance and crit randomness.
Boss encounter time tracking measures real-world effectiveness. Record time to kill for specific bosses, then compare across different weapon pairs and rotations. Faster kill times indicate higher effective DPS, accounting for mechanics, movement, and defensive requirements that dummy tests ignore.
Damage breakdown analysis identifies which skills contribute most to total DPS. Track damage dealt by each skill individually during rotations, calculating percentage contribution. This reveals whether rotation emphasizes correct high-damage skills or wastes time on low-value filler attacks.
Identifying DPS Bottlenecks
Cooldown gaps create bottlenecks when both weapons' primary skills remain unavailable simultaneously. Analyze rotation timing to identify these gaps, then adjust swap timing to ensure at least one weapon always has skills available. Stagger cooldowns between weapons rather than synchronizing them.
Buff downtime reduces effective DPS when damage buffs expire between reapplication. Track buff durations during rotations, identifying moments where no buffs are active. Adjust timing to maintain overlapping buff coverage—reapply long-duration buffs before expiration rather than waiting for complete expiration.
Endurance depletion forces premature swaps disrupting optimal flow. Monitor Endurance consumption during combos, identifying skills draining Endurance disproportionately. Replace Endurance-intensive skills with more efficient alternatives, or incorporate brief pauses for regeneration between strings.
Practice Drills
Single-weapon mastery drills build foundational combo execution before introducing swapping complexity. Practice each weapon's optimal combo individually until execution becomes automatic. Sword users should drill light strings into Inner Balance Strike until transition feels natural.
Swap timing drills focus exclusively on transition execution without concerning damage optimization. Practice swapping between weapons repeatedly, focusing on minimizing transition time through dodge-canceling and animation awareness. Use training dummies to practice without combat pressure.
Full rotation drills combine individual weapon mastery with swap timing practice. Execute complete rotation cycles against dummies, gradually increasing execution speed as accuracy improves. Record attempts to identify specific mistakes, then drill those problem areas individually before returning to full rotation practice.
Advanced Tips from High-Level Players
Buff snapshot mechanics allow certain buffs to persist beyond normal duration through swaps. Apply buffs with primary, swap to secondary, and some buffs continue affecting secondary attacks even after duration expires. Test different combinations to identify which buffs snapshot and exploit this for extended coverage.
Endurance management through swapping enables longer sustained combat. Swap to secondary when primary Endurance depletes, allowing primary Endurance to regenerate while secondary remains active. This alternating pattern maintains continuous pressure without Endurance-forced downtime.
Gear set mixing creates hybrid builds combining multiple set bonuses. Equip 2-piece Hawkwing for Affinity Rate and 2-piece Jadewear for Max Physical Attack, sacrificing 4-piece bonuses for balanced stat distribution. This suits players who haven't acquired full sets or prefer balanced stats over specialized bonuses.
Common Weapon Swapping Mistakes
Premature swapping before combo completion wastes damage and disrupts rhythm. Players frequently swap immediately after applying Bleed without executing Heavy Attack maximizing debuff windows. Solution: Practice full combos individually until muscle memory prevents premature swapping.
Buff desynchronization occurs when activating multiple buffs simultaneously, causing them to expire together and creating buff downtime. Solution: Stagger buff activation across swaps—apply long-duration buffs with primary, short-duration buffs with secondary, maintaining overlapping coverage.
Cooldown mismanagement leaves players with swapped weapons whose primary skills remain unavailable. Solution: Track both weapons' cooldown timers simultaneously using on-screen indicators, swapping only when secondary's key skills are ready for immediate use.
Swapping Too Early or Late
Early swapping before damage registration loses final hit's damage and associated effects. Strategic Sword's Inner Balance Strike detonates Bleed only if skill completes fully—swapping mid-animation wastes detonation. Solution: Wait for damage numbers before inputting swaps.
Late swapping after buff expiration nullifies synergy advantages. Jadewear's 12-second Affinity Damage buff requires immediate action—delaying swap until 2 seconds remain wastes 10 seconds of enhanced damage. Solution: Set mental timers based on buff durations, swapping with sufficient time remaining to complete secondary combos.
Inconsistent swap timing creates unpredictable flow preventing muscle memory development. Sometimes swapping after 3 hits, sometimes after 5, prevents hands from learning consistent patterns. Solution: Establish fixed swap points within combos—always swap after specific skills or hit counts—creating repeatable patterns becoming automatic through practice.
Chi Mismanagement
Affinity Rate without sufficient Max Physical Attack generates frequent but weak procs. Players stacking Affinity Rate without balancing Max Physical Attack see numerous small yellow numbers instead of fewer large ones. Solution: Balance Affinity Rate and Max Physical Attack through gear selection, aiming for roughly equal investment.
Buff overlap waste occurs when activating multiple Affinity Damage buffs simultaneously. Insightful Strike and Jadewear both provide Affinity Damage bonuses, but activating together doesn't stack durations. Solution: Stagger Affinity Damage buffs across swaps, maintaining continuous enhancement rather than clustered bursts.
Ignoring Affinity mechanics entirely wastes 20% potential damage from every attack. Players focusing exclusively on raw Physical Attack without Affinity Rate miss significant opportunities. Solution: Incorporate at least 0.2 Affinity Rate through gear and accessories, ensuring regular procs without excessive investment.
Ignoring Stance Benefits
Stance neglect leaves free damage bonuses unused. Players remaining in neutral stance miss offensive stance amplification or defensive stance survival improvements. Solution: Actively manage stance based on combat situation—offensive during enemy vulnerability, defensive during dangerous attacks.
Stance-weapon mismatches reduce effectiveness of both systems. Using offensive stance with defensive weapons or defensive stance with burst weapons creates contradictory playstyles. Solution: Match stance to weapon role—offensive with Twinblades, defensive with Umbrella, balanced with Sword.
Forgetting stance-specific Affinity bonuses wastes significant damage potential. Offensive stances often provide Affinity Damage bonuses multiplying with gear bonuses for extreme burst. Solution: Activate offensive stance before executing Affinity-focused burst combos, maximizing multiplicative damage stacking.
Overcomplicated Rotations
Rotation complexity beyond execution capability creates more mistakes than additional damage. Players attempting 8-step rotations with perfect buff alignment often miss steps, reducing actual DPS below simpler 4-step rotations executed flawlessly. Solution: Start with basic rotations, adding complexity only after achieving consistent execution of simpler versions.
Buff stacking diminishing returns occur when activating 5+ buffs simultaneously. Each additional buff provides smaller relative increases, and time spent activating buffs reduces time dealing damage. Solution: Limit active buffs to 2-3 most impactful options, spending saved time executing damage combos.
Ignoring fundamentals while chasing advanced techniques creates weak foundations. Players attempting animation canceling before mastering basic swap timing struggle with both. Solution: Master fundamental swap execution first—clean transitions, full combo completion, basic buff cycling—before incorporating advanced techniques like animation canceling.
Frequently Asked Questions
How does weapon swapping work in Where Winds Meet?
Weapon swapping allows equipping two weapons simultaneously and switching mid-combat via Dual-Weapon Skills on TAB (keyboard/mouse) or A/✖ (gamepad). Dual-Weapon Skill unlocks last in weapon skill trees, costs no Endurance, but has cooldown between uses. Manual switching via D-pad Down or custom keybinds provides alternative without skill integration.
What are the best weapon combinations for maximum DPS?
Strategic Sword + Heavenquaker Spear delivers highest single-target DPS through 5-stack Bleed detonation with Inner Balance Strike. Infernal Twinblades + Mortal Rope Dart excels at burst damage through Flamelash meter combos. Panacea Fan + Soulshade Umbrella provides sustained DPS with built-in healing and 15% damage buff. Nameless Sword + Nameless Spear offers balanced AoE across multiple targets.
How do Affinity mechanics affect weapon swap damage?
Affinity attacks deal 20% additional damage based on Max Physical Attack, scaling directly with gear stats. Hawkwing 4-piece stacks 2% Physical Attack up to 5 times when Affinity triggers, creating multiplicative increases. Jadewear 4-piece provides +10% Affinity Damage after Martial Art skills, increasing to +20% against controlled enemies for 12 seconds. These mechanics transform swapping from skill rotation into stat-scaling optimization.
Does weapon swapping have cooldowns or limitations?
Dual-Weapon Skills operate on cooldowns between uses, preventing spam-swapping. Manual switching bypasses cooldown but lacks integrated skill activation. Buffs persist through swaps until path logic breaks, allowing damage buffs from primary weapons to enhance secondary attacks. Endurance costs for skills before and after swapping create resource management requirements despite swaps themselves costing no Endurance.
What keybinds optimize weapon swapping performance?
Keyboard/mouse users should bind Dual-Weapon Skill to easily accessible keys like TAB (default) or mouse thumb buttons. Gamepad users benefit from default A/✖ binding but may remap manual switch from D-pad Down to shoulder buttons for faster access. Place Martial Arts (Q/X/□) and Special Skills (`/Y/△) on comfortable positions that don't require excessive finger stretching during complex rotations.
How do you prevent DPS loss during weapon swaps?
Minimize transition downtime through dodge-canceling—complete primary weapon's damage frames, input dodge, activate Dual-Weapon Skill during dodge animation. Maintain buff coverage by staggering activation across weapons rather than clustering buffs on one weapon. Track both weapons' cooldown timers, swapping only when secondary's primary skills are available for immediate use. Practice full rotation cycles until execution becomes automatic, eliminating hesitation creating DPS gaps.