Related articles
Wuthering Waves Echo Farming Guide: Cost 3 Aero & Havoc
Master the most efficient echo farming routes for Cost 3 Aero and Havoc sets in Wuthering Waves. Learn spawn locations, respawn mechanics, and optimized loops that maximize echo collection per hour for Jiyan's Aero build or Rover's Havoc configuration.
Buffget
Understanding Cost 3 Echoes
Cost 3 echoes are top-tier equipment in Wuthering Waves, dropping from boss-tier enemies with substantial damage bonuses. They offer main stats including HP%, ATK%, DEF%, Energy Regen%, and Attribute DMG Bonus modifiers.
Sierra Gale (Aero set) grants 10% Aero DMG with two pieces. Five-piece bonus delivers 30% Intro Skill Aero DMG for 15 seconds. Sun-sinking Eclipse (Havoc set) provides 10% Havoc DMG at two pieces, with five-piece stacking 7.5% Basic/Heavy Attack Havoc DMG up to four times for 15 seconds.
For faster progression, cheap Lunite subscription at buffget offers competitive pricing and fast delivery.
Echo Rarity and Drop Rates
Echo quality depends on Data Bank Level. Level 15 unlocks 5-star echoes, but Level 21 guarantees 5-star drops from elites—your critical farming threshold.
Drop rates vary by enemy type and Union Level. Elite Cost 3 echoes spawn at fixed locations with predetermined levels. Respawn triggers after defeating enemies and teleporting away, typically within minutes.
Tacet Fields cost 60 Waveplates per run with 15 enhanced chances weekly (resets Monday 4 AM server time). Open-world farming remains more efficient for targeting specific sets.
Echo Respawn System
Respawn follows location-based timers, not global cooldowns. After defeating elites, teleport to distant waypoints and wait several minutes. This enables efficient routes where you defeat multiple echoes, then return to find first enemies respawned.
Union Level impacts drop quality and rates. Data Bank Level advancement is the most important prerequisite for serious farming.
Server reset Monday 4 AM provides strategic opportunities for maximizing weekly Tacet Field bonuses. Plan farming around this reset to capture all 15 enhanced chances.
Optimal Farming Times
Peak efficiency combines multiple objectives: echo farming with daily quests, exploration, and material gathering. Maintain marked waypoints at key spawns for rapid route execution.
Buy Lunite Wuthering Waves through buffget's secure platform for fast account progression.
Complete Aero Echo Farming Routes
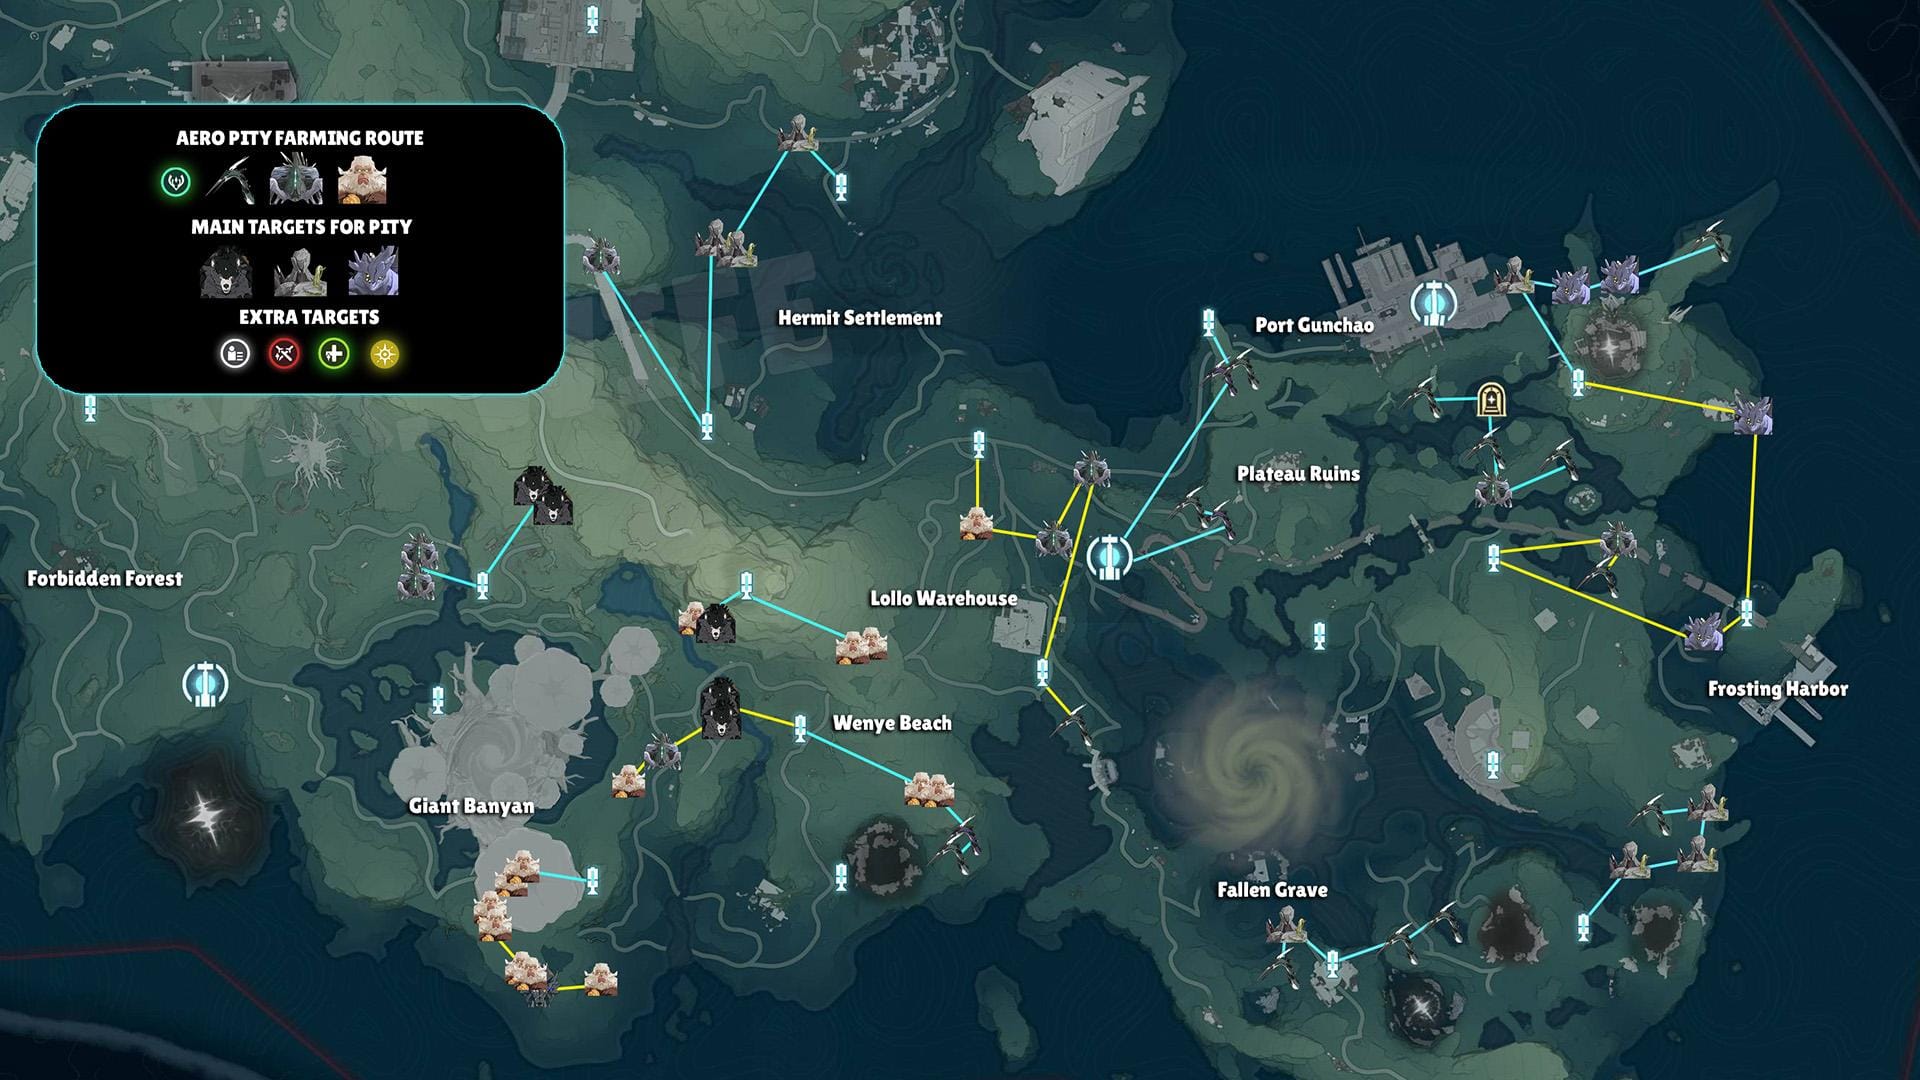
Sierra Gale farming centers on three Cost 3 echoes: Chaserazor, Cyan-Feathered Heron, and Hoochief variants.
Chaserazor Route
- Level: 25 in Central Plains (after Main Story Act 1)
- Spawns: 28 total points
- Route time: 12 minutes
- Yield: 4-6 encounters per loop
Start at Central Plains northern waypoint, sweep south through clustered spawns, loop back.
Cyan-Feathered Heron Location
- Level: 110 near Fallen Grave in Whining Aix Mire
- Spawns: 31 total points
- Route time: 15 minutes
- Premium Aero echo with better stats
Sierra Gale Route 2 targets Whining Aix Mire. Start from central waypoint, cover densest spawn clusters.
Hoochief Fast Loop
- Level: 120 in Thorny Passage, Dim Forest
- Spawns: 23 points each (Cyclone and Menace variants)
- Route time: 18 minutes
- Yield: 6-8 Cost 3 echoes per completion
Sierra Gale Route 1 begins at Giant Banyan, sweeps through Thorny Passage for both Hoochief variants. Most time-efficient Aero farming for endgame.
Combined Aero Sessions
Advanced mega-routes chain multiple regions into 45-minute sessions:
- Chaserazor in Central Plains
- Cyan-Feathered Heron in Whining Aix Mire
- Hoochief variants in Dim Forest
Sierra Gale Route 5 covers Withering Frontline in Desorock Highland for spawn diversity.
Complete Havoc Echo Farming Routes
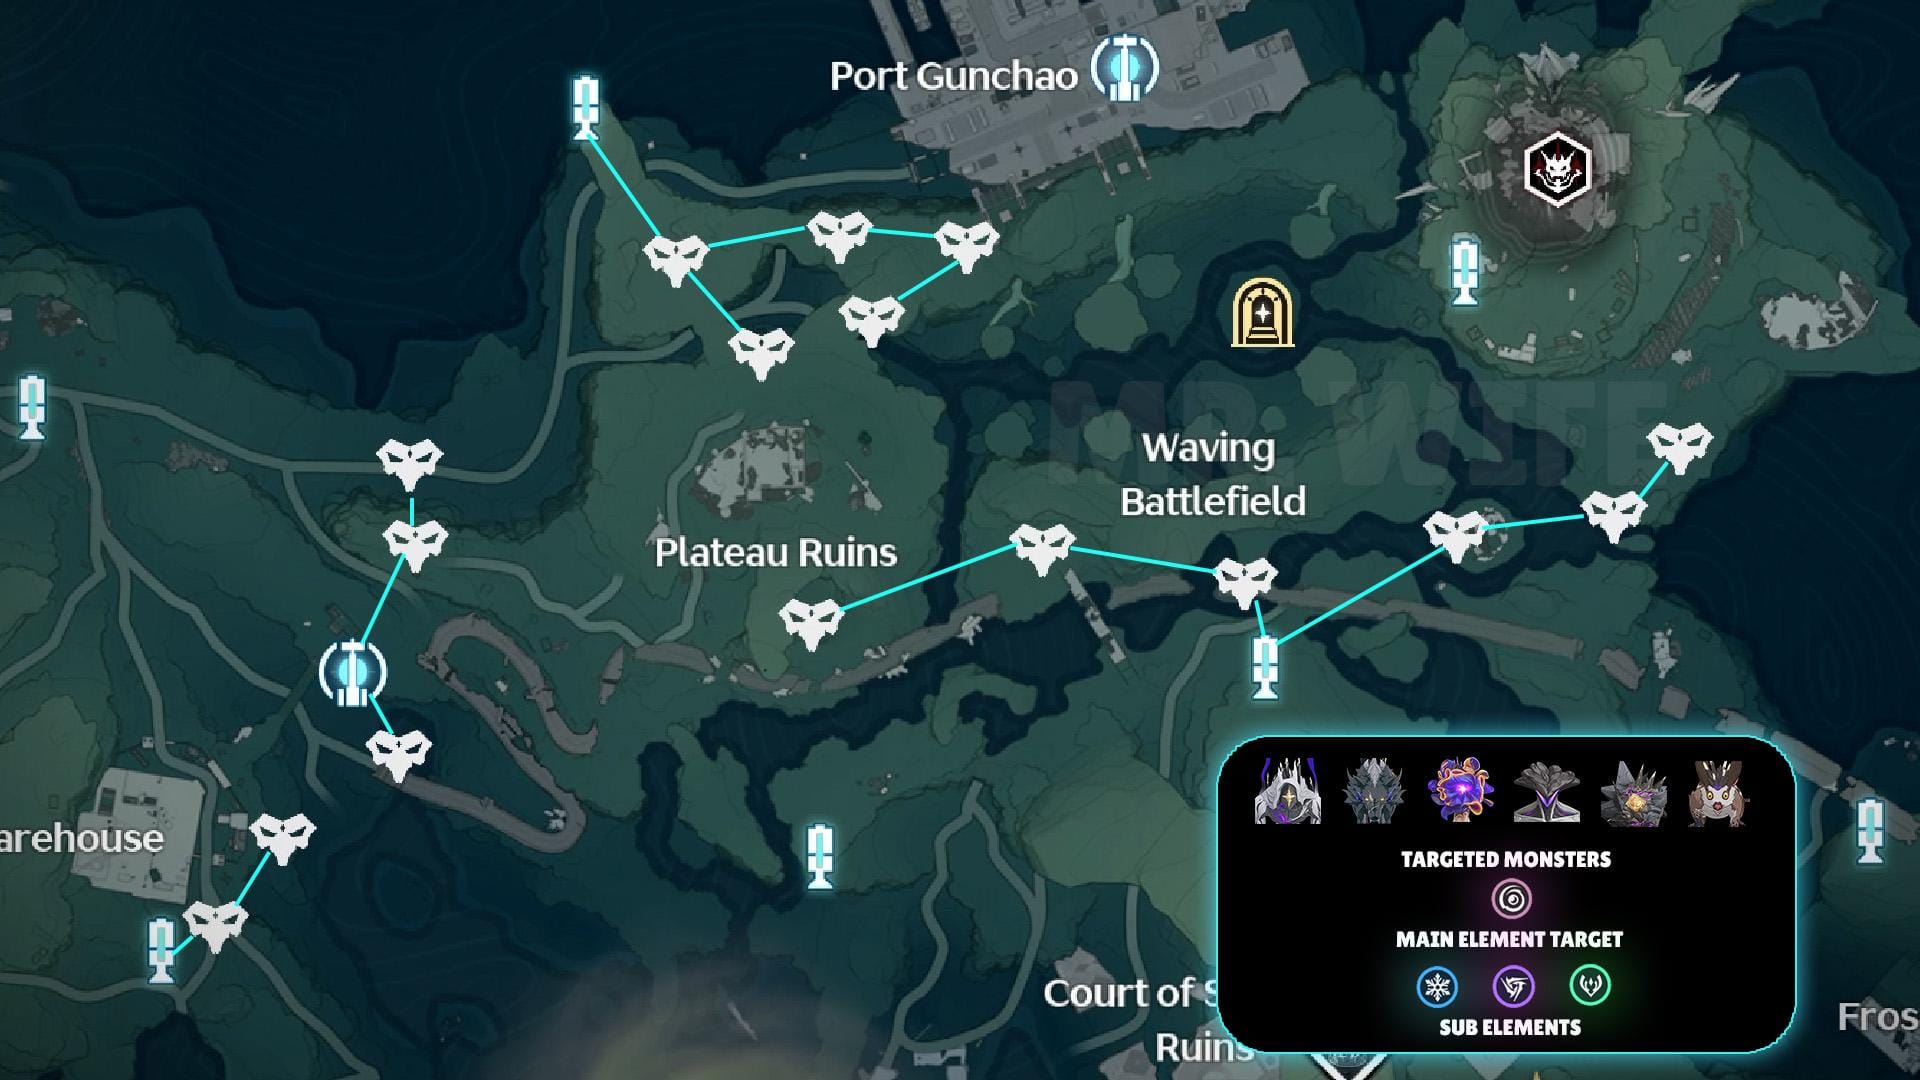
Sun-sinking Eclipse farming focuses on Havoc Dreadmane and Roseshroom.
Havoc Dreadmane Route
- Level: 40 in Shattered Blocks, Wuming Bay
- Spawns: 76 total points (highest density)
- Route time: 14 minutes
- Yield: 7-9 encounters per loop
Sun-sinking Eclipse Route 3 targets Settle Range Distribution Center and Thorny Passage. Start from Wuming Bay southern waypoint. Gold standard for Havoc farming efficiency.
Roseshroom Path
- Level: 60 near Port City Guixu, Donglu Research Station
- Spawns: 55 points (groups of two)
- Route time: 16 minutes
- Dual-spawn mechanic doubles acquisition
Start at Port City Guixu eastern waypoint, clear paired spawns in circular pattern.
Havoc Boss Rotation
Combine Havoc Dreadmane and Roseshroom into unified sessions. Sun-sinking Eclipse Route 4 in Whining Aix Mire offers additional spawns.
Optimal strategy: alternate between Wuming Bay and Port City Guixu routes across sessions. Always farm freshly respawned enemies.
Sun-sinking Eclipse Route 2 covers Forbidden Forest in Dim Forest for geographic diversity.
Advanced Route Optimization
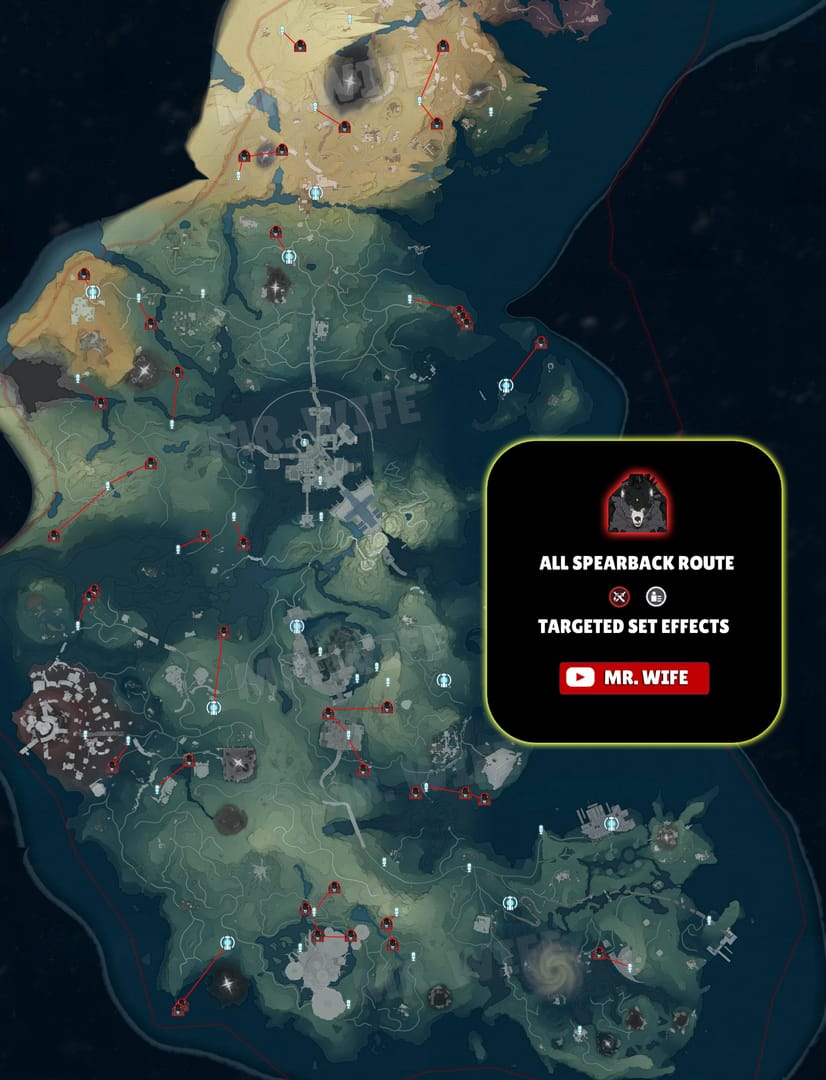
Building Custom 20-Minute Loops
- Identify target echo set and map spawn locations with waypoint markers
- Create logical path connecting high-density clusters
- Avoid backtracking or excessive running
- Test timing across multiple executions
Ideal 20-minute loop yields 8-12 Cost 3 encounters. Routes over 25 minutes indicate suboptimal pathing. Under 15 minutes may not allow sufficient respawn time.
Multi-Route Farming
Maintain three distinct routes across regions. Rotate: complete Route A → Route B → Route C → return to Route A with fully respawned enemies.
Prevents burnout while progressing multiple character builds. Alternate between Aero routes (Dim Forest) and Havoc routes (Wuming Bay).
Waypoint Teleport Efficiency
Place custom markers at spawn cluster starting points. Teleport instead of running—advances route and triggers respawn timers simultaneously.
Daily Quest Integration
Overlap daily objectives with echo routes. When quests require Dim Forest, Wuming Bay, or Whining Aix Mire visits, execute echo farming automatically.
Character-Specific Priorities
Jiyan (Aero DPS)
- Set: Sierra Gale five-piece (30% Intro Skill Aero DMG)
- Targets: Cyan-Feathered Heron, Hoochief variants (Level 110-120)
- Main stats: ATK%, Aero DMG Bonus
- Routes: Whining Aix Mire, Dim Forest (60% farming time on premium spawns)
Rover (Havoc)
- Set: Sun-sinking Eclipse five-piece (30% Basic/Heavy Attack Havoc DMG stacked)
- Target: Havoc Dreadmane (76 spawns, Level 40)
- Main stats: ATK%, Havoc DMG Bonus
- Substats: Crit Rate, Crit DMG, ATK%
- Route: Wuming Bay primary focus
Calcharo
Same Sun-sinking Eclipse requirements as Rover (Havoc). Single route progression serves multiple Havoc characters—high efficiency multiplier.
Support Characters
- Priority: Energy Regen%, HP% main stats
- Stonewall Bracer: Level 85, Camp Overwatch cliff, Desorock Highland (Rejuvenating Glow set)
- Traffic Illuminator: Level 60, groups of three, bridge north of Misty Coast
Echo Quality Optimization
High-Value Drops
Keep:
- ATK% or Attribute DMG Bonus main stats (DPS priority)
- Energy Regen% (expensive ultimates)
- Minimum two damage-oriented substats
Top substats: Crit Rate, Crit DMG, ATK%, element-specific damage
Low priority: Flat ATK, DEF%, HP% (unless bruiser builds)
Substat Priority
Aim for ~70% Crit Rate before heavily investing in Crit DMG. Balanced investment outperforms specialization.
When to Stop Farming
Transition to tuning when you have:
- Complete five-piece sets
- Correct main stats on all slots
- At least one desirable substat per piece
Shift focus to enhancement and tuning for controlled progression over RNG farming.
Absorption Cost Management
Absorb only echoes meeting main stat and minimum substat requirements. Recycle inferior drops immediately.
Data Bank synthesis converts excess echoes into targeted acquisitions. Balance open-world farming (volume) with synthesis (gap-filling).
Common Mistakes to Avoid
Drop Rate Misconceptions
Drop rates vary by enemy type, spawn level, and Data Bank progression. Higher spawn level elites provide better quality despite longer clear times.
Data Bank Level 21 = guaranteed 5-star drops. Farming before this threshold yields predominantly lower-quality echoes requiring replacement.
Low Union Level Farming
Lower Union Levels = reduced drop quality and rates. Rush Union Level instead of accumulating suboptimal echoes.
Inventory Management
Implement strict retention criteria during farming. Immediately recycle echoes failing minimum standards. Example: Only keep ATK% main stat with minimum two damage substats.
Use filtering tools, but maintain disciplined standards to prevent overflow.
RNG Truth
Large sample sizes (100+ echoes) normalize toward expected averages. Consistent farming volume matters more than short-term luck. Trust mathematical averages over anecdotal experience.
Efficiency Metrics
Echoes Per Hour
- Optimized routes: 20-30 echoes/hour
- Below 15/hour: Suboptimal pathing or insufficient damage
- Havoc Dreadmane (76 spawns): Higher end (30/hour)
- Cyan-Feathered Heron (31 spawns): Lower end (20/hour)
Golden Echo Drop Rates
Data Bank Level 21 guarantees 5-star drops. Below Level 21 = probability-based, heavily weighted toward lower rarities.
Delay serious farming until Level 21. Time invested in progression provides superior long-term value.
Farming vs Synthesis
- Open-world: Superior volume, selective targeting
- Synthesis: Guaranteed specific echo types at resource cost
- Optimal: Farm for volume, synthesize to fill gaps
Weekly Schedule Template
- Mon-Wed: Aero farming (Dim Forest, Whining Aix Mire)
- Thu-Fri: Havoc farming (Wuming Bay, Port City Guixu)
- Weekends: Tacet Field enhanced chances, synthesis
Rotation prevents burnout, maintains engagement through variety.
Team Compositions
Best DPS for Fast Clears
High burst damage + short cooldowns = minimal combat time per enemy.
- Jiyan: Farms own Aero set, self-reinforcing progression
- Rover (Havoc): Farms Havoc echoes using Havoc damage
Element alignment creates natural farming synergy.
Movement Speed Buffs
Movement speed = more echoes/hour. Prioritize characters or echo sets with speed buffs. Cumulative time savings across dozens of teleports = significant efficiency gains.
Maintain stamina for sprinting and climbing. Consider echo sets reducing stamina consumption.
Solo vs Co-op
Solo: Complete control, preferred for targeted farming Co-op: Can accelerate clears but coordination overhead often reduces efficiency
Solo farming with optimized routes delivers superior echoes/hour for most players.
FAQ
What are the fastest Cost 3 echo farming routes?
Havoc Dreadmane in Wuming Bay: 76 spawns, 7-9 echoes per 14-minute loop. Cyan-Feathered Heron in Whining Aix Mire: 31 spawns, 15-minute route. Hoochief in Dim Forest Thorny Passage: 23 spawns each variant, 18-minute circuit.
How long do echoes take to respawn?
Several minutes after defeat when you teleport away. Teleport to next location and clear 3-4 spawns—first enemies typically respawned when you loop back.
What Union Level for efficient Cost 3 farming?
Data Bank Level 21 guarantees 5-star drops—critical threshold. Lower levels produce blue/purple drops requiring replacement.
Which characters need Aero echo sets?
Jiyan benefits most from Sierra Gale five-piece (30% Intro Skill Aero DMG). Any Aero DPS gains value from two-piece 10% Aero DMG bonus.
Can I farm multiple Cost 3 echoes in one route?
Yes. Mega-route: Chaserazor (Central Plains) → Cyan-Feathered Heron (Whining Aix Mire) → Hoochief (Dim Forest). 45-minute session respects respawn timers, maximizes acquisition.
Should I farm echoes or use synthesis?
Farm for volume and set completion. Synthesize to fill specific gaps when you need one echo type to complete five-piece bonus.
_39648.jpg)
