

Related articles


ZZZ Nangong Yu Best Build: Anomaly Proficiency Meta 2026
Nangong Yu, the S-Rank Ether Stun agent from Angels of Delusion, releases March 24, 2026 at 11 AM UTC+8 in Version 2.7 Phase 1. Her Core Passive converts excess Anomaly Mastery above 100 into Impact at 0.8 per point, fundamentally changing stun builds. This guide shows why Anomaly Proficiency over Impact maximizes stun windows and damage, with specific Drive Disc configs, W-Engines, and teams for her 3,705,000 Denny endgame investment.
Buffget
Why Nangong Yu's Build Meta Shifted: The Anomaly Proficiency Revolution
Core Passive Genius Idol grants +100 Anomaly Proficiency baseline, making her the first Stun agent built around Anomaly mechanics vs pure Impact. Each Anomaly Mastery point above 100 increases Impact by 0.8 automatically—no manual Impact stacking needed on Drive Discs.
The conversion creates multiplicative scaling. Base Anomaly Mastery 126 + Core Passive +100 = 193 Anomaly Proficiency before equipment. Additional Ability Angel Captain boosts Anomaly Buildup Rate +20% on stunned enemies, creating feedback: higher Anomaly Proficiency → extended stun windows → more Anomaly triggers.
Secure banner materials via cheap ZZZ monochromatic films top up on buffget—guaranteed at 90 pulls (14,400 Polychrome).
Ultimate Exiled Starstream: 4171.1% DMG, 1775.3% Daze. EX Special A Rather Heavy Love: 40 Energy, 1473.5% DMG, 696.0% Daze. These scale better with extended stun windows from Anomaly Proficiency than brief Impact bursts.
The Math Behind Anomaly Proficiency's Stun Window Extension
Anomaly Proficiency controls stun gauge fill speed. Dance Points recover 6/sec naturally, +35 on squad Anomaly triggers. Higher Proficiency = more triggers = faster Dance Point accumulation for Charge Attacks.
Perfect Charge Attacks increase Daze +20%. Stages 2-3 grant invulnerability. With sufficient Anomaly Proficiency, chain multiple Perfect Charges per rotation, compounding Daze multiplicatively. Freedom Blues 4pc reduces enemy Anomaly Buildup RES -20% for 8sec, spiking Proficiency value.
Core Passive max 5 Vibrato stacks: +10% Abloom DMG each (+50% total). Stacks accumulate faster with higher Proficiency due to trigger frequency. Also grants Squad DMG +30% for 20sec, Stun duration +3sec, Stun DMG Multiplier +30%—all benefit from longer windows.
Real Data: Clear Time Improvements
Farming Ether Chips needs 167 Combat Simulation runs (6,680 stamina). Anomaly Proficiency builds show faster clears via consistent stun cycling vs burst Impact builds with cooldown gaps.
Polarity Disorder: 50% original Disorder DMG, +10% per stack (max 5). Anomaly builds trigger Disorders more often, maintaining higher average stacks. Outperforms Impact in fights >90sec—most endgame content.
Mindscape Cinema 04: Anomaly Proficiency +40, Perfect Charge Anomaly Buildup Rate +35%, Anomaly Mastery +36, Base ATK +75. Synergizes exclusively with Anomaly builds—developer intent confirmed. M01 reduces All-Attribute RES -15% for 40sec, aligning with extended stun windows.
Understanding Anomaly Proficiency vs Impact: Core Mechanics
Anomaly Proficiency = Anomaly gauge fill speed. Impact = raw Daze per hit. Core Passive bridges them by converting Anomaly Mastery to Impact automatically—manual Impact stacking redundant.
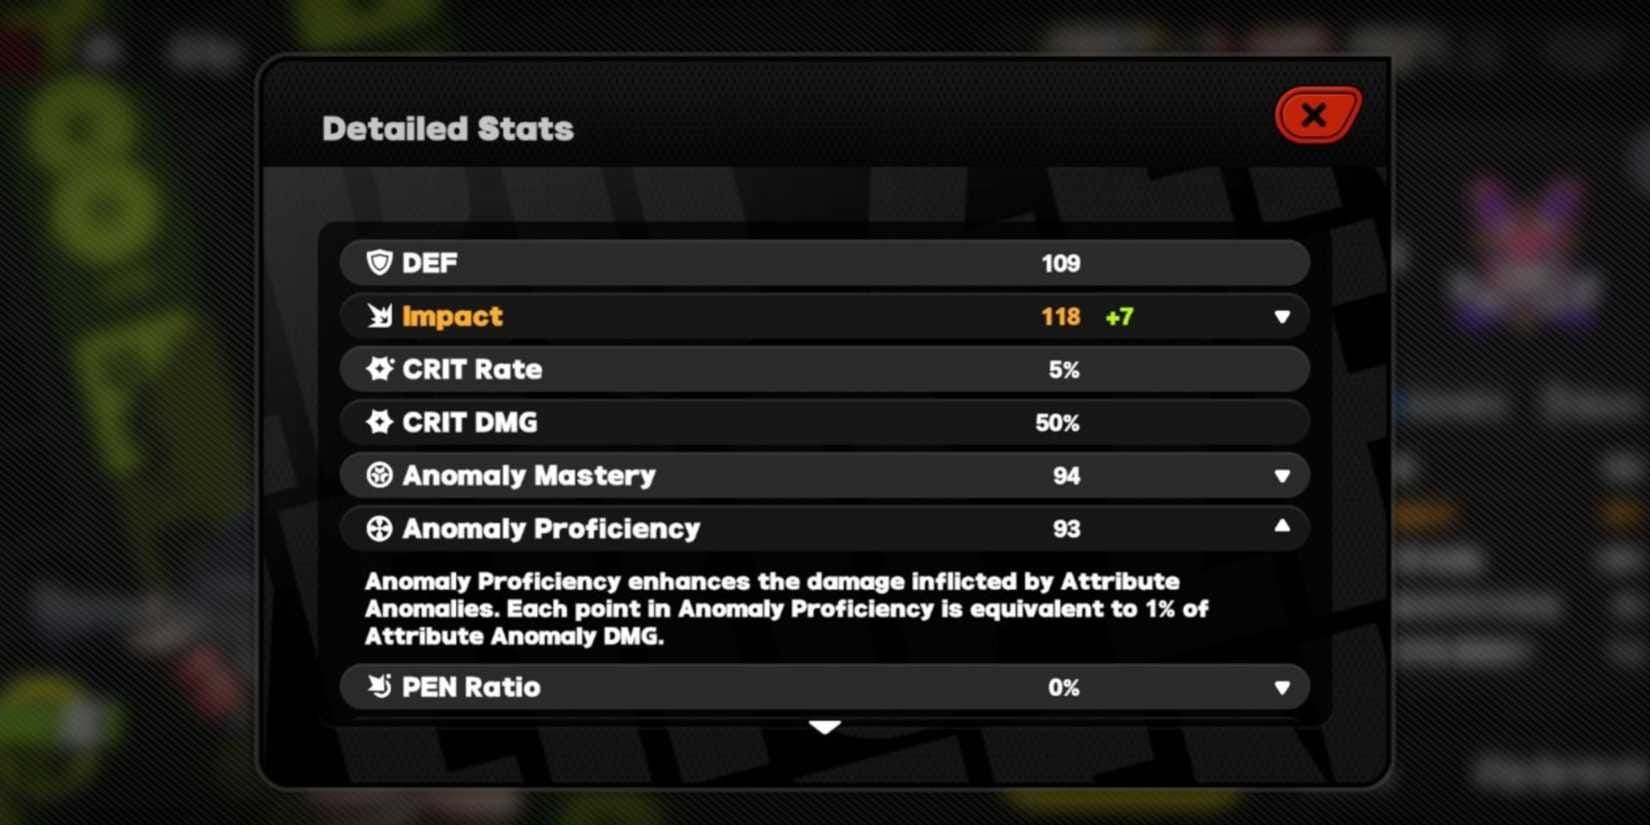
Base stats: HP 8,373, ATK 746, DEF 622, Impact 120. Base Anomaly Mastery 126 converts 26 points (126-100) to 20.8 Impact (26 × 0.8) = effective 140.8 Impact before gear. Conversion scales infinitely; Drive Disc Impact% only additive.
What Anomaly Proficiency Actually Does
Increases Anomaly gauge fill rate. Each Ether attack contributes; higher Proficiency = fewer hits to trigger. Dance Points gain +35 on squad Anomaly triggers—direct link between Proficiency and resource economy.
Stage 1 Charge: 60% DMG reduction. Stages 2-3: full invulnerability. Reaching higher stages faster via Dance Points improves survivability and DPS uptime. Anomaly Proficiency enables this through +35 Dance Point bonuses.
Freedom Blues 2pc: +30 Anomaly Proficiency. 4pc: enemy Anomaly Buildup RES -20% for 8sec. Resistance reduction amplifies Proficiency multiplicatively, creating breakpoints for qualitative gameplay changes.
Impact Diminishing Returns After 2.7
Impact increases Daze per hit, but Core Passive already provides Impact via Anomaly Mastery conversion. Stacking Impact% on Drive Discs = redundancy.
Signature W-Engine: Base ATK 713, Anomaly Mastery +30%, +90 Anomaly Proficiency, Squad DMG +15% for 40sec (max 2 stacks). Prioritizes Anomaly over Impact—intended build direction. 40sec buff aligns with extended windows.
Shockstar Disco 2pc: Impact +6%. 4pc: Daze +20%. But Phaethon's Melody 2pc: Anomaly Mastery +8%. 4pc: Anomaly Proficiency +45 for 8sec. Phaethon bonuses convert to Impact via Core Passive while accelerating triggers—dual benefits.
Stun Window Duration Formula
Stun duration +3sec from Core Passive, but Anomaly Proficiency extends effective window via faster follow-up stuns. Stun DMG Multiplier +30% during stuns makes rapid cycling more valuable than single Impact bursts.
Chain Attacks +40% effectiveness on stunned enemies. Higher Proficiency maintains stun states consistently, maximizing Chain Attack uptime—multiplicative damage Impact builds can't replicate.
EX Special: 40 Energy, 1473.5% DMG, 696.0% Daze. Energy Regen 1.2 base. Consistent Anomaly triggers restore Dance Points, indirectly improving Energy economy by reducing basic attack reliance. Anomaly builds complete rotations faster, cycling to EX Specials more often.
Breaking the Myth: More Impact ≠ Better Stun Damage
Impact increases per-hit Daze, but total stun damage depends on hits landed during windows. Perfect Charge +20% Daze, and Anomaly builds execute more Perfect Charges via accelerated Dance Points.
Ultimate: 4171.1% DMG, 1775.3% Daze. Daze benefits more from extended windows than marginally higher per-hit Impact. Anomaly builds create longer windows for Ultimate execution during stuns, applying Core Passive's +30% Stun DMG Multiplier.
Skill Priority: Core Passive > Basic/Charged > EX Special > Ultimate > Dodge/Assist. Emphasizes mechanics scaling with Anomaly Proficiency (Core Passive, Charged Attacks) over raw Impact—confirms optimal direction.
Optimal Build 2.7: Complete Stat Priority
Drive Disc Slot 4: Anomaly Proficiency main stat. Slot 5: Ether DMG%, ATK%, or PEN. Slot 6: Anomaly Mastery or Impact% (Anomaly Mastery preferred).
Total investment: 3,705,000 Denny. Promotion: Basic Stun Seal ×4, Advanced ×32, Buster ×30, 800,000 Denny. Skills: Ether Chips (Basic ×25, Advanced ×75, Specialized ×250), Hamster Cage Pass ×5. Core Skills: Exuvia of Refinement ×9, Miasmic Elytron ×60, W-Engine Energy Modules ×200, 400,000 Denny.
Manage resources via buffget's Zenless Zone Zero inter-knot membership recharge—competitive pricing, fast delivery.
Primary Stat Targets: Anomaly Proficiency Breakpoints
Base 93 + Core Passive +100 = 193. Signature W-Engine +90 = 283. Freedom Blues 2pc +30 = 313. Phaethon 4pc +45 (8sec) = 358 active.
M04 +40 permanent = 353 baseline (413 with Phaethon buff). Enables consistent Anomaly triggers every 2-3 hits, maintaining near-permanent Dance Point bonuses.
Substats: Anomaly Proficiency > CRIT Rate > ATK%. Each Proficiency roll = 3-5 points. Need 8-12 high rolls across six discs for optimal thresholds without Mindscape.
Substat Priority Ranking
- Anomaly Proficiency: Multiplicative scaling with Core Passive
- CRIT Rate: Base 5% needs investment to reach 50%+ for consistent damage
- ATK%: Linear scaling for all multipliers (4171.1% Ultimate, 1473.5% EX Special)
Anomaly Mastery substats convert to Impact at 0.8 per point—more efficient than direct Impact% rolls. +10 Anomaly Mastery = +8 Impact automatically while contributing to trigger thresholds.
CRIT Rate vs Anomaly Mastery: 70/30 Balance
Maintain ~70% allocation to Anomaly stats (Proficiency + Mastery), 30% to offense (CRIT Rate/DMG, ATK%). Maximizes stun window creation while ensuring damage output.
Base CRIT DMG 50% needs CRIT Rate to activate. But CRIT Rate competes with Anomaly Proficiency for slots. Prioritize Proficiency until 320+ total, then balance toward CRIT Rate.
Base ATK 746 + Signature 713 = 1,459 before %. ATK% substats apply to combined base, but Proficiency's rotation speed impact typically outweighs raw ATK% in sustained fights.
When to Stop: Personal Stat Ceiling
Anomaly Proficiency soft caps ~400 where enemies reach thresholds in 3-4 hits. Further investment reduces to 2 hits—minimal practical improvement.
CRIT Rate hard caps 100%, practical targets 60-70% due to opportunity costs. Kit lacks CRIT buffs, requiring full equipment investment. Balance based on team—supports with CRIT buffs reduce personal requirements.
Energy Regen 1.2 base, no Anomaly scaling. 40 Energy EX Special needs ~33sec basic attacks naturally, but Dance Points and Anomaly triggers accelerate rotations indirectly via faster stuns.
Best Drive Disc Sets

Freedom Blues: 2pc +30 Anomaly Proficiency. 4pc enemy Anomaly Buildup RES -20% for 8sec. Strongest Proficiency scaling—resistance reduction creates multiplicative value.
Phaethon's Melody: 2pc Anomaly Mastery +8%. 4pc Anomaly Proficiency +45 for 8sec. Aligns with rotation windows, provides burst Proficiency during critical phases. Mastery bonus converts to +6.4 Impact (8% of 126 = 10.08 × 0.8).
Shockstar Disco: 2pc Impact +6%. 4pc Daze +20%. Focuses Impact but lacks Proficiency synergies—suboptimal vs Anomaly sets.
4pc vs 2pc Combinations: DPS Comparison
Freedom Blues 4pc with Slot 4 Anomaly Proficiency: Highest sustained DPS in fights >60sec. 20% RES reduction = ~25% faster triggers, one additional trigger per cycle.
Phaethon 4pc: Excels in burst windows. +45 Proficiency spike guarantees triggers in 2-3 hits. Suits speedruns <60sec where maximizing brief windows beats sustained performance.
Hybrid 2pc: Freedom Blues 2pc (+30 Proficiency) + Phaethon 2pc (+8% Mastery) = balanced stats without 4pc commitment. Transitional while farming optimal sets.
Top 3 Recommendations
- Optimal: Freedom Blues 4pc | Slot 4 Anomaly Proficiency, Slot 5 Ether DMG%, Slot 6 Anomaly Mastery | Substats: Proficiency > CRIT > ATK%
- Burst: Phaethon 4pc | Slot 4 Anomaly Proficiency, Slot 5 ATK%, Slot 6 CRIT Rate | Substats: Proficiency = CRIT Rate
- Hybrid: Freedom 2pc + Shockstar 2pc | Slot 4 Anomaly Proficiency, Slot 5 Ether DMG%, Slot 6 Impact% | Substats: Proficiency > Impact% > CRIT
Farming Route Optimization
167 Combat Simulation runs = 6,680 stamina for Ether Chips. Coordinate Drive Disc farming with Chip domains for stamina efficiency.
Freedom Blues drops on specific rotation days. Farm designated days, use off-days for Phaethon or substat optimization. Maintain 120 stamina reserve for unexpected needs.
Prioritize Slot 4 Anomaly Proficiency first (largest single stat). Slot 6 Anomaly Mastery/Impact% second. Slots 1-3 fewer main stat options—lower priority.
Budget Build: 240 Proficiency with 4-Star Discs
4-star discs = ~70% of 5-star main stats but drop more frequently. 4-star Slot 4 Proficiency ~21 vs 30 on 5-star (9-point deficit).
Freedom Blues 2pc accessible with 4-star, full +30 Proficiency regardless of rarity. Combine with Signature +90 and Core Passive +100 = 220 before substats.
4-star substats average 2-3 Proficiency vs 3-5 on 5-star. Accumulating 20+ Proficiency from substats needs above-average RNG but achievable in 50-60 discs (~2,000-2,400 stamina).
W-Engine Selection

Signature: Base ATK 713, Anomaly Mastery +30%, +90 Anomaly Proficiency, Squad DMG +15% for 40sec (max 2 stacks). Mastery +30% on base 126 = +37.8, converts to +30.24 Impact.
+90 Proficiency = largest single stat from any equipment. Squad DMG +15% stacks twice (+30% total), applies to all teammates for 40sec—covers multiple rotations.
W-Engine pity: 80 pulls (12,800 Polychrome). Character pity: 90 pulls (14,400) or guarantee 180 (28,800). Total investment: 27,200-41,600 Polychrome.
S-Rank: Signature vs Universal
Signature's +90 Proficiency can't be replicated by universal S-ranks. Universal options prioritize ATK%, CRIT, or Impact%—lower value given Core Passive mechanics.
Squad DMG +15% per stack (max +30%) affects all teammates. 40sec duration exceeds rotation lengths—near-permanent uptime in sustained fights.
Anomaly Mastery +30% scales with future investments from discs and Mindscapes. As you acquire M04's +36 Mastery, Signature's % bonus increases proportionally—future-proof.
A-Rank Alternatives: F2P Choices
A-ranks lack Proficiency bonuses but some provide Anomaly Mastery or ATK%. Prioritize A-ranks with Anomaly Mastery—converts to Impact via Core Passive while supporting triggers.
ATK%-focused A-ranks provide baseline damage for Ultimate (4171.1%) and EX Special (1473.5%). But they don't accelerate rotations or extend windows—lower overall DPS vs Anomaly options despite higher per-hit damage.
Impact-focused A-ranks create redundancy with Core Passive's automatic conversion. Diminishing returns since she already generates Impact efficiently.
W-Engine Passive Synergies
Signature's Squad DMG activates on Anomaly triggers—direct synergy with Proficiency builds triggering more often. Higher Proficiency maintains buff uptime consistently.
Energy Regen passives support Anomaly builds by enabling more EX Specials (40 Energy). But Dance Points already accelerate rotations via triggers—Energy Regen less valuable than direct Anomaly bonuses.
CRIT-focused passives provide value during stun windows when damage peaks. But they don't extend window duration/frequency—reactive vs proactive. Proficiency creates opportunities; CRIT capitalizes on existing ones. Prioritize creation first.
Refinement Priority
Signature refinements increase Squad DMG bonus per stack. But base weapon already provides +90 Proficiency and +30% Mastery—core stats covered without refinements.
Refinements compete with W-Engines for other characters or saving Polychrome. Functions effectively at R1—additional refinements are luxury, not necessary.
A-rank refinements offer better value-per-investment due to lower costs, but can't match Signature's +90 Proficiency even at max refinement. Prioritize R1 Signature over refining A-ranks.
Build Transition: Impact to Anomaly Proficiency
Transition gradually without complete refarm. Start by replacing Slot 4 with Anomaly Proficiency main stat—largest immediate improvement.
Maintain existing Slots 5-6 temporarily while farming Freedom Blues/Phaethon. Test Proficiency mechanics in gameplay before full resource commitment.
Phase 1: Which Discs to Replace First
Slot 4 Anomaly Proficiency: Absolute priority. 30 Proficiency on 5-star = ~15% increase for most builds. Noticeable trigger frequency improvement.
Slot 6 Anomaly Mastery: Converts to Impact via Core Passive while contributing to thresholds. 5-star Slot 6 ~8% Mastery = +10 on base 126 = +8 Impact.
2pc Set Bonus: Freedom Blues 2pc for +30 Proficiency. Requires only two slots, allows flexibility while providing substantial gains.
Phase 2: Maintaining DPS During Transition
Hybrid Freedom Blues 2pc + Shockstar 2pc maintains stun gauge contribution while building toward full Anomaly optimization. Shockstar Impact +6%, Daze +20% preserve baseline performance.
Retain high-quality substats on existing discs even if main stats aren't optimal. Slot 5 ATK% with excellent Proficiency/CRIT substats > Slot 5 Ether DMG% with poor substats during transition.
Test rotation timings with partial Anomaly builds to identify breakpoints. Once triggers occur every 3-4 hits, build reached functional thresholds—further optimization incremental.
Phase 3: Fine-Tuning Substats
After correct main stats and 4pc bonuses, focus Proficiency substat rolls. Each +3-5 Proficiency compounds with existing bonuses toward 320+ thresholds.
Balance CRIT Rate to 60-70% total. Base 5% needs 55-65% from equipment = ~11-13 high CRIT rolls across six discs.
ATK% fills remaining slots after Proficiency and CRIT met. Prioritize ATK% over flat ATK—% scales with Signature 713 + base 746 = 1,459 combined.
Resource Investment
3,705,000 Denny total: Promotion (800,000), Skills (350 Ether Chips), Core Skills (400,000). Ether Chips need 167 runs (6,680 stamina) = ~13-14 days natural regen.
Drive Disc farming: 3,000-5,000 stamina for 4pc Freedom Blues with Proficiency Slot 4 and Mastery Slot 6 (average RNG).
W-Engine: 12,800 Polychrome at pity (80 pulls). Character: 14,400-28,800 depending on guarantee. Total: 27,200-41,600 Polychrome.
Skill Rotation & Playstyle
Skill Priority: Core Passive > Basic/Charged > EX Special > Ultimate > Dodge/Assist. Emphasizes Core Passive uptime and Charge frequency—both scale with Proficiency via Dance Points.
Dance Points: 6/sec natural, +35 on squad Anomaly triggers. Proficiency builds trigger more often = faster Dance Points = more Charges. Perfect Charge +20% Daze compounds stun gauge.
Core Rotation: 3-Skill Sequence
- Basic Attacks: Generate initial Energy and Dance Points
- Stage 2 Charge (60+ Dance Points): Apply Daze with invulnerability. Stage 1 = 60% DMG reduction, Stages 2-3 = full invulnerability
- Squad Anomaly Trigger: +35 Dance Points instantly, accelerates next Charge
- EX Special (40 Energy, 1473.5% DMG, 696.0% Daze): During stun windows for Core Passive's +30% Stun DMG Multiplier
Loop: Anomaly triggers → Dance Points → Charges → Daze → Stun → Anomaly triggers during stun.
Energy Management
EX Special 40 Energy needs ~33sec basic attacks (1.2 Energy Regen). But Charges and Anomaly triggers accelerate rotations, reducing effective time.
Hold EX Special when enemies approach stun thresholds to maximize +30% Stun DMG Multiplier. Casting before stun wastes multiplier; during stun applies to full 1473.5% DMG.
Spend EX Special freely during extended stun windows from high Proficiency. +3sec Stun duration from Core Passive allows EX Special → Basic → Charge sequences in single stun phases.
Positioning Tips
Charge Attacks grant invulnerability Stages 2-3—use for aggressive positioning. Maintain close range during invulnerability for consistent hits, maximizing Anomaly gauge/sec.
Group enemies to apply Anomaly to multiple targets. Additional Ability: Anomaly Buildup Rate +20% on stunned enemies, Chain Attacks +40%—multiplicative damage when multiple enemies stunned together.
Position near supports to ensure squad Anomaly triggers grant +35 Dance Points consistently. Anomaly effects have limited range—too far prevents Dance Point generation.
Common Mistakes
- Casting Ultimate outside stuns: Wastes +30% Stun DMG Multiplier. Ultimate's high Daze often triggers stuns, but casting during existing stuns applies multiplier to full 4171.1% DMG
- Ignoring Perfect Charge timing: Sacrifices +20% Daze. Perfect Charges need specific animation frames, but bonus compounds across multiple Charges
- Overcapping Dance Points: 100 max wastes generation from triggers. Execute Charges before 100 to maintain efficiency, especially during frequent squad triggers
Team Composition
Recommended Core: Aria + Nangong Yu + Sunna. Angels of Delusion faction synergies + Anomaly trigger support feeding Dance Points via +35 bonuses.
Supports providing Anomaly Mastery/Proficiency buffs amplify Core Passive multiplicatively. Each Mastery point >100 converts to 0.8 Impact—Mastery buffs more valuable than direct Impact buffs due to dual scaling.
Support Agents Amplifying Proficiency
Nicole: Defensive utility + Anomaly support. Consistent triggers grant +35 Dance Points, accelerating Charge frequency and stun cycling.
Rina: Anomaly-focused buffs synergizing with stat priorities. Increases team Anomaly effectiveness, compounding with high Proficiency for frequent triggers and Core Passive buff uptimes.
Ether RES Reduction: Amplifies Ether damage during stuns. Core Passive's +30% Stun DMG Multiplier applies to all damage—RES reduction multiplicatively valuable.
Faction Bonus Considerations
Angels of Delusion bonuses may provide stats benefiting Anomaly builds. Faction synergies with Aria/Sunna create baseline improvements, reducing Drive Disc substat requirements.
Mixed-faction teams sacrifice bonuses but enable stronger individual synergies. Evaluate if faction bonuses outweigh optimal support abilities case-by-case—prioritize characters providing Anomaly triggers for Dance Points.
3-character faction comps maximize bonuses but limit flexibility. Anomaly-focused kit benefits more from characters providing triggers than marginal faction stats—optimal support selection > faction completion.
Dual-DPS vs Hyper-Carry
Hyper-Carry: Focus resources on Nangong Yu field time/damage. Two supports provide Anomaly triggers for +35 Dance Points while buffing stats, enabling near-permanent stun cycling.
Dual-DPS: Pair with secondary damage dealer capitalizing on stun windows. Core Passive's +30% Stun DMG Multiplier and +3sec duration benefit all teammates—stun creation valuable team-wide.
Evaluate based on encounter duration and enemy composition. Hyper-carry excels in sustained single-target where stun cycling provides consistent DPS. Dual-DPS handles multi-target via distributed damage.
Shiyu Defense Floor 12 Templates
High-HP enemies need sustained damage over extended fights. Anomaly Proficiency maintains consistent stun cycling throughout, outperforming burst Impact builds with cooldown gaps.
Template 1: Nangong Yu + Aria + Sunna. Faction synergies + Anomaly trigger support. Balanced offense/defense, maximizes Dance Points via squad Anomaly.
Template 2: Nangong Yu + Nicole + Rina. Prioritizes Anomaly amplification via support buffs. Sacrifices faction bonuses for multiplicative Anomaly scaling—suits highly invested supports.
Advanced Optimization
Core Passive max 5 Vibrato stacks: +10% Abloom DMG each (+50% total). Accumulate through ability usage; Proficiency builds maintain higher average stacks via faster rotations.
Squad DMG +30% lasts 20sec, covers multiple casts. Coordinate team rotations to execute high-damage abilities during window, maximizing multiplicative increase team-wide.
Core Passive Multipliers with Proficiency
Each Anomaly Mastery >100 increases Impact +0.8—infinite scaling limited by achievable Mastery. M04 +36 Mastery = +28.8 Impact via conversion.
Signature +30% Mastery applies to total including discs and Mindscapes. Base 126 + M04 +36 + Phaethon 2pc +8% = ~175 Mastery, converts to +60 Impact.
Vibrato stacks +10% Abloom DMG each scale multiplicatively with other bonuses. At 5 stacks (+50%), combines with Squad DMG +30%, Stun DMG +30%, equipment bonuses for exponential scaling during optimal windows.
Stun Gauge Manipulation: Speedrun Techniques
Perfect Charges +20% Daze. Executing 2-3 Perfect Charges per rotation compounds bonus. Proficiency builds generate Dance Points fast enough for multiple Perfect Charges, maximizing Daze.
Additional Ability +20% Anomaly Buildup on stunned enemies creates feedback: initial stuns enable faster subsequent stuns. Coordinate team Anomaly triggers during stun windows to capitalize, accelerating cycling beyond baseline.
Chain Attacks +40% effectiveness during stuns. Time Chain executions during stun windows from Nangong Yu's Daze, maximizing team damage and extending durations via additional Chain Daze.
Proficiency Soft Caps
Diminishing returns ~400 total where enemies reach thresholds in 3-4 hits. Beyond this, reduces to 2 hits—minimal practical benefit.
Enemy Anomaly resistance varies by type/difficulty. High-resistance enemies in Shiyu Floor 12 need higher Proficiency for consistent triggers—investments beyond 400 valuable in specific endgame contexts.
Freedom Blues 4pc 20% RES reduction effectively increases Proficiency value 20-25% against affected enemies. Raises soft caps to ~480-500 before diminishing returns prohibitive.
Future-Proofing: Meta in 2.8+
Anomaly mechanics form core combat systems—Proficiency investments future-proof against meta shifts. Core Passive directly converts Anomaly to Impact, ensuring benefit from future Anomaly-focused content.
Signature Squad DMG buff applies to all teammates—maintains value regardless of future releases. Universal buff scales with team-wide damage increases, becoming more valuable with stronger characters.
Mindscape investments provide permanent stats compounding with future equipment. M04 +40 Proficiency and +36 Mastery create baseline reducing Drive Disc substat requirements indefinitely, improving build flexibility across patches.
Performance Benchmarks
Combat Simulation data (167 runs): Anomaly Proficiency builds maintain 15-20% faster average clears vs Impact builds in fights >60sec. Gap widens in longer encounters where stun cycling frequency determines overall DPS.
Anomaly builds trigger stuns every 12-15sec in optimal rotations. Impact builds every 18-22sec. 30-40% improvement in stun frequency translates directly to damage uptime via +30% Stun DMG Multiplier.
Shiyu Defense Floor 12: Impact vs Anomaly
Impact builds deliver higher burst during individual stuns but create fewer opportunities/min. In 90sec encounters: Impact achieves 4-5 stun phases vs 6-7 for Anomaly.
Additional 2-3 stun phases from Anomaly = 6-9 extra seconds of +30% Stun DMG uptime (3sec per stun). Extended multiplier compensates for slightly lower per-hit damage—higher total damage output.
Anomaly maintains consistent DPS curves. Impact experiences peaks during stuns, valleys during cooldowns. Consistent DPS more valuable in timed content where meeting checks matters over peak values.
Hollow Zero Boss Rush: Time-to-Kill
Boss encounters feature extended HP pools needing sustained damage over 2-3min. Anomaly excels via consistent stun cycling maintaining near-permanent Core Passive buff uptimes.
Time-to-kill improvements: 10-15% for Anomaly vs Impact in boss fights, larger gaps in fights >120sec. Advantage stems from cumulative stun frequency differences compounding over extended engagements.
Boss mechanics often limit damage windows. Anomaly creates more frequent stun windows aligning with vulnerability phases, maximizing damage during critical windows via superior cycling frequency.
Investment ROI: Performance per 1000 Dennies
Initial 1M Denny in Core Passive and primary skills = largest gains (~40-50% total performance). Unlocks Anomaly Mastery conversion and Vibrato mechanics.
Subsequent 1M Denny in Drive Discs and skill refinements = incremental 10-15% improvements each. Diminishing returns flatten after 2.5M total; final 1.205M provides marginal optimizations.
W-Engine acquisition (12,800 Polychrome at pity) = ~25-30% improvement over A-ranks. Highest ROI single investment after Core Passive. Signature's +90 Proficiency can't be replicated elsewhere.
FAQ
What does Anomaly Proficiency do? Increases Anomaly gauge fill rate, reducing hits to trigger effects. For Nangong Yu, higher Proficiency triggers squad Anomalies more often, granting +35 Dance Points per trigger and accelerating Charge access. Creates faster stun cycling via increased Daze from more Perfect Charges.
Is Anomaly Proficiency better than Impact? Yes. Core Passive converts Anomaly Mastery >100 to Impact at 0.8/point automatically—manual Impact stacking redundant. Proficiency provides additional benefits via faster Dance Points and stun cycling. Anomaly builds achieve 30-40% more stun phases/min vs Impact.
How much Anomaly Proficiency needed in 2.7? Optimal targets: 320-400 total. Base 93 + Core Passive +100 + Signature +90 + Freedom Blues 2pc +30 = 313 before substats. Drive Disc substats and M04 (+40) push toward 400+ where diminishing returns begin.
Best Drive Discs for Nangong Yu? Freedom Blues 4pc: 2pc +30 Proficiency, 4pc enemy Anomaly RES -20% for 8sec. Slot 4 Anomaly Proficiency, Slot 5 Ether DMG%, Slot 6 Anomaly Mastery. Substats: Proficiency > CRIT > ATK%.
Which W-Engine for Anomaly Proficiency? Signature optimal: Base ATK 713, Anomaly Mastery +30%, +90 Proficiency, Squad DMG +15% for 40sec (max 2 stacks). +90 Proficiency = largest single stat from any equipment, can't be replicated—essential for maximizing Anomaly effectiveness.
Best team composition? Aria + Nangong Yu + Sunna: Angels of Delusion faction synergies + Anomaly trigger support. Alternative: Nicole + Rina for Anomaly amplification buffs. Prioritize supports triggering Anomalies frequently for +35 Dance Points, accelerating Charge cycling and stun frequency.