

Related articles


Best Microphone Settings for StarMaker: Complete Guide 2026
Achieving professional StarMaker recordings requires precise microphone configuration: under 50ms latency, 35-55% reverb depth, and 6-8 inch mic positioning. This guide reveals exact settings top performers use—buffer optimization, effect layering, and device-specific adjustments that transform amateur recordings into studio-quality tracks.
Buffget
Understanding StarMaker's Audio System
StarMaker processes audio through multiple stages: microphone capture, latency compensation, effect application, and final mixing. The critical metric for best microphone settings for StarMaker is latency—delay between singing and hearing your processed voice.
Latency benchmarks by device:
- Flagship Android (Snapdragon 8 Gen 2+): 35-50ms
- Mid-range devices: 50-80ms
- Budget models: 80-100ms+
Target under 50ms for seamless recording. The October 10, 2025 update improved latency across all tiers. Minimum requirements: 4GB RAM, 2GB free storage. Android 14 reduces latency by 10-15ms vs. previous versions. iOS needs 13.0+ for optimal performance.
Need premium features? Platforms like buffget offer convenient options to top up StarMaker gold with competitive pricing.
How StarMaker Processes Your Voice
Lock sample rate to 48kHz for optimal balance between fidelity and processing speed. Set audio buffer size to minimum or 256 samples to reduce latency while maintaining stability on capable devices.
Enable Low-Latency Monitoring for direct audio pathway that bypasses processing during recording. You'll hear fewer effects live, but full processing applies to final output.
Signal chain order: Microphone input → noise reduction → pitch correction → EQ → reverb/effects → compression → final mix
The ME tab controls latency adjustment and calibration. Navigate to ME tab > Latency Adjust > AUTO-ADJUST for automatic calibration. Recalibrate monthly as system conditions change.

Wired vs. Bluetooth:
- Wired earphones: under 20ms latency
- Bluetooth: 100-200ms delay (avoid for recording)
With wired earphones, disable echo cancellation—physical isolation eliminates feedback loops, reducing processing overhead.
Recording vs. Live Performance Modes
Recording mode applies full effects to final output while providing low-latency monitoring during capture. Maintains audio peaks at -6dB to -3dB automatically.
Live performance mode prioritizes real-time processing over quality—best for casual sessions where immediate feedback matters more than archival quality.
Access professional controls: tap Studio icon > microphone icon > preset name for granular reverb, EQ, and multi-track options.

Why Default Settings Fail
Default settings target broad compatibility, compromising performance for specific use cases. Soprano voices need different EQ than bass voices. Small bathrooms create natural reverb conflicting with app effects. Flagship phones handle complex effect chains that crash budget devices.
Optimize starmaker audio optimization by matching settings to your hardware and acoustic environment.
Essential Microphone Configuration
Access comprehensive controls via ME tab (latency, auto-denoise, calibration) or Studio icon during song selection.
Android Developer Options: Enable by tapping Build Number 7x in Settings > About Phone. Navigate to Developer Options > Audio to verify sample rate and buffer size align with StarMaker's configuration.
Microphone Sensitivity Adjustment
Position microphone 6 inches from mouth at 45-degree angle for lead vocals. This captures clear tone while minimizing plosives (harsh p and b sounds).
Adjust sensitivity so voice volume sits at 50-70% over music during playback. For harmony vocals, increase distance to 8 inches. Background vocals: 10 inches.
Record 30-second test segments at different sensitivity levels. Find minimum gain that captures your voice clearly without distortion during loud passages.
Input Gain by Voice Type
High voices (soprano/tenor): Need less gain—mics naturally emphasize higher frequencies.
Low voices (bass/alto): Require increased gain to capture fuller lower frequency content.
Breathy styles: Higher gain for subtle nuances, but increases background noise—pair with stronger noise reduction.
Powerful belting: Lower gain prevents clipping; use compression for dynamic control instead.
Higher gain amplifies both voice and noise proportionally. Find minimum gain for clear capture, then use noise reduction for background sounds.
Real-Time Preview Testing
Turn off waveform animations during testing to reduce CPU load and ensure accurate preview quality. Always test at actual performance intensity—not softer or louder than you'll record.
Noise Reduction Settings
Auto-denoise in ME tab should be applied before effects. Remain silent for 2-3 seconds at recording start to allow accurate noise profiling.
Intensity levels:
- Low (20-40%): Quiet environments with minor ambient noise
- Medium (40-60%): Household appliances, outdoor activity—balanced approach for most home recording
- High (60-80%): Significant environmental noise; accepts vocal processing artifacts
Want to maximize StarMaker potential? Buffget provides reliable options to buy StarMaker coins with fast delivery.
Echo Cancellation Configuration
With wired earphones: Disable entirely—physical isolation eliminates feedback, reducing processing overhead.
With speakers/Bluetooth: Essential but adds 15-25ms latency. Algorithm subtracts music track from mic input.
Hard surfaces (tile, glass) challenge the algorithm. Improve room acoustics rather than relying solely on software.
Aggressive vs. Subtle Reduction
Aggressive: For unusable background noise situations—busy households, urban apartments. Accept processed vocal quality as necessary tradeoff.
Subtle: Preserves vocal naturalness in controlled environments. Professional recordings use lightest reduction possible.
Adaptive approach: Create multiple presets with different intensities, selecting based on current conditions.
Audio Effects Mastery
Fundamental rule: subtlety. Each effect should enhance without drawing attention. Listeners should feel emotional impact, not notice reverb.
Limit recordings to 2-4 tracks maximum to maintain clarity and prevent CPU overload.
Reverb Settings
Studio Reverb (0.3-0.6s decay): Adds 8-12ms latency. Perfect for pop/R&B. Apply to harmony vocals on tracks 2-3.
Hall Reverb (2-4s decay): Adds 25-35ms latency. Dramatic, spacious—ideal for ballads.
Room Reverb (0.5-1s decay): Adds 15-20ms latency. Natural-sounding for acoustic performances.
Optimal depth: 35-55%, adjusted in 5% increments.
- Lead vocals: 20% wet / 80% dry
- Harmonies: 40-50% wet
Reverb Depth and Panning
Pan lower harmonies 30% left, upper harmonies 30% right for stereo width. Combined with differentiated reverb depths, this creates professional dimensional separation.
Apply Studio Reverb as final effect in signal chain to prevent reverberating imperfections from earlier processing.
Auto-Tune and Pitch Correction
Moderate (40-60% strength): Fixes minor pitch drift while preserving natural vibrato and emotional character.
Aggressive (70-100%): Creates robotic T-Pain effect for hip-hop/electronic pop—use intentionally, not as crutch.
Disable entirely for blues, jazz, folk where slight imperfections express human emotion.
EQ Adjustments
Boost 3-5kHz: Adds presence and clarity, helps vocals cut through dense arrangements.
Cut below 100Hz: Eliminates rumble, breath noise, low-frequency room resonances.
Reduce 200-400Hz (2-4dB): Addresses muddiness and boxiness without thinning voice.
Compression Settings
Moderate compression (3:1 ratio): Evens volume without obvious pumping artifacts.
Threshold: Set so compression engages during normal singing volume, leaving quiet breaths uncompressed.
Attack times:
- Fast (5-10ms): Catches peaks but sounds aggressive
- Slow (20-30ms): Preserves vocal punch and articulation
Release times (100-200ms): Smooth disengagement between phrases.
Combining Effects Without Distortion
Optimal effect order: Noise reduction → EQ → compression → pitch correction → reverb → final limiting
Each effect should output at similar levels to input. Monitor audio peaks throughout chain, keeping them at -6dB to -3dB. If peaks exceed -3dB, reduce gain at that stage, not final output.
Device-Specific Optimization
iOS and Android handle audio differently, requiring platform-specific optimization.
iOS Configuration
Grant microphone permissions: Settings > Privacy > Microphone. iOS sometimes revokes after updates.
Disable Spatial Audio: Settings > Music > Audio Quality. This adds latency and interferes with StarMaker's processing.
Android Configuration
Android 14 reduces latency by 10-15ms vs. previous versions. Update to latest version your device supports.
Disable battery optimization: Apps > StarMaker > Battery > Unrestricted. Prevents throttling that introduces stuttering.
Clear cache regularly: Apps > StarMaker > Storage > Clear Cache to remove accumulated files causing glitches.
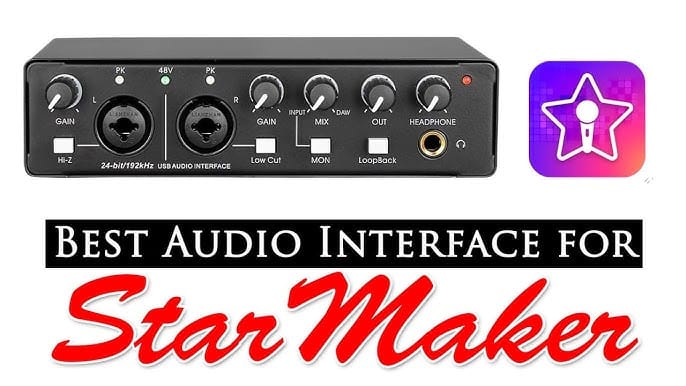
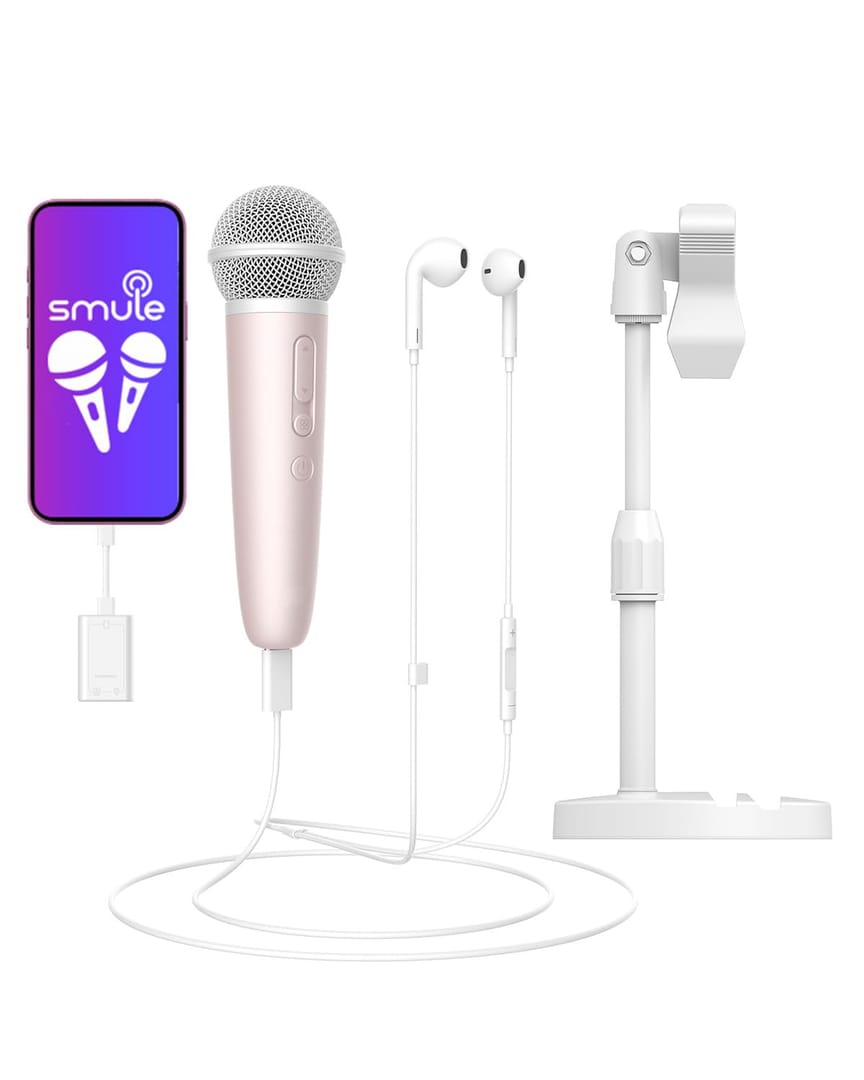
External Microphone Setup
USB-C and Lightning-compatible mics bypass internal processing, delivering cleaner signals. Test before important recordings to verify recognition.
Lavalier mics: Position 6-8 inches below mouth, pointed upward at 45-degree angle.
Condenser mics: Superior frequency response but capture more room noise—need quieter environments.
Dynamic mics: Better noise rejection but less detailed.
Wired vs. Wireless
Wired earphones: Under 20ms latency—essential for serious recording. Standard 3.5mm works perfectly.
Connection procedure: Unplug, wait 2 seconds, firmly replug in ME tab for proper recognition.
Bluetooth: 100-200ms latency makes real-time monitoring impossible. Reserve for casual listening only.
Recording Environment Setup
Room acoustics impact starmaker recording quality as much as app settings.
Hard surfaces reflect sound, creating echoes. Soft materials (curtains, carpets, furniture) absorb reflections.
Pro tip: Record in closets filled with hanging clothes for surprisingly effective isolation.
Optimal Positioning
- Lead vocals: 6 inches, 45-degree angle
- Harmony vocals: 8 inches for natural separation
- Background vocals: 10 inches for layered depth
Room Acoustics Management
Small rooms (under 100 sq ft): Strong early reflections within 20-30ms. Record in corners away from parallel walls.
Large rooms (over 200 sq ft): Longer reflection delays. Position 3-4 feet from walls.
Bathrooms: Natural reverb sounds impressive live but creates muddy recordings. Avoid for serious work.
Minimizing Environmental Noise
Record during quiet hours (late evening/early morning) when traffic and household noise minimize.
Turn off fans, AC, appliances during sessions. Close windows and doors. Interior rooms away from exterior walls provide better isolation.
DIY Sound Treatment
Heavy blankets on walls behind and beside recording position absorb reflections.
Pillows in corners trap low-frequency buildup causing boomy recordings.
Portable vocal booth: Clothing rack with heavy blankets draped over three sides. Position yourself inside with open side facing away from walls.
Genre-Specific Settings
Different genres require distinct starmaker vocal enhancement approaches.
Pop: Bright and Polished
- Boost 3-5kHz by 3-4dB for clarity
- Moderate compression (4:1 ratio) for controlled dynamics
- Studio Reverb at 35-40% depth, 0.4s decay
- Lead vocals: 20% wet / 80% dry
Rock: Raw and Dynamic
- Minimal compression (2:1 ratio) preserves energy
- Emphasize midrange (1-3kHz) over high-frequency brightness
- Slight low-mid boost (200-400Hz) adds weight
- Room Reverb at 25-30% depth, 0.7s decay
R&B: Warm and Smooth
- Reduce 2-4kHz by 2-3dB, boost 200-300Hz by 2dB for warmth
- Moderate compression (3:1) with slow attack (20-30ms)
- Studio Reverb at 40-50% depth, 0.5s decay for lush space
Hip-Hop: Clarity-Focused
- Boost 4-8kHz by 4-6dB for lyrical intelligibility
- Minimal reverb (15-25% depth), very short decay (0.2-0.3s)
- Aggressive compression (5:1 ratio) for consistent dynamics
Troubleshooting Common Problems
Distorted/Clipping Audio
Reduce mic sensitivity by 20-30%. Ensure audio peaks remain at -6dB to -3dB throughout signal chain. Disable effects one at a time to identify which causes distortion.
Low Volume
Increase sensitivity by 20-30%. Verify 6-inch mic positioning. Check voice volume sits at 50-70% over music. Reduce compression ratio if exceeding 6:1.
Feedback, Buzzing, Static
Switch to wired earphones to eliminate feedback. Record on battery power to eliminate charging cable interference. Unplug and firmly replug earphones using ME tab procedure.
Latency Issues
Enable auto-adjust latency weekly in ME tab. Recalibrate monthly using AUTO-ADJUST. Switch to wired earphones. Lock sample rate to 48kHz, buffer size to minimum/256 samples.
Advanced Tips from Top Performers
Pre-Recording Routine
Perform 5-10 minutes vocal warm-ups before sessions. Record 30-second test segments before full takes. Verify wired earphone connections using ME tab reconnection procedure.
Post-Recording Review
Listen on multiple playback systems—earphones, phone speakers, external speakers. Check for background noise during quiet passages. Verify vocals sit at 50-70% relative to music.
Continuous Improvement
Save recordings chronologically to document progress. Solicit feedback from other users. Experiment with one setting change at a time, documenting successful experiments.
Maintaining Consistent Quality
Saving Custom Presets
Create genre-specific presets: Pop Bright,Rock Raw,R&B Smooth. Save immediately after successful recordings. Date preset names to track versions.
Adapting for Different Songs
While genre presets provide starting points, individual songs need minor adjustments. Ballads might need different reverb depths than uptempo tracks. Test settings across entire vocal range, not just comfortable middle notes.
Regular Monitoring
Perform monthly quality checks using same test song. Enable auto-adjust latency weekly. Clear cache monthly to prevent performance degradation.
When to Re-Calibrate
Recalibrate after major system updates, when noticing increased latency, or when changing recording environments/hardware.
FAQ
How do I reduce background noise in StarMaker recordings?
Enable auto-denoise in ME tab, set intensity to 40-60% for typical homes (70-80% for noisy locations). Record during quiet hours, close windows/doors, turn off appliances. Use wired earphones and disable echo cancellation.
What are the best audio effects for singing on StarMaker?
Studio Reverb at 35-55% depth with 0.3-0.6s decay. Apply to harmonies at 40-50% wet, lead vocals at 20% wet. Use moderate compression (3:1 ratio), boost 3-5kHz for clarity, minimal pitch correction (40-60% strength). Limit to 2-4 vocal layers maximum.
Why does my StarMaker recording sound muffled or distorted?
Muffled: Cut below 100Hz, boost 3-5kHz by 3-4dB. Distorted: Reduce mic sensitivity by 20-30%, ensure peaks stay at -6dB to -3dB. Position 6 inches from mic at 45-degree angle.
How do I adjust microphone sensitivity in StarMaker app?
Studio icon > microphone icon > preset name. Adjust so voice sits at 50-70% over music. Position mic 6 inches away at 45-degree angle. Test with 30-second segments at different levels.
What is the difference between reverb and echo in StarMaker?
Reverb simulates acoustic spaces through thousands of rapid reflections (0.3-4s decay). Studio Reverb (0.3-0.6s) creates subtle space, Room (0.5-1s) simulates intimate environments, Hall (2-4s) produces dramatic spaciousness. Echo creates distinct repetitions with clear separation—used for special effects, not natural ambiance.
How do I fix low volume issues in StarMaker recordings?
Increase mic sensitivity by 20-30%. Verify 6-inch positioning. Set voice to 50-70% over music—if buried, reduce music volume instead. Check compression doesn't exceed 4:1 ratio. Disable battery optimization for StarMaker in Android settings.