

Related articles


Ineffa + Neuvillette Guide: Fix C0 Interruption Issues
Birgitta's shield from Ineffa's Elemental Skill eliminates Neuvillette C0's interruption vulnerability during Charged Attacks. This guide covers optimal rotations with Furina and Xilonen, artifact builds targeting 2000 ATK for Ineffa and 50k HP for Neuvillette, plus strategies to maximize this synergy in Spiral Abyss.
Buffget
Understanding Neuvillette C0 Interruption Challenges
Neuvillette's Charged Attack Equitable Judgment deals 7.32% Max HP per hit, but C0 lacks interruption resistance during channeling. Any enemy attack cancels the sequence, wasting 50 stamina and 8.0% Max HP every 0.5 seconds.
Charged Attack Mechanics
Neuvillette's rotation revolves around Sourcewater Droplets. Elemental Skill O Tears I Shall Repay generates 3 Droplets (12.86% Max HP damage), Burst O Tides I Have Returned creates 6 Droplets (22.26% Max HP damage, 70 Energy, 18s cooldown).
Each Droplet grants Past Draconic Glories stacks (max 3), increasing Charged Attack damage by 110%, 125%, and 160%. Stacks last 30 seconds. Optimal pattern: Skill for 3 Droplets → Burst for 6 more → extended Charged Attacks.
Why C0 Gets Interrupted
C1 Venerable Institution grants interruption resistance on field entry. C0 lacks this entirely—every hilichurl arrow to Ruin Guard missile cancels your Charged Attack. Multi-enemy scenarios become nearly unplayable without external protection.
DPS Impact
Single interruption wastes 50 stamina, 8-16% Max HP, 2-3 seconds animation. Two interruptions in 20 seconds cut damage output by 66%, transforming top-tier DPS into underperforming liability.
Interruption Resistance vs Poise
Interruption resistance provides complete immunity to knockback during specific actions. Poise is a damage-absorption threshold that depletes per hit. Neuvillette C0's standard poise values can't sustain channeling under focused fire.
Birgitta Shield Support: Complete Analysis
Birgitta (summoned via Ineffa's Skill Cleaning Mode: Carrier Frequency) deploys Optical Flow Shield Barrier absorbing Electro damage at 250% effectiveness while preventing interruptions.
Shield absorption: 221.2% Ineffa's ATK + 1,387 flat, lasting 20s with 16s cooldown. Birgitta persists 20s, creating perfect uptime synchronization.
Shield Generation Mechanics
Ineffa's Skill summons Birgitta and shields active character. Shield refreshes when using Burst Supreme Instruction: Cyclonic Exterminator, resetting Birgitta's duration to full 20s.
Birgitta attacks independently: Overclocking Circuit (65% ATK AoE Electro), Support Cleaning Module (300% ATK).
Shield Strength Calculations
With 2,000 ATK Ineffa, shield absorbs 5,811 damage. Against Electro: 14,528 effective HP—comparable to dedicated shielders.
Elemental shields gain 250% absorption to matching element, Geo shields get 150% to all types. Birgitta's Electro specialization excels vs Electro enemies while maintaining universal viability.
Ineffa Level 90 base: 330 ATK. With Fractured Halo (608 Base ATK, 66.2% CRIT DMG) and ATK% Sands, reach 1,800-2,000 ATK. Fractured Halo passive grants +24% ATK for 20s after Skill/Burst, pushing total to 2,400+ during rotations.
Skill and Burst Synergy
16s Skill cooldown vs 20s shield duration creates 4s gap. 60 Energy Burst (15s cooldown) fills this, allowing alternating casts for permanent coverage.
Requires 130-170% ER on Ineffa. At 150% ER with proper funneling, generate sufficient particles for Burst every cycle. Burst's Birgitta reset extends protection through Neuvillette's full damage window.
Why Optimal for Neuvillette
20s duration matches Neuvillette's rotation length. After deploying supports (6-8s), Neuvillette needs 12-14s protected channeling. Birgitta covers this with buffer.
Alternative shielders like Zhongli occupy slots better used for damage amplification. Birgitta integrates through Ineffa, providing protection + Electro application + personal damage.
Ineffa's Role in Synergy Triangle
Ineffa enables protection and amplification. Electro application triggers Electro-Charged with Neuvillette's Hydro. Lunar-Charged reactions (converting Electro-Charged into thunderclouds dealing Electro damage scaling with ATK) add supplementary damage.
C1 Rectifying Processor passive: +2.5% Lunar-Charged damage per 100 ATK, capping at 50% bonus at 2,000 ATK. Perfect stat alignment with shield threshold.
Elemental Application
Birgitta applies Electro every 2-3s. With Neuvillette's continuous Hydro, creates persistent Electro-Charged dealing periodic damage.
Lunar-Charged conversion inherits Ineffa's ATK scaling. At 2,000+ ATK, reaction damage contributes 15-20% total team DPS in AoE scenarios.
Energy Generation
Ineffa generates 3-4 Electro particles per Skill. 60 Energy Burst, 15s cooldown requires moderate generation.
130-170% ER ensures Burst availability with Favonius weapons on Xilonen or proper funneling. Skill cooldown (16s) aligns with rotation, allowing one Skill + one Burst per cycle, generating 6-8 particles total.
Skill Rotation Timing
Cast Skill immediately after Xilonen's buff but before Neuvillette takes field. This 2s window ensures shield activates before channeling.
Burst timing: standard 18-20s rotations use Burst at 10s mark to reset Birgitta duration and extend coverage through final Charged Attack sequence. Also refreshes Fractured Halo's ATK buff.
Complete Team Rotation: Ineffa Neuvillette Furina Xilonen
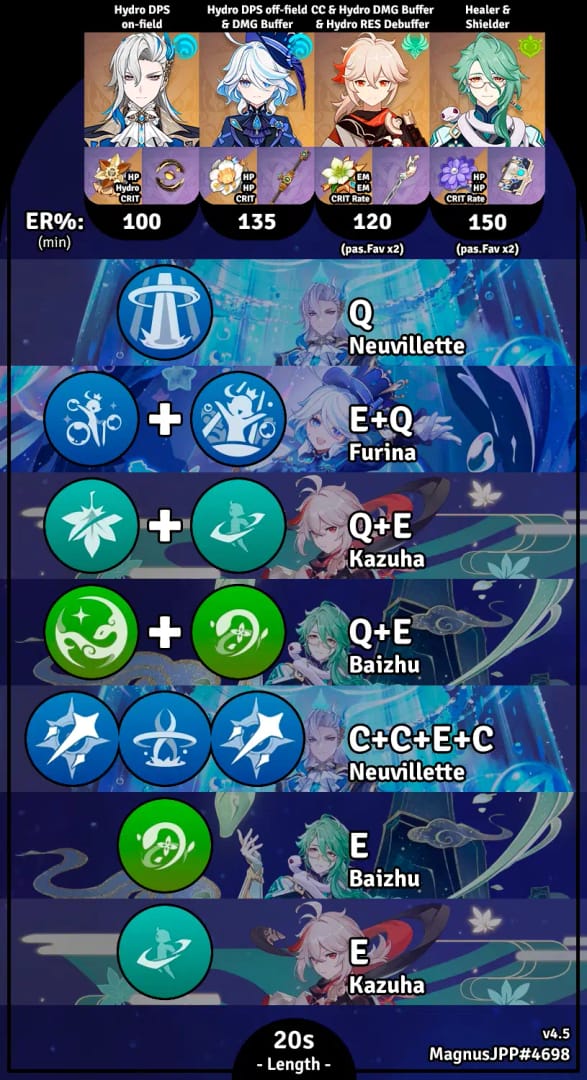
Optimal composition: Neuvillette (Main DPS, Marechaussee Hunter, Tome of Eternal Flow), Furina (Sub-DPS), Xilonen (Support), Ineffa (Support, Gilded Dreams, Fractured Halo).
Standard Rotation (18-20s):
- Furina Burst then Skill (3s): Activate Burst for teamwide damage bonus, deploy Skill for Hydro application and Fanfare stacks
- Xilonen Skill, 2 Normal Attacks, Burst (4s): Skill for resistance shred, 2 Normals for Nightsoul Burst bonus, cast Burst for buffs
- Ineffa Skill then Burst (3s): Skill summons Birgitta and shields, immediate Burst resets Birgitta to 20s and activates Fractured Halo ATK buff
- Neuvillette Skill, Burst, Charged Attacks (8-10s): Skill generates 3 Droplets, Burst adds 6 (9 total, consume 3 for max stacks), channel extended Charged Attacks until shield expires
Charged Attack Windows
With 9 Droplets and max stacks, Neuvillette channels 8-10s continuous beam. 160% damage bonus at 3 stacks delivers 30,000+ per tick with proper builds.
Monitor Birgitta's 20s timer starting from Ineffa Burst. Gives 12-14s protected channeling after swap time.
Energy Funneling
Particle generation per rotation: Furina 3-4 Hydro, Xilonen 3-4 Geo, Ineffa 3-4 Electro, Neuvillette 4-5 Hydro. Total: 13-17 particles.
Catch particles on characters needing energy. After Furina Skill, swap to Furina briefly to absorb own particles. Let Ineffa catch Skill particles before swapping to Neuvillette. Reduces ER requirements by 10-15%.
Common Mistakes
Mistake 1: Neuvillette Burst before Skill wastes 3 Droplets. Always Skill first for 3 Droplets, then Burst for 6 more.
Mistake 2: Delaying Ineffa Burst. Cast immediately after Skill to maximize Birgitta uptime and activate weapon passives.
Mistake 3: Ignoring particle funneling increases ER requirements by 15-20%.
Mistake 4: Overcapping Droplets. Max 3 active for stacks. Generating 9 total (3 Skill, 6 Burst) provides 3 for stacks + 6 for extended beam.
Building Birgitta for Maximum Shield
Shield strength depends on Ineffa's ATK. 2,000 ATK threshold balances absorption and damage.
Gilded Dreams 4pc: 80 EM base, +14% ATK after reactions with same element, +50 EM per different element (max 3). With Neuvillette/Furina/Xilonen, gain 150 EM bonus. Synergizes with Lunar-Charged while boosting ATK for shields.
Best Artifact Sets
Primary: Gilded Dreams 4pc
- 2pc: +80 EM
- 4pc: +14% ATK for 8s after reactions; +50 EM per different element (max 3 stacks)
Alternative: Noblesse Oblige 4pc
- 2pc: +20% Burst DMG
- 4pc: +20% ATK to party for 12s after Burst
Budget: 2pc Gladiator + 2pc Shimenawa
- Combined: +36% ATK
Main Stats and Substats
Main Stats:
- Sands: ATK%
- Goblet: Elemental Mastery
- Circlet: CRIT Rate or CRIT DMG
Substat Priority:
- CRIT Rate/CRIT DMG (60:120 ratio minimum)
- ATK% (until 2,000 total)
- Elemental Mastery
- Energy Recharge (130-170%)
Target: 2,000 ATK, 60% CRIT Rate, 120% CRIT DMG, 150-200 EM, 150% ER. Enables 5,800+ shield absorption, consistent Burst uptime, meaningful reaction damage.
Weapon Recommendations
Best: Fractured Halo (5★)

- Base ATK: 608, 66.2% CRIT DMG
- Passive: +24% ATK for 20s after Skill/Burst
- Shield: 6,500+ absorption
Premium: Staff of Homa (5★)
- Base ATK: 608, 66.2% CRIT DMG
- Passive: +20% HP, +0.8-1.8% ATK based on HP
- Shield: 5,900 absorption
F2P: Favonius Lance (4★)
- Base ATK: 565, 30.6% ER
- Passive: 60-100% chance to generate particle on CRIT
- Shield: 5,200 absorption, solves energy issues
Craftable: Prototype Starglitter (4★)
- Base ATK: 510, 45.9% ER
- Shield: 4,900 absorption
Shield Effectiveness Breakpoints
Abyss Floor 12 First Half (Electro enemies):
- Effective shield: 14,528 HP
- Enemy burst damage: 8,000-12,000
- Result: Survives full rotation
Floor 12 Second Half (Non-Electro):
- Standard shield: 5,811 HP
- Enemy burst damage: 6,000-10,000
- Result: Breaks mid-rotation, requires Burst refresh at 10s mark
Optimizing C0 Neuvillette
Focus on maximizing HP and CRIT stats. Marechaussee Hunter 4pc: +12% CRIT Rate per HP change (max 3 stacks, 36% total) + 15% Normal/Charged Attack damage.
Target: 50,000 HP, 2,000 ATK, 70% CRIT Rate (including Marechaussee), 140% CRIT DMG, 120% ER. Enables 35,000+ damage per tick.
Artifact Sets
Optimal: Marechaussee Hunter 4pc

- 2pc: +15% Normal/Charged Attack DMG
- 4pc: +12% CRIT Rate for 5s when HP changes (max 3 stacks)
- Synergy: Charged Attack drains 8% Max HP every 0.5s, instantly triggering max stacks for 36% CRIT Rate
Alternative: Heart of Depth 4pc
- 2pc: +15% Hydro DMG
- 4pc: +30% Normal/Charged Attack DMG for 15s after Skill
Main Stats:
- Sands: HP%
- Goblet: Hydro DMG%
- Circlet: CRIT Rate or CRIT DMG
Substat Priority:
- CRIT Rate/CRIT DMG (1:2 ratio, 70:140 with Marechaussee)
- HP% (until 50,000 total)
- Energy Recharge (120% minimum)
- ATK%
CRIT Balance
Base 88.4% CRIT DMG at Level 90. Marechaussee's 36% CRIT Rate means need only 34% from artifacts/weapon to reach 70%.
With CRIT Rate Circlet (+31.1%) and moderate substats (15-20%), achieve 65-70% before Marechaussee activation.
Optimal: 70% CRIT Rate : 140% CRIT DMG = 1:2 ratio.
Weapons
Best: Tome of Eternal Flow (5★ signature)
- Base ATK: 542, 88.2% CRIT DMG
- Passive: +16% HP, +14-28-42% Charged Attack DMG per stack (max 3, gained when HP changes)
- Provides 128% CRIT DMG total, 42% Charged Attack bonus, reaches 55,000 HP
Premium: Lost Prayer to Sacred Winds (5★)
- Base ATK: 608, 33.1% CRIT Rate
- Passive: +10% Elemental DMG per 4s on field (max 4 stacks)
- Solves CRIT Rate, allows CRIT DMG Circlet
F2P: Prototype Amber (4★ craftable)
- Base ATK: 510, 41.3% HP%
- Passive: Regenerates 4-6 Energy and heals 4-6% Max HP per second for 6s after Burst
- Boosts HP to 48,000, provides energy/healing, zero CRIT stats
Budget: Oathsworn Eye (4★ event)
- Base ATK: 565, 27.6% ATK%
- Passive: +24-48% ER for 10s after Skill
- Solves energy completely
Talent Priority
- Normal Attack (Level 9-10): Scales Charged Attack damage directly
- Burst (Level 8-9): Generates 6 Droplets, significant burst damage
- Skill (Level 6-8): Generates 3 Droplets, lower scaling
Crown Normal Attack only. Level 9→10 increases damage by 8-10%, translating to 2,500-3,000 per tick.
Ineffa Build Requirements
Dual role requires balanced ATK, CRIT, EM, ER. 2,000 ATK non-negotiable for shields, CRIT enables personal damage.
Gilded Dreams 4pc provides ATK (14% after reactions) and EM (150 from different elements), superior to pure ATK sets.
EM vs ATK Builds
Hybrid (Recommended):
- 2,000 ATK (shields: 5,800 damage)
- 150-200 EM (Lunar-Charged: 8,000-10,000 per proc)
- 60% CRIT Rate / 120% CRIT DMG (personal: 12,000-15,000 per rotation)
ATK-Focused:
- 2,400 ATK (shields: 6,500 damage)
- 50-100 EM (Lunar-Charged: 5,000-7,000)
- 55% CRIT Rate / 110% CRIT DMG (personal: 10,000-12,000)
EM-Focused:
- 1,800 ATK (shields: 5,200 damage)
- 300-400 EM (Lunar-Charged: 12,000-15,000)
- 50% CRIT Rate / 100% CRIT DMG (personal: 8,000-10,000)
Hybrid provides optimal team contribution. 600 damage shield difference rarely determines survival, while 3,000-5,000 additional reaction damage significantly impacts clear times.
Energy Recharge Thresholds
60 Energy, 15s cooldown requires 130-170% ER.
130% ER: Perfect funneling, catching all self-generated particles, needs 2-3 from teammates, achievable with Favonius weapons
150% ER: Comfortable, allows occasional missed particles, recommended for most
170% ER: Guarantees Burst regardless of funneling, overkill with Favonius teammates
Test in practice: three consecutive rotations. If Burst available 2-3s before cooldown, excess ER. If waiting 2-3s after cooldown, need 10-20% more.
Artifact and Weapon Synergies
Fractured Halo's 24% ATK buff activates 20s after Skill/Burst, matching rotation length. Casting Skill at rotation start (second 3) and Burst mid-rotation (second 10) maintains permanent uptime.
Pushes 2,000 ATK to 2,480 during rotations, increasing shield from 5,800 to 6,880—1,080 HP improvement.
Gilded Dreams 4pc activates when triggering reactions. Birgitta's Electro triggers Electro-Charged with Neuvillette's Hydro, activating 14% ATK bonus within 1-2s. Stacks multiplicatively with Fractured Halo.
Advanced Strategies
Abyss Floor Adjustments
Floor 12 First Half (Electro enemies):
- Birgitta's 250% Electro absorption: 14,528 effective HP
- Extend Neuvillette field time to 12-14s
- Prioritize Furina Hydro for Electro-Charged
Floor 12 Second Half (Mixed elements):
- Standard shield (5,811) breaks faster
- Use Ineffa Burst at 8s instead of 10s
- Reduce Neuvillette field time to 10s
Floor 11 (Energy drain):
- Increase ER by 10-20%
- Prioritize Favonius weapons
- Execute shorter rotations (15s)
Shield-Breaking Enemies
Rifthound attacks (Corrosion):
- Bypasses shields, damages HP directly
- Maintain Furina healing
- Reduce Charged Attack duration
Abyss Lector shields:
- Break elemental shields before DPS rotation
- Use Birgitta Electro to break Hydro Lector shields
- Save Neuvillette Burst for shield-break windows
Consecrated Beasts (absorption):
- Time Charged Attacks between absorption windows
- Use Birgitta autonomous attacks to bait absorption
Single Target vs AoE
Single Target:
- Extend Neuvillette field time to 14-16s
- Burst refresh at 10s mark
- Prioritize CRIT DMG over CRIT Rate
AoE:
- Reduce Neuvillette field time to 8-10s
- Cycle supports frequently
- Position to hit 3+ enemies
Mixed (Boss + adds):
- Focus Charged Attacks on boss
- Birgitta clears adds
- Use Furina/Xilonen to group enemies
Fourth Slot Flexibility
Kazuha (Anemo):
- 40% Elemental DMG bonus via Swirl
- Groups enemies
- Requires Viridescent Venerer 4pc
- Trade-off: Loses Furina teamwide bonus
Zhongli (Geo):
- Stronger shield (20,000+)
- 20% universal resistance shred
- Trade-off: Redundant shielding, lower damage ceiling
Bennett (Pyro):
- 1,000+ ATK buff
- Healing
- Enables Vaporize
- Trade-off: Requires staying in circle
Furina + Xilonen core provides optimal damage, making alternatives situational.
Alternative Solutions
Other Shielders vs Birgitta
Zhongli:
- Shield: 20,000+ (stronger)
- Duration: 20s, Cooldown: 12s
- Trade-off: Occupies slot without reactions/amplification
Layla:
- Shield: 12,000-15,000
- Duration: 12s, Cooldown: 12s
- Trade-off: Cryo interferes with Hydro reactions
Diona:
- Shield: 10,000-12,000
- Duration: 12s, Cooldown: 15s
- Trade-off: Weaker shields, Cryo issues
Thoma:
- Shield: 8,000-15,000 stacking
- Duration: 15s, Cooldown: 20s
- Trade-off: Pyro causes Vaporize, steals reactions
Birgitta's integration through Ineffa (damage + reactions) makes her more team-efficient.
F2P Teams
Budget: Neuvillette + Barbara + Xingqiu + Noelle
- Noelle shields (50% uptime)
- Barbara/Xingqiu: Hydro Resonance, healing
- Cost: 0 Primogems
- Performance: 60-70% optimal DPS
Mid: Neuvillette + Furina + Sucrose + Layla
- Layla shields with Cryo
- Sucrose: EM sharing, grouping
- Performance: 75-85% optimal DPS
C0 5★: Neuvillette + Kazuha + Kokomi + Fischl
- Kokomi: healing, Hydro Resonance
- Kazuha: grouping, amplification
- Fischl: Electro reactions
- Performance: 80-90% optimal DPS
When to Replace Ineffa
Need healing over shields:
- Corrosion floors (Floor 11 Rifthounds)
- Swap for Kokomi/Barbara
Lack Electro reactions:
- Pure Hydro teams
- Swap for second Hydro (Xingqiu, Yelan)
- Lose shield, gain 25% HP and healing
Need crowd control:
- Many small enemies
- Swap for Kazuha/Venti
Constellation Priority
Highest: Neuvillette C1
- Grants interruption resistance
- Free Past Draconic Glories stack
- Impact: 30-40% DPS increase
High: Furina C1-C2
- C1: Increases Fanfare generation
- C2: Improves Hydro application/healing
- Impact: 15-20% team DPS
Medium: Ineffa C1
- +50% Lunar-Charged damage
- Impact: 10-15% personal (3-5% team DPS)
Low: Xilonen C0→C1
- Extends buff duration
- Impact: 5-8% team DPS
If acquiring Neuvillette C1, Birgitta becomes redundant, allowing Ineffa replacement with pure damage supports.
Troubleshooting
Shield Breaking Too Quickly
Problem: Shield breaks in 5-6s
Diagnosis:
- Check Ineffa ATK (should be 2,000+)
- Verify Birgitta active
- Confirm not facing Electro-immune enemies
Fixes:
- Increase Ineffa ATK via artifacts
- Upgrade Fractured Halo to Level 90
- Use Burst mid-rotation (10s mark)
- Verify Gilded Dreams activating
Problem: Specific enemy attacks break shield
Fixes:
- Dodge telegraphed attacks
- Burst refresh after major hit
- Position behind enemies
- Consider Zhongli for specific encounters
Energy Issues
Problem: Ineffa Burst unavailable
Fixes:
- Increase ER to 150%
- Swap to Ineffa after Skill to catch particles
- Equip Favonius Lance on Xilonen
- Extend rotation 2-3s
Problem: Neuvillette Burst unavailable
Fixes:
- Increase ER to 130%
- Always Skill before Burst
- Delay swap 0.5s after Skill
- Use Prototype Amber for 4-6 Energy after Burst
Low Damage Output
Expected: 35,000-40,000 per tickActual: 20,000-25,000
Checklist:
- Neuvillette HP above 50,000
- CRIT Rate 65-70% (Marechaussee active)
- CRIT DMG 140%+
- Hydro DMG Goblet equipped
- Talent levels 9/8/6 minimum
- Past Draconic Glories at 3 stacks
- Furina/Xilonen buffs active
- Tome stacks at maximum
If all checked:
- Verify enemy resistance
- Check floor debuffs
- Confirm beam hitting hitboxes
Rotation Timing Errors
Problem: Buffs expire before Neuvillette finishes
Fixes:
- Reduce animation time: dash-cancel Furina Skill
- Practice until support phase completes in 6-7s
- Limit Charged Attacks to 10s max
- Use rotation timer
Problem: Shield expires mid-Charged Attack
Fixes:
- Cast Ineffa Burst at exactly 10s
- Reduce Neuvillette field time to 12s max
- Monitor Birgitta duration, swap when 3s remain
- Practice until muscle memory develops
FAQ
How does Birgitta solve interruption problems?
Birgitta's shield provides complete interruption immunity, allowing uninterrupted Charged Attacks. Absorbs 5,811 damage (14,528 vs Electro) with 20s duration, covering Neuvillette's 10-12s damage window. Binary protection—fully protected or unshielded, no partial resistance.
Best team rotation?
Furina Burst+Skill (3s) → Xilonen Skill, 2 Normals, Burst (4s) → Ineffa Skill+Burst (3s) → Neuvillette Skill, Burst, Charged Attacks (8-10s). Total: 18s. Ensures buffs activate before Neuvillette while maintaining shield uptime.
Does C0 Neuvillette need shielder?
Yes. C0 completely lacks interruption resistance, experiencing 40-60% DPS loss in multi-enemy scenarios. C1 grants resistance, eliminating need, but C0 requires Birgitta, Zhongli, or similar for consistent output.
How much shield strength?
221.2% Ineffa ATK + 1,387 flat. At 2,000 ATK: 5,811 standard or 14,528 vs Electro (250% bonus). Fractured Halo's 24% ATK increases to 6,880 during rotations. Exceeds most 4★ shielders, matches Zhongli vs Electro.
What artifacts for Birgitta?
Inherits Ineffa's stats. Gilded Dreams 4pc: ATK% Sands, EM Goblet, CRIT Circlet. Target: 2,000 ATK, 150-200 EM, 60% CRIT Rate, 120% CRIT DMG, 150% ER. Balances shield (5,800+), reactions (8,000-10,000), personal damage (12,000-15,000).
Is Ineffa necessary?
Provides optimal interruption protection + Electro application + damage without excessive field time. Alternatives like Zhongli offer stronger shields but lower team DPS. For C0 Neuvillette, Ineffa is most team-efficient. C1 Neuvillette eliminates interruption issues, making Ineffa optional.
👉 cheap Primogems 👈
✅ Official direct recharge, 100% secure
✅ No waiting – top-up arrives in 7 seconds
✅ Big discounts, low prices to save more
✅ 7×24-hour customer service, ready to assist anytime