

Recommended Discounts

Arena Breakout Bonds
Arena Breakout Player ID is numerical!Tap in Personal Information center, your player ID can be found under the avatar.
10% OFF
Related articles


Arena Breakout S5 Distortion: Cheap Bonds & Detector Guide
S5: Distortion launched April 2, 2026 (02:00 UTC) with a full wipe, new anomaly modes, and weapon rebalancing. Bonds (~100 Bonds per USD) buy Elite Anomalies Detectors for high-yield farming. With up to 25% off PC bundles, smart recharge funds Chaotic Matter routes worth 300k–1.5M Koen per run while minimizing real-money spend.
Buffget
Chasing efficient anomaly-zone farming in S5 Distortion? Mastering your Arena Breakout S5 Distortion cheap Bonds recharge is the foundation of a profitable wipe. The Distortion update reset all gear, weapons, loot, and stash progression on April 2, 2026 — everyone started equal, and those who optimized Bonds spending early gained a real head start. This guide breaks down the Bonds economy, detector mechanics, and recharge value tiers.
What Are Bonds in S5 Distortion?
Bonds are Arena Breakout's premium currency. Unlike Koen (the in-raid soft currency from looting and trading), Bonds are purchase-only — you can't farm them. Baseline: 100 Bonds ≈ 1 USD, making value comparison across bundles easy.
Bonds vs. Koen
Koen funds raid loadouts, weapon mods, and market buys — and it resets each wipe. Bonds persist across wipes alongside cosmetics, skins, and unlocks. That's critical: S5 wiped all gear and economic progression, but your Bonds balance carried over untouched. Bonds are a stable long-term investment; Koen evaporates every season.
What S5 Changed
The wipe didn't alter Bonds pricing but spiked demand. With everyone rebuilding from zero, Bonds-funded buys became the fastest path to premium gear and detectors. Recharge early and you secure detector access before Koen-driven market prices stabilize.
Why Bonds Matter for Detectors
Anomalies Detectors unlock max value from S5's anomaly zones, and consistent usage needs a reliable Bonds supply. For affordable top-ups, the arena breakout s5 bond top up service on buffget offers PC discounts up to 25%, delivering Bonds within minutes through secure transactions.
Elite Anomalies Detectors: The S5 Meta
Distortion introduced the reworked Distorted Valley — a night/dusk map packed with environmental anomalies and dynamic extraction points. Detecting and safely harvesting these is where detectors earn their keep.
Detection Mechanics
In Distorted Valley, pick one of four pre-raid abilities:

- Blindsight — blinding dark matter impairs enemy vision; cooldown resets on elimination.
- Transcend — temporary invincibility and movement speed, but you can't attack or be attacked.
- Reconstruct — deploys a wall blocking bullets and throwables while letting players pass through.
- Sprawling — places an Erosion Trap to disorient enemies or links with a teammate for mutual regen.
Anomaly KM-001-6 is a standout hazard: puppets that move only when unobserved, freeze on eye contact, and emit distinct metallic sounds. Pro tip: recognize that audio cue and keep one in your sightline to keep it frozen.
Elite vs. Standard
The difference is yield consistency and survivability in high-density zones. Standard handles basic interactions; Elite-tier is built for Central Anomaly Core and Northern Warehouse runs where loot density — and risk — peaks. Pair the detector with the right ability and a risky run becomes a controlled extraction.
Durability Metrics
Your cost-per-run depends on how many orb, shrine, and container interactions you survive. Chaotic Matter (a gold trophy) drops at 0–2 per raid across 100–500 interactions, so durability directly affects your odds of pulling that trophy before extraction.
How to Recharge Cheap (Step-by-Step)
Locate Your Player ID
- Launch Arena Breakout on PC and log in.
- Click your profile avatar.
- Open the Account Center.
- Copy your ID field — this links your top-up to your account.
Recharge Safely via buffget
- Select your Bond amount.
- Enter your User ID and email.
- Choose your payment method.
- Complete payment — Bonds arrive within minutes.
For dependable detector funding, players turn to buy bonds anomalies detector infinite on buffget, combining competitive pricing, fast delivery, secure transactions, and strong ratings.
Verify Your Top-Up
Relaunch the game and check your Bonds balance in the Account Center. Delivery is near-instant, but confirm the balance before queuing your next raid.
Recharge Tier Comparison: Best Value
Current PC pricing — note the 25% discount baseline and how bonus Bonds scale:
- 100 Bonds — $0.82 (25% off, no bonus)
- 500 + 10 bonus — $4.33
- 1000 + 40 bonus — $8.66
- 2500 + 125 bonus — $21.66
- 5000 + 300 bonus — $43.31
- 10000 + 800 bonus — $86.62
Small vs. Large
The smallest tier gives a flat 100 Bonds, no bonus. The 10000 bundle adds 800 free Bonds — an 8% bonus on top of the base discount. For sustained farming, larger tiers stretch every dollar further.
First-Time Bonus
When a first-time bonus is active, front-load a mid-to-large bundle to capture that one-time multiplier instead of splitting it across small top-ups. The bonus applies once, so a single larger recharge maximizes it.
Recurring Planning
Match your bundle to projected detector usage. A mid-tier 2500 + 125 (~$21.66) covers multiple high-yield runs without over-committing capital you might not spend before the next wipe.
Is It Worth It?
ROI: Cost vs. Returns
Chaotic Matter routes yield per run:
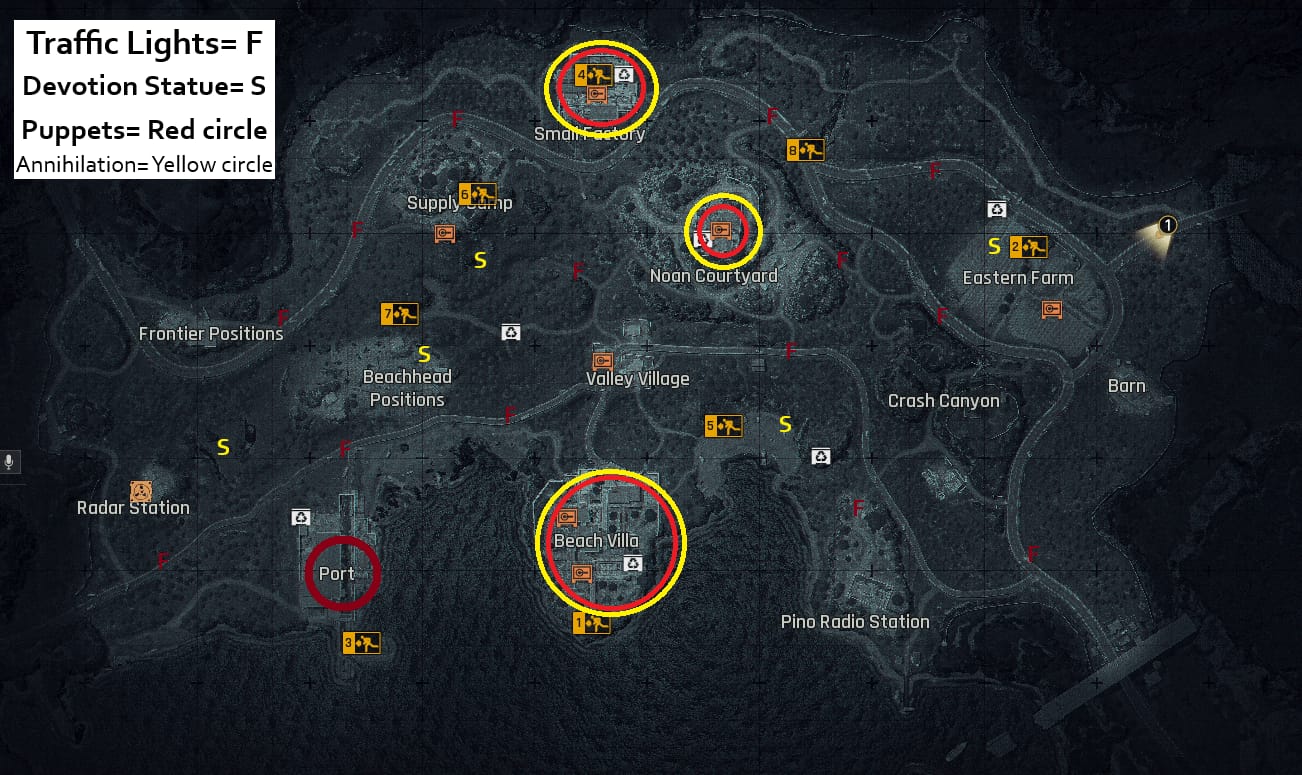
- Western Outskirts: 300,000–600,000 Koen
- Eastern Compound: 500,000–900,000 Koen
- Northern Warehouse: 800,000–1,500,000 Koen
- Central Anomaly Core: 800,000–1,500,000 Koen
A single successful Northern Warehouse or Central Core run nets 800k–1.5M Koen, dwarfing detector funding costs.
Break-Even
Bonds carry over while Koen resets, so break-even comes fast when you consistently extract from higher-tier zones. Watch your extraction success rate — a failed extraction forfeits the entire run's loot, so survivability gear matters as much as the detector.
Misconceptions
A frequent error: assuming the cheapest 100-Bond tier is always smartest. It carries no bonus, so for repeat farmers it's the least efficient per-Bond. And no — Bonds can't be earned in-game. They're purchase-only, so planned recharge is the only path.
Best Maps and Zones
High-Yield Hotspots
Central Anomaly Core and Northern Warehouse top the charts at 800k–1.5M Koen per run. Eastern Compound (500k–900k) is a strong risk-adjusted middle ground while building durable loadouts.
Risk vs. Reward
Boss Rally events trigger randomly in Farm and the Northridge Forbidden Zone, spawning multiple bosses with enhanced guards. Higher danger, higher reward — only commit detectors here when your loadout and ability (Reconstruct for cover, Transcend for escapes) support survival.
Loadout Optimization
Plan slots around extraction priority. The new Downed Emergency Smoke Grenade creates a 30-second smoke screen when downed

— critical since self-revive and first aid kits were removed in S5. Reserve a slot for it on high-value runs to buy extraction time.
Budget Strategies: F2P and Spenders
F2P
Treat every Bond as wipe-persistent capital. Prioritize detector funding over cosmetics, deploy in mid-tier zones like Eastern Compound first, and reinvest Koen profits into gear rather than burning Bonds on non-essentials.
Spenders
Capture first-time bonuses with a single larger recharge, then top up incrementally at mid-tiers as detector inventory depletes. The 5000 + 300 bundle (~$43.31) suits multiple daily Central Core sessions.
Avoid Overspending
Don't recharge more than you can deploy before the next wipe. Bonds persist, but idle currency earns nothing — match recharge volume to realistic raid frequency.
Pro Tips From Real Raids
Pre-Raid Checklist
- Pick your ability by zone: Reconstruct for static defense, Sprawling for team regen.
- Pack a Downed Emergency Smoke Grenade for high-value runs.
- Confirm your Bonds-funded detector inventory before queuing.
In-Raid Timing
Against KM-001-6 puppets, hold line-of-sight to keep them frozen and listen for the metallic cue. Trigger Blindsight on contact — its cooldown resets on elimination, so chaining kills keeps it nearly always available.
Extraction Priority
Always prioritize Chaotic Matter (the gold trophy) over bulk loot. With a 0–2 drop rate per raid, securing even one before extraction defines a profitable run. The Trophy Room Collection Room now holds up to 800 Red Drops for high-value trophy storage.
Troubleshooting
Failed or Pending Recharge
If a recharge stays pending, first verify you entered the correct User ID from your Account Center. Most delays resolve within minutes given the fast-delivery process.
Verify Balance
Relaunch and check the Account Center balance. Cross-reference the credited amount against your bundle, including bonus Bonds.
When to Contact Support
If your balance hasn't updated after a reasonable window, buffget's customer service resolves order status and confirms delivery — a key advantage of a platform with strong support and high ratings.
Ready for S5 Distortion? Recharge Bonds cheaply and securely on buffget to unlock Elite Anomalies Detectors and dominate every anomaly zone — top up now and hit your next raid loaded.
FAQ
What are Bonds used for in S5 Distortion? Premium currency for detectors, premium gear, cosmetics, and account unlocks. Unlike Koen, they persist across wipes and are purchase-only.
Which recharge bundle gives the best value? Larger bundles add more bonus — the 10000 + 800 tier ($86.62) gives an 8% bonus on top of the 25% discount. For moderate use, the 2500 + 125 (~$21.66) balances value and commitment.
Is recharging for Elite Detectors worth it? Yes, for active farmers. Northern Warehouse and Central Anomaly Core runs yield 800k–1.5M Koen each, so funding pays back fast when extraction is consistent.
Which maps are best for detectors? Central Anomaly Core and Northern Warehouse (800k–1.5M Koen). Eastern Compound (500k–900k) is the best risk-adjusted choice while building loadouts.
Why did my recharge fail or stay pending? Usually an incorrect User ID. Verify your ID from the Account Center, confirm payment, and relaunch — delivery is typically within minutes.
What changed about Bonds and detectors in S5? The April 2, 2026 wipe reset all gear, loot, and economic progression while Bonds and unlocks persisted. Self-revive and first aid kits were removed, replaced by the Downed Emergency Smoke Grenade.